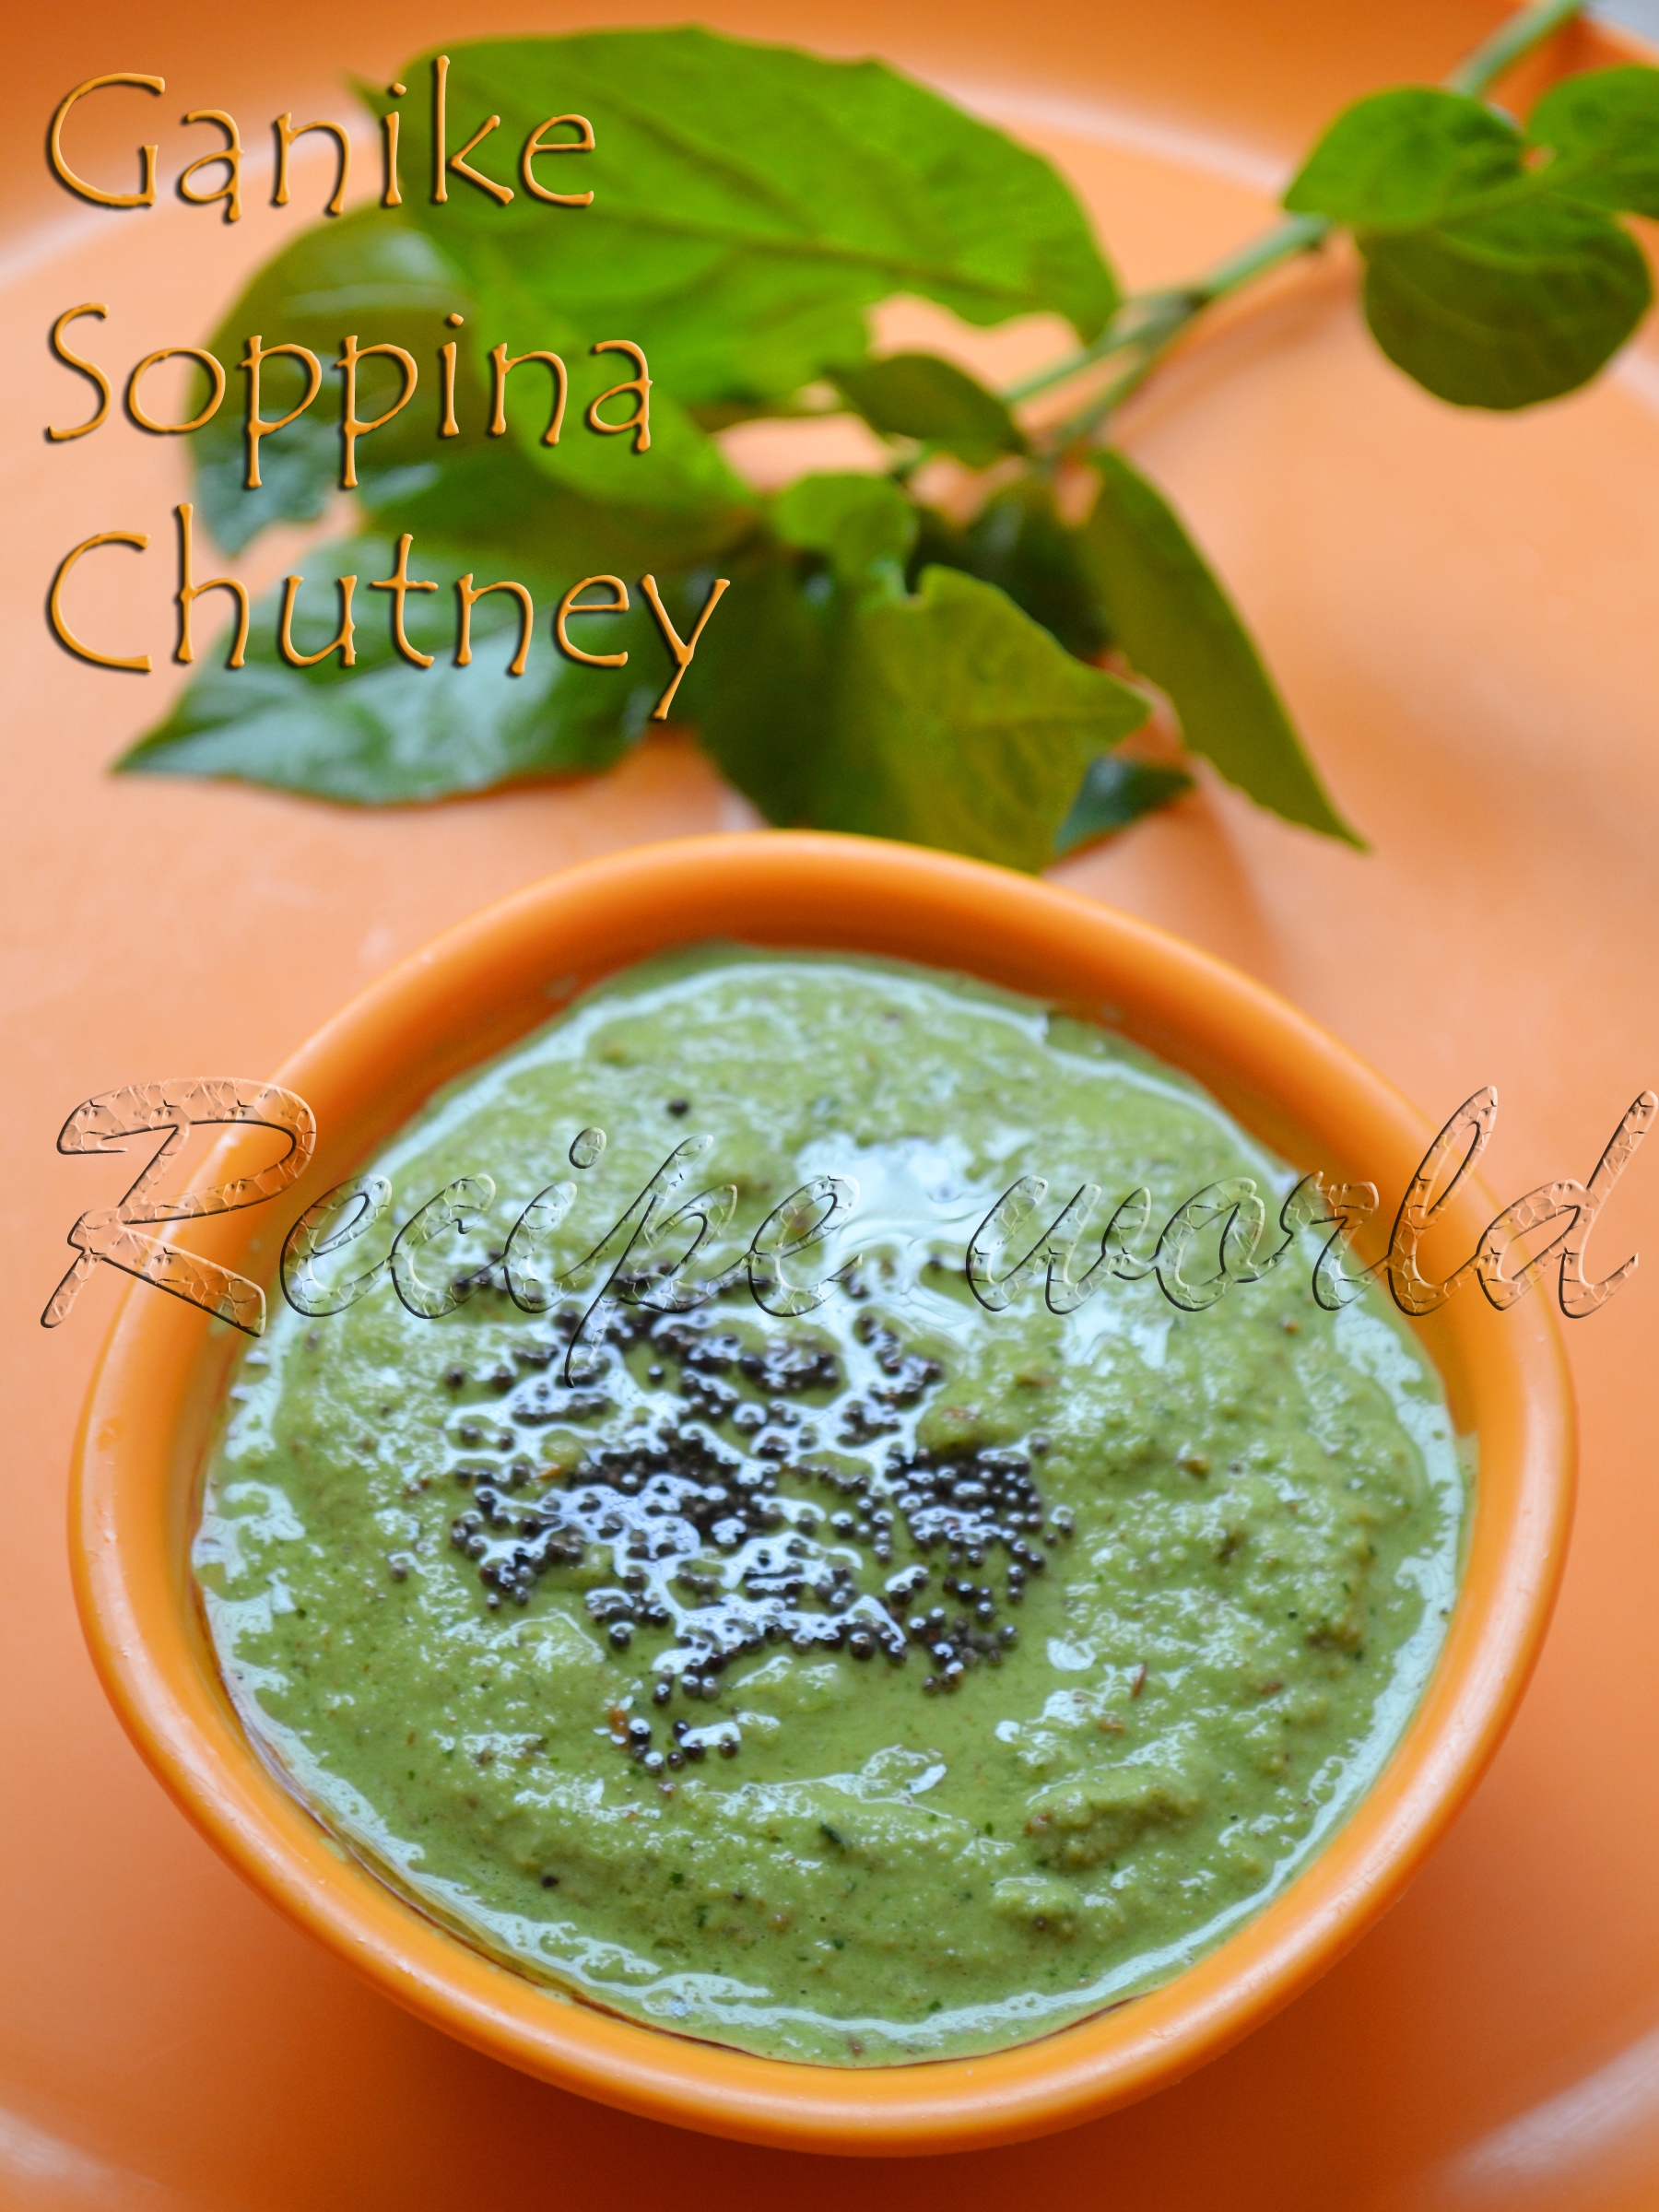
Ganike Soppu, also known as Kage Soppu in Kannada, is a medicinal plant which is not familiar to many people. Scientific name for this plant is Solanum Nigrum (Black Nightshade). Leaves of this plant are used as a good remedy for cold, cough, mouth ulcer and stomach related problems. Kids love to eat the small, black colored fruits of this plant. 
I use Ganike soppu as medicine for my daughter whenever she gets cold. I will crush the leaves with little water, collect about 2 table spoons of extract, then mix it with sugar / jaggery and make her drink. This works really well for her. I have few Ganike Soppu plants in my backyard just for kiddo. She loves to pick and eat those small berries from these plants daily!
Few days back, I was talking to Mom something about my plants. She told me that delicious Chutney can be prepared using Ganike leaves. I just tried her recipe and it tasted really well. Its so easy to prepare and also good for health.
Sharing the Ganike Soppina Chutney with you now..hope you like it!


Time required: 10 minutes
Servings: 6 - 7 
Difficulty level: Easy

Ingredients:
  • Ganike / Kage leaves - handful (I have used 30 - 32 leaves here)
  • Grated coconut - 1 1/4 cup
  • For seasoning:
          Oil - 3 tsp (divided)
          Green chillies - 2 (adjust according to taste)
          Cumin seeds - 1 1/4 tsp
          Sesame seeds - 1 1/4 tsp
          Mustard seeds - 1 tsp
  • Tamarind - gooseberry size (around 1 1/2 tbsp)
  • Salt to taste
  • Water for grinding

Method:
  • Heat 1 1/2 tsp of oil in a heavy bottom pan. Add cumin seeds and sesame seeds and roast them till nice aroma comes. 
  • Then add the cleaned Ganike leaves. Saute them for 1 - 2 minutes till it changes the color and switch off the flame.
  • Grind together the roasted ingredients along with grated coconut, tamarind and salt to taste into fine paste. Add water as required.
  • Heat oil in a heavy pan. Add mustard seeds and when they start crackling, switch off the flame. Add this seasoning to the ground paste.
  • Delicious Chutney is ready now. Serve it as a side dish with rice.


Tips:
  • Instead of 2 green chillies, 2 red chillies and 1 green chilli can be used here.
  • If you don't want to preserve it in the refrigerator, heat the Chutney nicely and it will be good for few more hours.

Carrot Halwa also called as Gajar Ka Halwa, is a delicious sweet prepared on festivals and such special occasions in India. Being prepared using healthy and rich ingredients like carrot, milk, sugar, Khoya, Ghee, dried fruits and nuts, it tastes delicious! 
Carrot Halwa is one of our family favorite sweets. My daughter is not crazy about eating the sweets..but she loves to have this Halwa anytime! Since its made of all healthy ingredients, its good for kiddos health as well. Adding of khova is not a must for this Halwa, but it increases the taste. I had tried adding some quantity of paneer when I had a small quantity of Khoya with me. It was truly delicious and nobody could  make it out that I had replaced some quantity of Khova with Paneer!
There are different versions of preparing Carrot Halwa and here is the one which I usually follow. Hope you like this recipe :)


Preparation Time: 1 1/2 hour
Servings: 10 - 12
Difficulty level: Difficult

Ingredients:
  • Carrot - 1 kg
  • Sugar - 800gm (adjust according to taste)
  • Salt - a big pinch
  • Milk - 1/2 litre
  • Ghee / clarified butter - 6 tbsp
  • Khova / Khoya - yield from 1 litre milk (or around 200 gm)
  • Cardamom powder - 1 1/2 tsp
  • Raisins, Almonds and Pista - handful


Method:
  • Wash the carrots cleanly and grate them using a vegetable grater. 
  • Heat ghee in a heavy bottom pan. Add the grated carrots and saute them for 5 minutes or till the raw smell is gone. 
  • Add half litre of milk to the carrot mixture and cook it partially covered. Stir it regularly.
  • When the carrot mixture is cooked and the milk is almost evaporated, add sugar and pinch of salt.
  • You can notice the mixture becoming watery after adding the sugar. Continue cooking on medium flame, it will thicken after some time.
  • When the mixture becomes thick, add the Khova and mix it nicely. Cook it for 10 - 12 minutes and turn off the flame.
  • Finally add the cardamom powder and mix well. 
  • Garnish with ghee roasted raisins, and pieces of almonds and pista.
  • Serve it warm or cold.

Khoa or Khoya, also called as Mawa, is a product of milk which is widely used in Indian cuisine. This is prepared by boiling the milk till it gets thick. For preparing Indian sweets like Halwa, Barfi, Pedha, Gulab Jamoon, etc., Khoa is used to make them rich in taste.
In India, Khoya is easily available in most of the supermarkets and grocery stores. When I was in Bangalore, I always used the store bought Khoa for my sweets. I had tried preparing Khoa at home sometime back and it was really good. These days, I am making Khoya at home whenever needed. Preparing Khoa at home is not at all difficult. The only thing is it takes lot of time to prepare.
Here is the recipe to prepare your Khoa at home..


Time required: 1 hour
Difficulty level: Medium

Ingredients:
Full cream milk - 1 litre

Method:
Transfer the milk into a wide pan with thick bottom and bring to boil. I prefer using non-stick pan to avoid milk sticking to the bottom.
Keep stirring the milk with a spatula occasionally. 
Slowly, the water content in the milk gets evaporated and milk starts thickening. 
Keep stirring the mixture, and when it starts leaving the bottom of the pan and comes to ball stage, its time to turn off the flame.
Once it cools down completely, knead the Khoa nicely. Transfer to an airtight container and store it in the refrigerator. Use when required.
Khoa gives a richer taste to Indian sweets like Barfi, Halwa, Gulab Jamoon, Pedha, etc.


When its summer, something cold would be perfect to have when we feel thirsty. I prepare varieties of milkshakes, juices, smoothies, Lassi, etc. healthy n refreshing drinks at home using fresh ingredients. Since its the mango season now, we all love to have mango milkshake and juice whenever mangoes are there at home. Mango Milkshake is my daughter's all time favorite. She will be happy to have this drink anytime! 
Try this easy and delicious milkshake and let me know how you liked it!


Time required: 10 minutes
Cooling time: 1 hour
Servings: 3
Difficulty level: Easy

Ingredients:
  • Ripened mango (medium size) - 2 nos
  • Sugar - 5 tbsp (adjust according to taste)
  • Full cream milk - 300 ml (see Tips)
  • Water - 100 ml
  • Salt - a big pinch

Method:
  • Peel and chop the mangoes roughly into medium size cubes.
  • Blend the mango pieces along with sugar and pinch of salt into fine paste. Add little milk if required.
  • Once it becomes a fine paste, add the remaining milk and water and adjust the consistency. 
  • Blend it for one more minute so that everything is combined well.
  • Check and adjust the taste. 
  • Serve it chilled.


Tips:
  • You can reduce the quantity of milk by adding more water.
  • If the milkshake need to be served immediately, use the chilled milk for preparing it!

Fenugreek / Methi seeds, even though used in very small quantities, are very much necessary for our day-to-day cooking. Without fenugreek seeds, preparing Dosa, Sambar Powder, Methi Powder, etc. will not be perfect. These seeds are having some health benefits as well. For all sorts of hair problems, fenugreek seeds works as a good remedy. Not only the seeds, fresh fenugreek leaves are also good for cooking. Roti, Paratha, Stir Fry and various rice items can be prepared using Fenugreek / Methi leaves.
Sometimes, I need fresh methi leaves for my cooking, but we get them very rarely in the convenience stores here. So, since the summer has started, I am growing the fenugreek leaves in our backyard and using the same for cooking. Every week, I will sow the seeds in 1 - 2 rows and within the next 3 weeks, it will be available for cooking. 
Both fenugreek leaves and dill leaves can be interchanged for some variety of dishes. I had posted the Dill Leaves Stir Fry recipe long back. The same way, you can prepare the Fenugreek Leaves Stir Fry. Since fenugreek leaves are slightly bitter in taste, it tastes better if we add little more sugar to this stir fry. 


Preparation time: 20 minutes
Servings: 2 - 3
Difficulty level: Easy

Ingredients:
  • Fenugreek leaves - 3 big bunch
  • Urid dal - 1 tsp
  • Mustard seeds - 1 tsp
  • Asafoetida - a pinch
  • Sambar powder - 2 tsp or according to taste (see Tips)
  • Sugar - 1 tsp or to taste (see Tips)
  • Amchur powder - 1/2 tsp
  • Salt to taste
  • Grated coconut - fistful
  • Oil - 4 tsp


Method:
  • Wash and clean the fenugreek leaves. Chop them finely including the tender stems. 
  • Heat oil in a heavy bottom pan. Add urid dal, asafoetida and mustard seeds. Once the mustard seeds start crackling, add the sambar powder followed by chopped fenugreek leaves.
  • Add salt, sugar and amchur powder according to your taste. Cook the mixture half covered.
  • Saute the mixture regularly. Cook it for around 7 - 8 minutes or till its dried out fully and looks too dark. 
  • Add grated coconut and cook for 2 - 3 minutes more and switch off the flame. 
  • Serve this delicious stir fry along with Roti, Chapathi or rice.


Tips:
  • Any type of sambar powder, saarina pudi or palyada pudi can be used for this recipe. 
  • Since the fenugreek leaves are bitter in taste, I have made this stir fry slightly sweet in taste. Those who won't like sweet taste, can add less sugar for this recipe.

If there are any special occasions like birthday or anniversary of near and dear ones, it calls for a celebration. Baking a cake at home is not a big deal, but decorating the cake needs some thinking and more efforts. Depending on the type of cake, we need to decide which type of frosting will be suitable.
I tried chocolate frosting for my chocolate cake few days back. Chocolate cake with layers and yummy frosting..it was divine! You can remember my earlier recipe of Egg-less Chocolate Cake which I shared sometime back. I just prepared 2 chocolate cakes in that way, layered and decorated them and finally, here is the outcome!


Time required: 45 - 50 minuted
Cooling time: 2 - 3 hours
Servings: 10 - 12
Difficulty level: Difficult

Ingredients:
- Egg-less chocolate cakes - 2 nos (prepare and keep them ready)
- For Frosting:
  • Unsalted butter (at room temp) - 1 cup
  • Icing sugar - 3 cups (adjust according to taste)
  • Vanilla essence - 1 tsp
  • Dark chocolate - 200 gm
  • Milk - 1/2 cup
  • Big pinch of salt
  • Chocolate shaves - as needed (see Tips)
  • Chocolate coated peanuts (or any other chocolate bytes) - few


Method:
- How to prepare frosting:
  • Melt the dark chocolate and allow to cool.
  • Beat butter using a beater or hand mixer till creamy. 
  • To this, add melted chocolate, salt and 1 cup of icing sugar. Beat them for a minute.
  • Add 2 - 3 tbsp of milk and one more cup of sugar. Beat the mixture again. 
  • Continue adding milk followed by sugar till you are done. 
  • Adjust the consistency and taste.
  • Beat the mixture for 2 - 3 minutes or till its light and creamy. 

- How to assemble the cake:
  • Slice each cake carefully into two layers. You will have 4 separate layers in total now.
  • Keep the first layer on the cake base or on a plate. Cover it with one layer of chocolate frosting.
  • Put the second layer of cake upon that and cover with frosting.
  • Fix all the four layers in the same way and cover the top and sides with frosting.
  • Decorate the sides with chocolate shaves. Arrange the choco-coated peanuts / your favorite chocolates on the top. Sprinkle some chocolate shaves as you like.
  • Refrigerate the cake for 2 - 3 hours before cutting. 


Tips:
  • Dark chocolate which I used for frosting was sweet and hence, 3 cups of icing sugar was enough. If using unsweetened chocolate, add more sugar accordingly.
  • You can prepare the chocolate shaves easily at home. Refrigerate the chocolate block and once it becomes really hard, peel them using a peeler. Your chocolate shaves are ready to use!

There are some well known areas for shopping in Bangalore and one of them I like most is Gandhi Bazar. Evening time will be really good to roam around there, and our shopping will be complete only after having some food, preferably chat food. You can see so many chat shops serving various chat food to the never ending crowd. I had been to Gandhi Bazar with my sister quite a few months back. She knows that area very well and we did plenty of shopping. We were really tired and feeling hungry. She took me to a chat shop in Gavipuram Area. Mango - Sweet Chat from that shop was her all time favorite. So, we ordered the same enjoyed eating. It was so good and so yummy! 
Unripened Totapuri mangoes are perfect for this chat recipe. Grilled sweet corn and finely chopped mangoes are really a wonderful combination. This chat food has become one of our favorite snacks for the evenings. Here is the recipe of Mango - Sweet Corn Chat for you!


Time required: 20 - 25 minutes
Servings: 3
Difficulty Level: Medium

Ingredients:
  • Sweet corn cobs - 2
  • Totapuri mango (medium size) - 1
  • Green chilli paste - 1 tsp (adjust according to taste)
  • Lime juice - for taste
  • Salt - for taste


Method:
  • Roast the corn cobs on direct flame. I did this on my stove top. Separate the kernels when its still hot. You can do this job easily using a knife. 
  • Chop the raw mango finely. I prefer cutting them to the same size as of corn kernels. 
  • Combine corn kernels and chopped mango in a mixing bowl. Add salt, chilli paste and lime juice according to taste. 
  • Toll them quickly and serve immediately! 
  • This delicious chat can be served as salad for the lunch or as evening snacks. 
 
NewerStories OlderStories Home