ಕನ್ನಡ ಆವೃತ್ತಿ

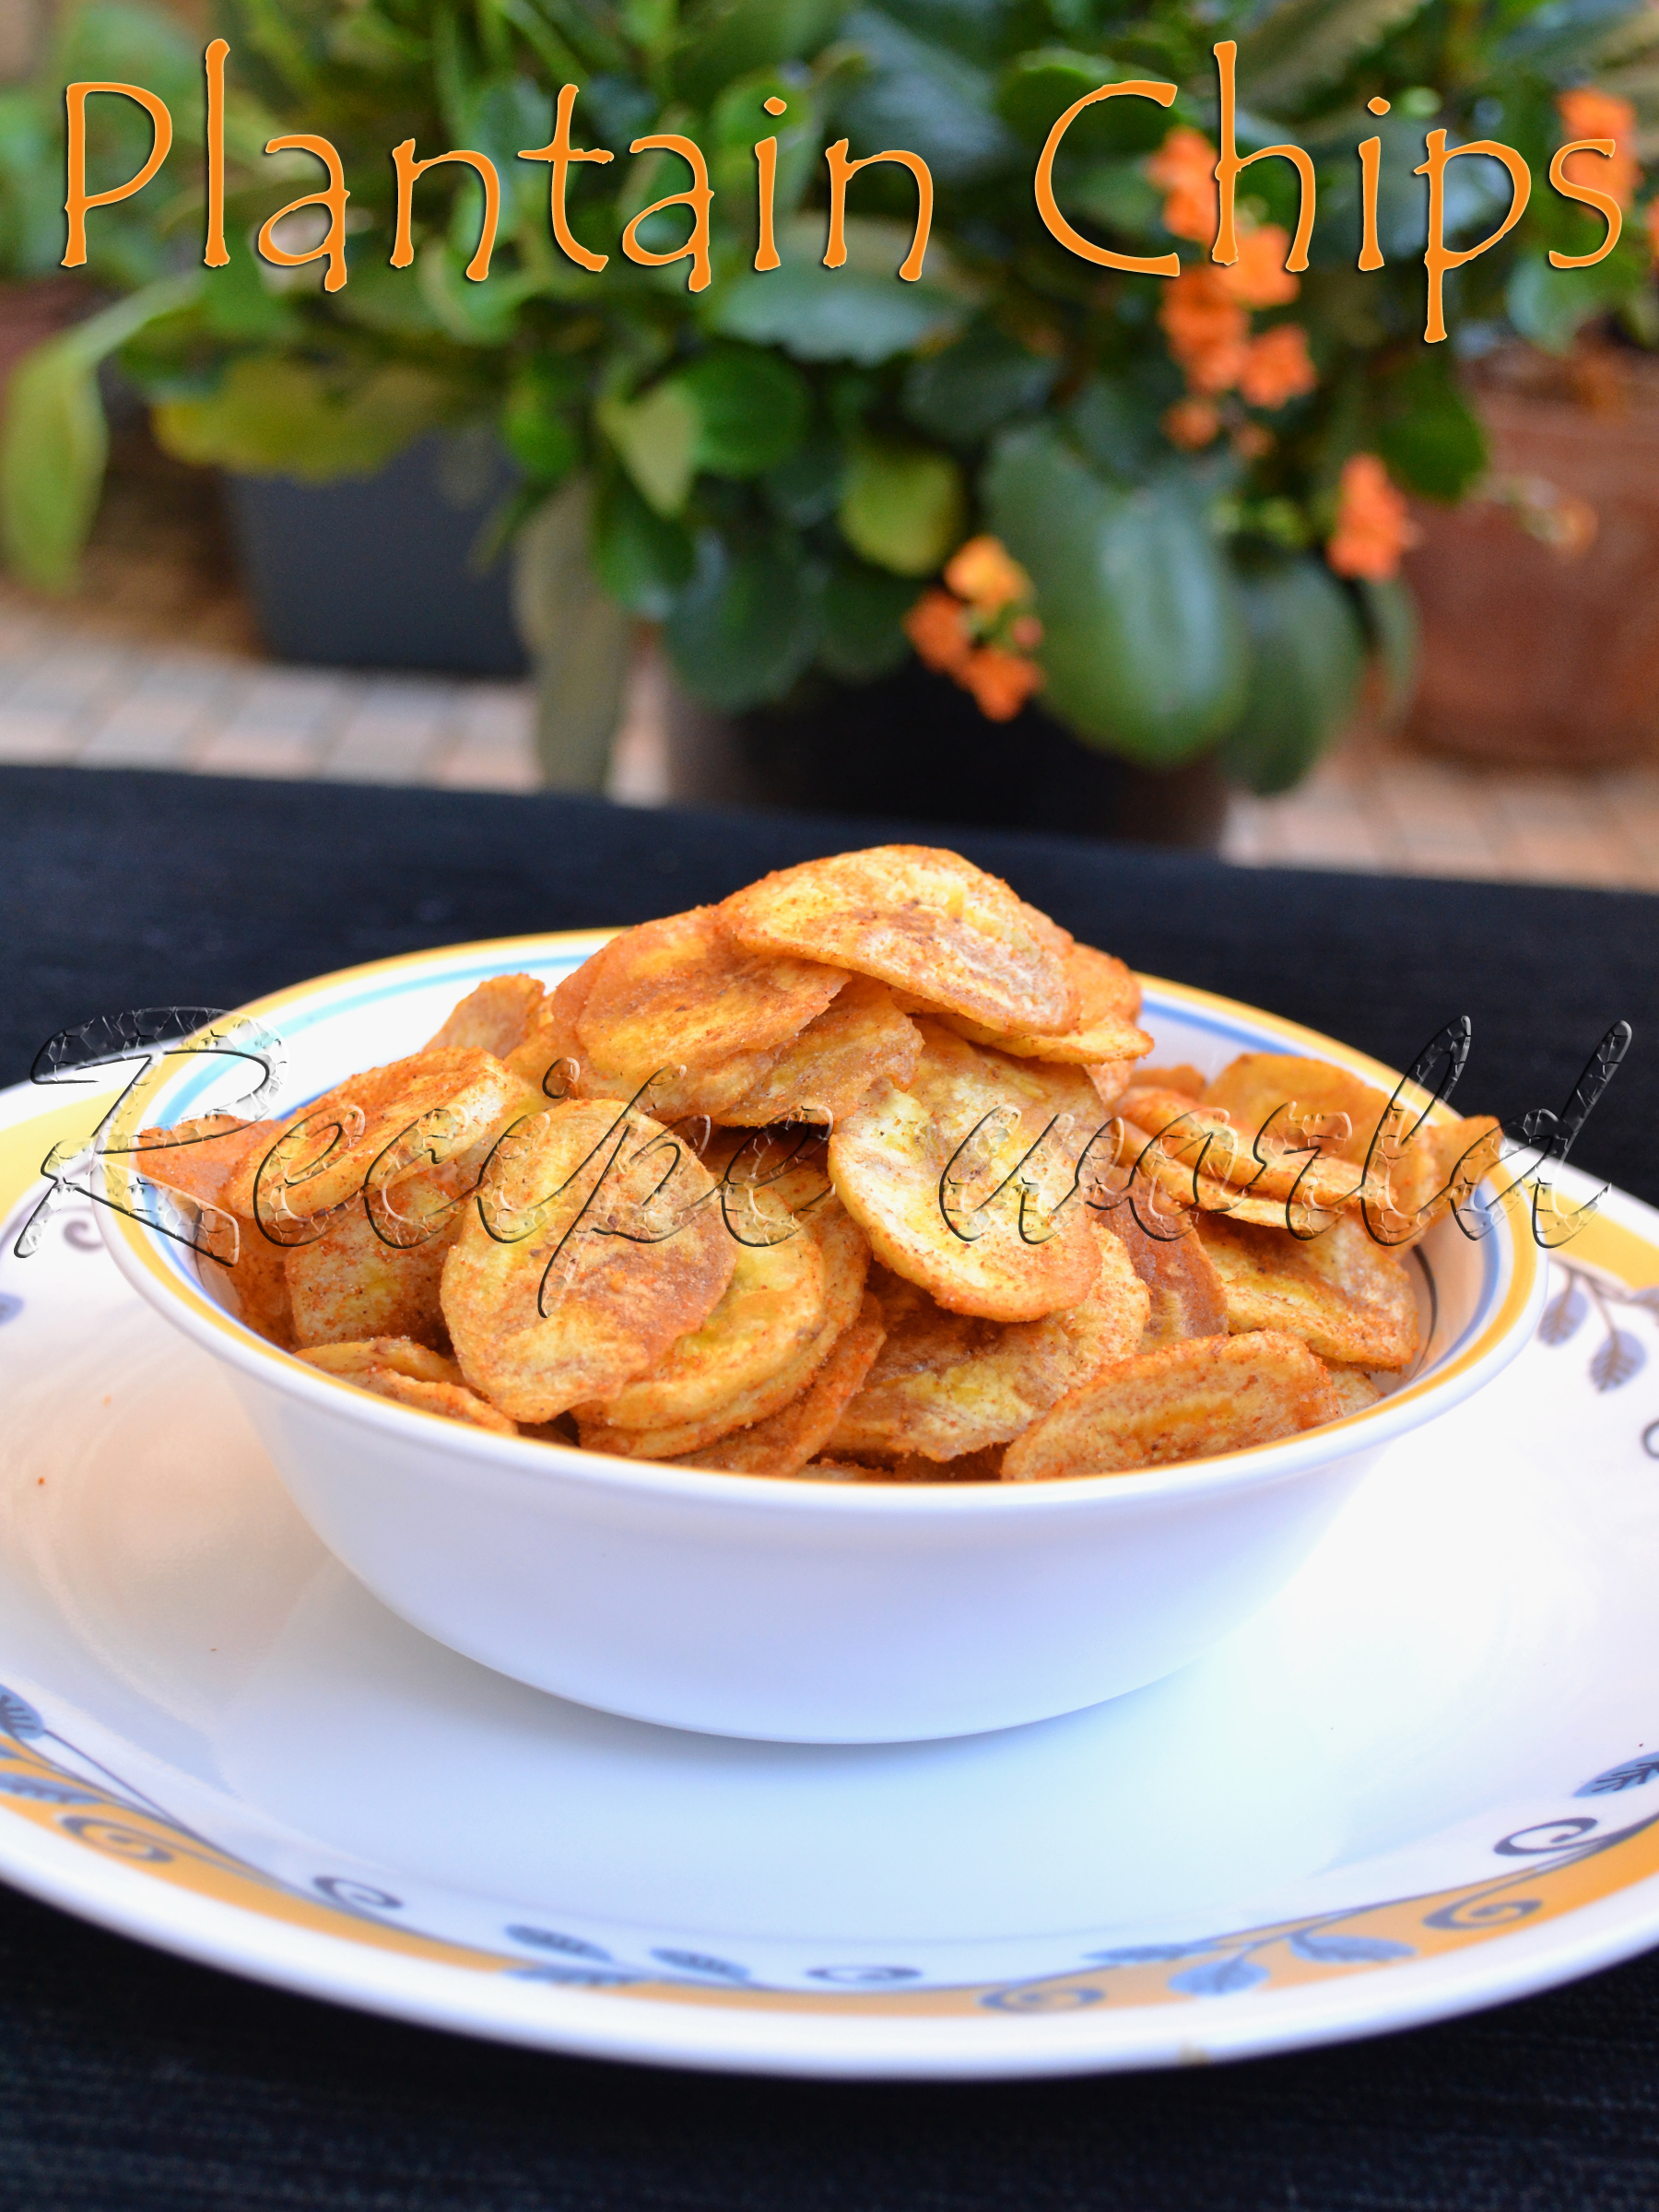
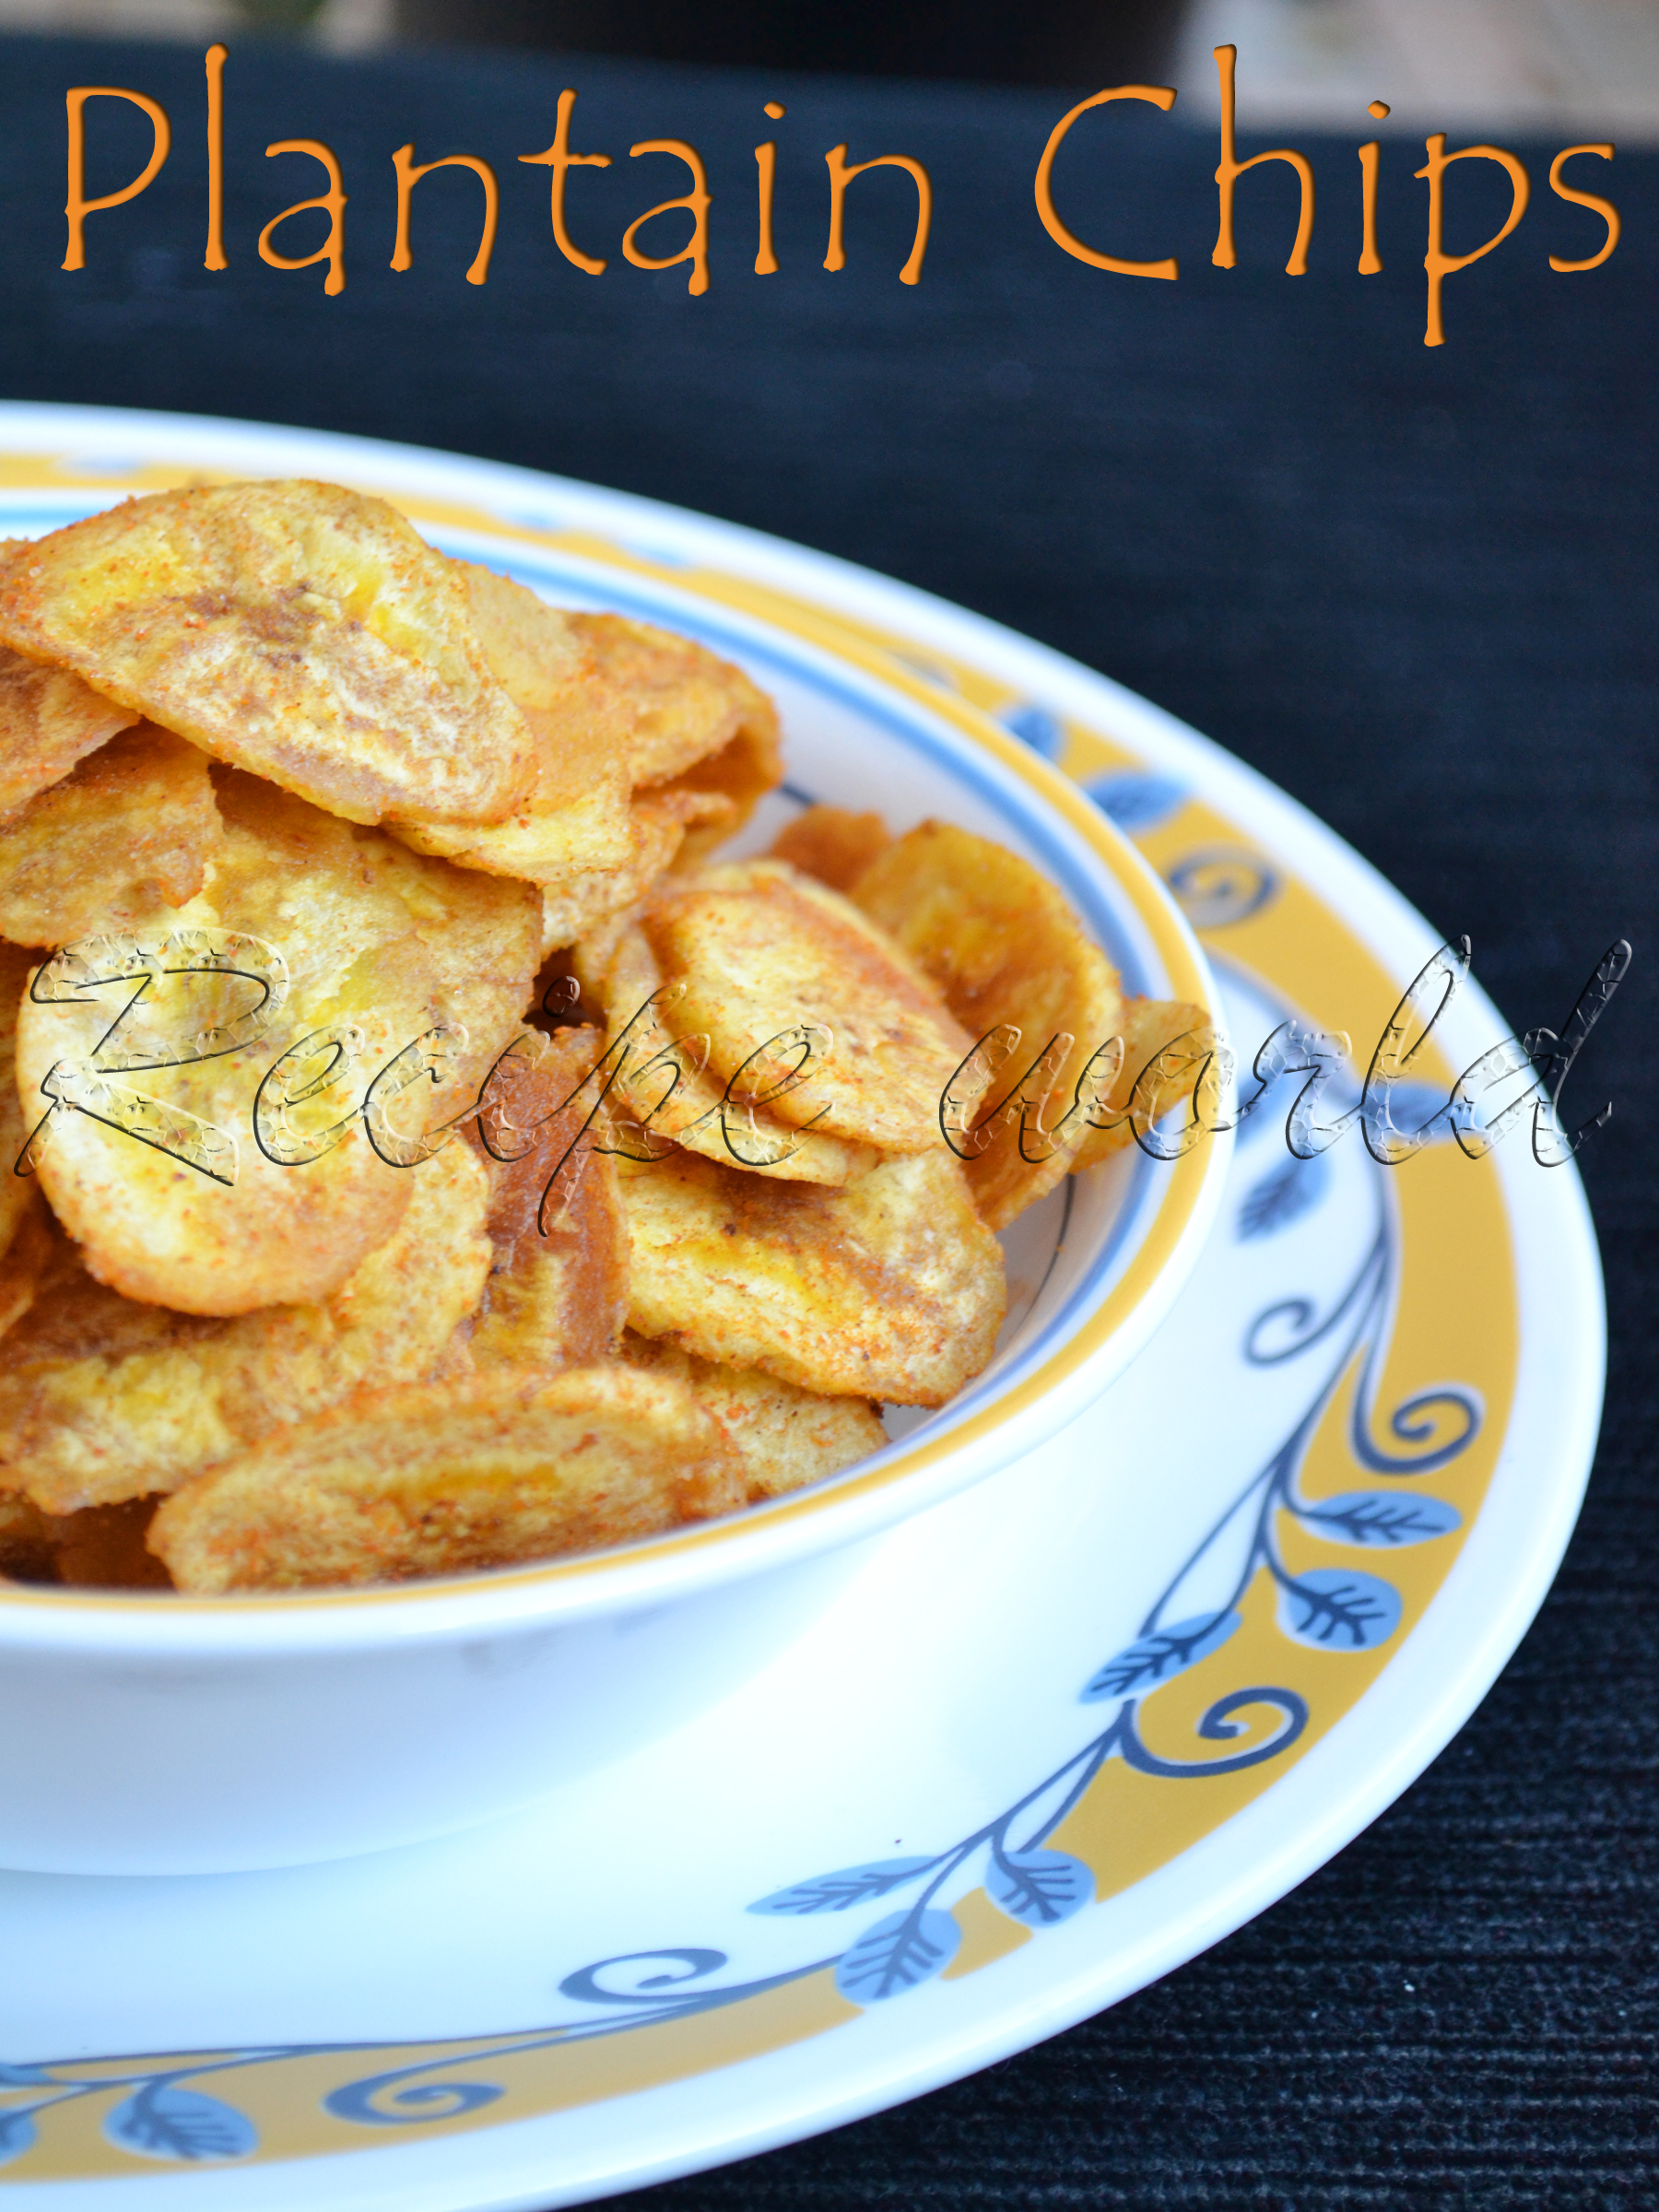
Chips are perfect snacks for tea time! Varieties of chips can be prepared using different vegetables. At my native place, people prepare chips using vegetables like raw banana (plantain) chips, raw jack fruit chips, bread fruit chips, sweet potato chips, etc. Raw banana (plantain)s are available in all the seasons and hence, one can prepare Raw Banana Chips anytime. There are different varieties of bananas, the one known as 'Nendra Baale' is one among them, which is perfect for preparing chips.
Both me and my hubby like varieties of chips prepared at our native place. Since it has been a while we visited native, sometimes we miss the native style food here. Whenever I find raw banana (cooking banana)s in Indian stores, I remember those crunchy and tasty chips prepared at my native. One fine day, I prepared chips using those cooking bananas which were there in the pantry. I came out nice and after adding my mom's style masala powder, it tasted the same like the native one. After this trial, I'm happy that I can prepare my favorite Banana Chips anytime!
Here is the recipe of Raw Banana Chips / Plantain Chips..


Time required: 1 hour
Servings: 5 - 6
Difficulty level: Medium

Ingredients:
Raw bananas - 5
Chips Masala Powder - 4 tbsp
Salt to taste
Oil for deep frying

Method:
Take around 5 cups of water in a wide vessel and add 4 - 5 drops of cooking oil. Peel the raw bananas and keep them in this water.
Take the peeled bananas one - by - one, rub them in a dry cloth, chop them into thin slices.
Heat oil in a heavy bottom pan. Deep fry the sliced bananas on medium flame till crispy and/or golden brown.
Spread the fried chips on a tissue paper for a minute or to in order to absorb the excess oil.
Transfer the chips to a wide bowl. Add Masala powder and salt, as required. Toss it nicely and ensure that masala powder and salt is coated evenly.
Enjoy the crispy crunchy chips with a cup of Tea or Coffee!
If preserved in an airtight container, chips will remain fresh for at least upto a month.


Tips:
Instead of Masala powder, you can add turmeric powder and hing (asafoetida) for flavoring.
Sunflower oil and coconut oil are good for frying raw banana chips.
Soaking the peeled bananas in water is to avoid them from ripening. If you are using the peeled bananas quickly, then no need to soak in water.

Palak Paneer, is a famous side dish from North Indian cuisine. Paneer cubes are dipped in Spinach gravy with added spices, which tastes delicious with Chapathi, Roti and Poori. 
Palak plants are easy to grow even in your balcony. One of my friends have gone for vacation last month and she had left her plants at my place. She gave me her spinach plants and shared a nice tip. Don't take out the whole plant when it is ready for plucking. Take out only the grown up leaves and leave the plant to grow again. This works nicely and the leaves are again ready for plucking within 3 weeks! I had planted some spinach plants in our backyard when we were in Adelaide, but I didn't knew about this. Hope this tip will be useful for you as well!
And, wish you all a very happy and prosperous new year! 
Below is the recipe of Palak Paneer:


Time required: 30 minutes
Servings: 3
Difficulty level: Medium

Ingredients:
  • Spinach leaves - 1 big bunch
  • Tomato - 1
  • Onion - 1, medium sized
  • Grated ginger - 1 tsp
  • Grated garlic - 1 tsp
  • Cumin seeds - 1 tsp
  • Coriander powder - 1 1/2 tsp
  • Garam masala powder - 1/2 tsp
  • Red chilli powder - 1 1/4 tsp or according to taste
  • Salt to taste
  • Lime squeeze - 1 tsp or to taste
  • Paneer / Cottage cheese - 300 gm or as required
  • Cooking oil - 7 tbsp
  • Water - 3 cups approx


Method:
  • Chop the tomato finely. Grate the onion using a vegetable grater and keep ready.
  • Wash the spinach leaves thoroughly and cook them in 1 1/2 cups of water. Add more water if required. 
  • Once the spinach is cooked, turn off the flame and allow to cool. Drain the remaining water and keep aside. Grind the spinach leaves into smooth paste.
  • Cut the paneer / cottage cheese into medium size cubes. Shallow fry them with little oil on hot tava till golden brown and keep aside.
  • Heat 5 - 6 tbsp of oil in a heavy bottom pan. Add cumin seeds and saute for a while. Then, add grated ginger and garlic. Saute them till the raw smell is gone.
  • To this, add grated onion and cook it till turns into light brown color.
  • Add finely chopped tomato and 1/4 tsp salt and mix well. Cook it covered. 
  • Keep mixing it regularly and once tomato is cooked and the mixture starts leaving oil from the sides, add the spinach paste. Add water as required to make it gravy and salt to taste. You can use the drained water left after cooking the spinach. 
  • Now add the coriander powder, garam masala powder and red chilli powder. Mix it nicely and allow the mixture to boil for 3 - 4 minutes.
  • After you turn off the flame, add lime juice for taste and mix it well. 
  • Finally add the Paneer cubes and mix everything slowly.
  • Serve it hot with Chapathi, Roti or Poori.


Tips:
  • If you have the paneer at home, you can use the left over paneer water for this recipe instead of plain water.
  • Green chillies can be used instead of red chilli powder. If using green chillies, you can combine ginger, garlic and green chillies and make a fine paste for using here.

Paneer or Cottage Cheese is a common ingredient in most of the North Indian side dishes. Also, there are varieties of sweets which calls for Paneer as the primary ingredient. Since Paneer is easily available in super markets and convenience stores, most of the people prefer to buy them instead of preparing it at home. If you have enough time, preparing Paneer at home is not a big deal. 
Here is the recipe of Home - made Paneer..


Time required: 30 - 35 minutes
Hanging time and refrigeration time: 2 hours
Yield : 25 pieces

Ingredients:
  • Full cream milk: 1 1/4 liter
  • Half lime
  • A Muslin cloth


Method:
  • Heat the milk in a vessel and bring to boil. 
  • Once it starts boiling, add 1 table spoon of lime juice and stir it nicely. Keep it on medium flame and stir regularly.
  • After 1 - 2 minutes, add one more spoon of lime juice. You can see the milk starts curdling slowly. 
  • Add little more lime juice if required. Keep stirring the mixture regularly. 
  • After boiling it for 15 - 20 minutes, all the fat separates and the water turns into pale green color. 
  • Switch off the flame and pour the mixture onto the muslin cloth. 
  • Expose the mixture to tap water once, to remove the citrus content. 
  • Tie the paneer mixture inside the cloth and hang it onto a hook or tap for 1 1/2 hours.
  • Then, spread the paneer mixture on a flat surface and knead it nicely without any lumps.
  • Pat it into a square or rectangular shape and keep refrigerated for 30 minutes.
  • Take out the paneer and cut into desired shapes.
  • While adding paneer cubes to any side dishes, shallow fry them on the tava to avoid them from breaking.
 

Tips:
  • Dont discard the water which you get while preparing the paneer. This water, known as Paneer Ka Pani is good for health. You can replace the plain water for side dishes with Paneer Ka Pani.

Don't know whether I am becoming more busy (or lazy!) these days, its becoming tough for me to invest time for blogging. We were roaming around different places during the week-ends and kiddo keeps me busy during the week days! Even I tried varieties of dishes, but couldn't click the picks being with her.
We had a memorable Diwali celebration this time. There are more Indians in our locality. So, we took part in Diwali celebrations at different places. We celebrated the festival at home one day. I had prepared Holige / Obbattu for Diwali this time. In fact I prepared Seven Cup Burfi and Mysore Pak too! But they were for kiddos playgroup and hubby's office.
There are different ways to prepare this Tovve. My version was slightly different earlier; after I learned this version from my friend Maitri, I just shifted to this method. Try this simple and easy curry and let me know your feedback!


Preparation time: 20 minutes
Serves: 2
Difficulty level: Easy

Ingredients:
  • Moong dal - 1/3 cup (1 cup = 70 gm approx)
  • Water - 4 cups
  • Turmeric powder - big pinch
  • Ginger (crushed) - 1 1/2 inch
  • Green chilly - 2 nos (adjust according to taste)
  • Asafoetida / hing - big pinch
  • Salt - for taste
  • Finely chopped coriander leaves - 2 tbsp
  • Lime - half slice

For tempering: Ghee / clarified butter - 1 1/2 tsp, cumin seeds - 1 tsp, Mustard seeds - 1 tsp


Method:
  • Wash the moong dal in clean water. To this, add around 3 cups of water, big pinch of turmeric and 2 - 3 drops of cooking oil. Pressure cook for 1 whistle. You can cook it directly on the stove top; it takes little longer to cook. 
  • Once the moong dal is 3/4th cooked, add crushed ginger, slit green chillies, hing, salt and lime squeeze for taste. Add little more water if required. Let it boil nicely for 5 minutes and then, add the chopped coriander and turn off the flame.
  • Heat ghee in a small wok. Add mustard seeds and cumin seeds. Once it starts crackling, mix it with the prepared Tovve or Dal mixture.
  • Serve it hot with rice and pickle!

Tips:
  • Lime squeeze can be added either before boiling the mixture or at the end. Anything is fine!

Mysore Pak is one among those famous Indian sweets which are prepared during festivals and special occasions. With the nice aroma and flavor of ghee, this sweet tastes divine and just melts in your mouth!
Mysore Pak is my favorite sweet ever and of course, this is the first sweet recipe I learnt! My Aunt is an expert in preparing Mysore Pak. She uses fresh home made ghee for preparing this sweet and everybody at home loves to have this delicious sweet. Preparing Mysore Pak is not that difficult, but experience makes you perfect! You need to know the right time and consistency to take out the mixture from the flame. And freshness of the ingredients i.e., ghee and gram flour / besan flour also matters a lot.
Mysore Pak can be prepared using Dalda/Vanaspati or other oils also, instead of ghee. I prefer using half - ghee and half - sunflower oil. Try this Mysore Pak recipe at your home and let me know your feedback!


Preparation time: 35 minutes
Yield: 45 small pieces
Difficulty level: Difficult

Ingredients:
  • Besan flour / chickpea flour / gram flour - 1 cup (1 cup = 100 gm approx)
  • Sugar - 1 1/2 cup
  • Ghee / clarified butter - 1 cup
  • Sunflower oil - 1 cup
  • Salt - a pinch
  • Cooking soda - a pinch
  • Water - 3/4th cup + 3 tbsp


Method:
  • Combine sugar and water and bring to boil. By the time it reaches two string consistency, we need to roast the besan flour.
  • Take 1/2 cup of ghee in a wide pan. Add besan flour and roast it on low flame till nice aroma comes. Add a pinch of salt once its done.
  • Heat the oil and the remaining ghee separately and keep ready.
  • Once the sugar syrup reaches 2 string consistency, add it to the roasted besan flour and mix well. Keep mixing it continuously on medium flame.
  • Add 2 - 3 table spoons of oil at a time to the flour mixture. Once the oil is absorbed in the mixture, add 2 - 3 tbsp of oil again. Repeat it till all the oil gets over. Then repeat the same thing with ghee.
  • At one stage, the mixture starts leaving the oil from the sides or bubbles start coming up and the mixture starts leaving the ladle. 
  • Quickly add a pinch of cooking soda, mix it nicely and turn off the flame.
  • Pour the mixture onto a wide plate and allow to set down.
  • After 3 - 4 minutes when the mixture becomes slightly hard, cut it into desired shapes using a knife. Allow it to cool completely.
  • Separate the pieces after its completely cool. Enjoy the home made Mysore Pak with your family!


Tips:
  • If you wont like to use any oil, can use 2 cups of ghee instead.
  • If the quality of besan flour is not good, you may not be able to get the perfect Mysore Pak sometimes.
  • Make sure that the ghee and oil will be slightly hot while preparing this sweet. It will give a nice crispy texture to the Mysore Pak. 


After coming back from work, having a cup of hot tea blended with spices is my Hubby's daily routine. We all would like to have some snacks along with evening tea, with lot of talk and laughter since it is the relaxing time for us! Me and Hubby prefer home made snacks all the time and so, I maintain at least 2 - 3 varieties of snacks in my pantry most of the time. Just like every other kid, my daughter also loves the store bought biscuits and snacks. So, we buy her favorite snacks sometimes from the stores.
Cornflakes Mixture is one of the tea time snacks which I prepare. We do buy plain cornflakes to make breakfast on lazy days, but most of the time I will use it for making the Mixture. This mixture is easy to make and goes well with your cuppa tea! 


Preparation time: 5 - 10 minutes
Servings: 15 approx
Difficulty level: Easy

Ingredients:
  • Plain Cornflakes (Breakfast cornflakes) - 5 cup (measured in big cup)
  • Groundnut - 1/2 cup
  • Almonds - 3 tbsp
  • Broken cashews - 1/8th cup or more
  • Raisins - 20
  • Dalia split - 3 tbsp
  • Urid dal - 1 tsp
  • Mustard seeds - 1 tsp
  • Turmeric powder - 1/4 tsp
  • Masala powder - 1 1/2 tsp or to taste
  • Curry leaves - 1 strand
  • Oil - 10 to 11 tbsp
  • Salt to taste
  • Powdered sugar - 1 1/2 tsp or for taste

Method:
  • Cornflakes can be used directly if its crispy. Else, you need to toast them on low flame or oven - roast them for few minutes till it becomes crispy.
  • Heat oil in a heavy bottom pan. Add almonds and ground nuts and saute for 2 - 3 minutes.
  • Add the broken cashews and saute for a minute. Then add raisins, split dalia, urid dal and mustard seeds. Once the mustard seeds start crackling, add turmeric powder. Saute them till raisins puff up.
  • Then add curry leaves and saute for a minute. Add the Masala Powder and turn off the flame.
  • Add salt and sugar powder for taste. 
  • Fold in the cornflakes and mix everything nicely. Check and adjust the taste, it required.
  • Transfer the Mixture onto an air tight container and use as required. 
  • Cornflakes mixture is a perfect snack for tea time. This mixture goes well with Rava Upma and Seasoned Poha too!

Shrikhand is one of the famous sweet dish from Indian cuisine. This delicious sweet is prepared using minimal and easily available ingredients. Adding of saffron, dry fruits and nuts makes it more rich in taste. Amrakhand is also a variation of Shrikhand, which contains the goodness of mangoes. 
Shrikhand can be served as a dessert or side dish. It tastes good with Poori, Dosa and Tellevu. Try this easy dessert at home and let me know your feedback!


Preparation time: 15 - 20 minutes
Time to hung the curd: 7 - 8 hours
Serves: 5 - 6 
Difficulty level: Easy

Ingredients:
Hung curd - 1 1/2 cup
Powdered sugar - 3/4 cup or to taste
Cardamom / Elachi powder - 1/2 tsp
Saffron strands - 10 to 12

Method:
Take the hung curd in a large vessel and beat it for few minutes without lumps.
To this, add the powdered sugar, saffron strands and cardamom powder. Beat it till everything is combined well. 
Serve is as it is or refrigerated. Add few pieces of pista if you would like to.
It can be served as dessert or as side dish with Poori, Dosa and Tellevu.


Tips:
How to prepare hung curd: Pour the curd on a muslin cloth, tie it and hang it to a hook or a tap. Put a vessel below the hung curd to collect the excess water. Keep it overnight or 7 - 8 hours and then, take out the curd.
If not using saffron strands, add 3/4 tsp of cardamom powder instead of 1/2 tsp. 


Blueberries are one of among the Baker's favorite fruits. As the name indicates, these pretty fruits are blue in color and have a sweet and a bit sour taste. I had eaten fresh blueberries quite a few times, but never used them in baking. Last month, we bought the frozen ones to prepare smoothie and I thought of preparing Blueberry Muffins for the kiddo with the leftover fruits. 
Whenever I plan to bake something, I need to think of the egg substitute first, since we wont eat eggs. This time, I decided to use milk to prepare my muffins. Experiment went on well and the muffins tasted good. But I felt like some more improvement is needed. Next time, I replaced milk with curd in the same recipe and yippee..muffins came out perfect!
I have tried this recipe several times and yes! now its the time to share the recipe with you all!! Here is the recipe of Egg less Blueberry Muffins..


Preparation time: 15 minutes
Baking time: 23 - 25 minutes
Yield: 6 muffins 
Difficulty level: Medium

Ingredients:
  • All purpose flour / Maida - 2 1/2 cup (1 cup = 70 gm)
  • Sugar - 1 cup
  • Curd - 1 cup
  • Baking powder - 1 1/4 tsp
  • Baking soda - 3/4 tsp
  • Cooking oil - 1/2 cup
  • Vanilla essence - 3/4 tsp
  • Salt - pinch
  • Blueberries - 1/2 cup

Method:
  • Preheat the oven to 200°C. 
  • Sieve all purpose flour 2 - 3 times and keep aside.
  • Combine curd and sugar in a mixing bowl and dissolve the sugar completely.
  • To this, add baking powder, baking soda and mix it slowly. Leave it for 2 - 3 minutes to rise.
  • Add oil, pinch of salt and vanilla essence to the curd mixture and mix it lightly.
  • Fold in the all purpose flour in small batches and mix it slowly without lumps. This batter will be thicker than the regular cake batter. If you find it too hard to mix, you can add 1 - 2 spoon of milk. For me, it was fine and I didn't add any milk.
  • Finally add the blueberries to the muffin batter and mix it well.
  • Fill the batter in lined muffin cups up to 3/4th level and leave some space for them to rise. This batter would be sufficient to make 6 medium sized muffins.
  • Keep the muffin tray inside the oven and bake for 23 - 25 minutes or till done. Check the muffins after baking for 20 minutes. If the toothpick or knife inserted comes out clean, its the indication that the muffins are done.
  • Take out the muffins and keep them on a cooling rack. 
  • Enjoy the home made Egg less Blueberry Muffins with your family!


Tips:
  • I have used frozen blueberries here; fresh blueberries also goes well for this recipe.
  • Don't add more blueberries than mentioned above. Once I had added 3/4th cup of blueberries instead of 1/2 cup. It was too moist and the texture was not to good.

NewerStories OlderStories Home