Showing posts with label Sweets / Desserts. Show all posts
ಕನ್ನಡದಲ್ಲಿ ಓದಲು ಇಲ್ಲಿ ಕ್ಲಿಕ್ ಮಾಡಿ. 

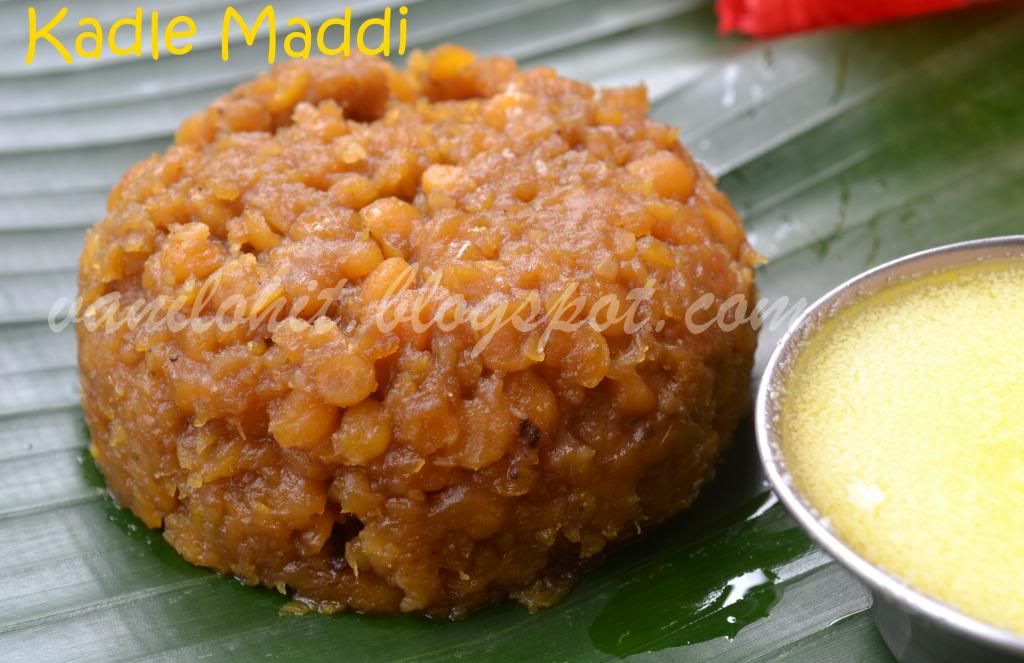
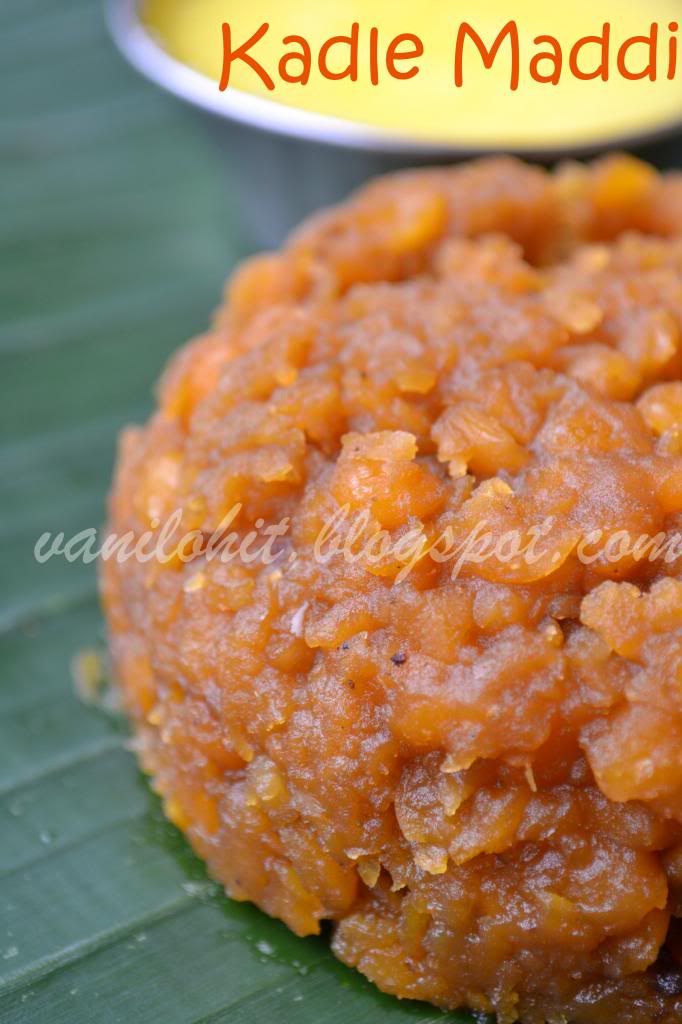
Mostly people who have a rural base will be familiar with this recipe. Ginnu is a sweet dish prepared from lactating cow's milk or colostrum milk of cow. Normally, first day's milk will be thicker and it can be used to prepare Ginnu. Often its called as 'Posu', 'Junnu' or Kharvas in different languages. In my native place, its called as 'Battalu Ginnu'.
We both are the great fans of Ginnu. Being away from native, we rarely get a chance to enjoy this sweet dish. One of my sister stays Hyderabad. She keeps preparing Ginnu using a powder mixture which they get there. Even I searched, but never found such a mixture in Bangalore. I had tried making Ginnu using normal milk by referring recipes on the net, but the taste was not that great.
Last week, I had a chance to taste Ginnu at my mother's place. Mom prepared it twice and I enjoyed eating :) Preparing Ginnu using colostrum milk is damn easy. Also, won't take much time for you to prepare! Try this recipe when you get colostrum milk of cow and let me know your feedback :)


Preparation time: 20 minutes
Yield: 10 medium size pieces
Difficulty level: Easy

Ingredients:
  • Colostrum milk of cow / buffalo - 3 cups (See Tips)
  • Sugar - 2 cups
  • Saffron - 15 strands


Method:
  • Combine sugar with milk and mix it till the sugar gets dissolved completely.
  • Fill the pressure cooker base with water and allow to heat.
  • Add saffron strands and transfer the sweetened milk into a steel pan which fits inside the pressure cooker.  
  • Close the lid of pressure cooker and allow it to get cooked. Switch off the flame after 2 whistles.
  • Once the pressure cooker becomes cool, take out the pan and cut the Ginnu into squares.
  • That's all, delicious Ginnu is ready to eat!


Tips:
  • If its the very first colostrum milk of buffalo, it will be very thick. Just add equal quantity of water and dilute the milk to avoid Ginnu becoming too hard. If its the second time milk, no need to add water. If its cow's colostrum milk, don't add water anytime.
  • Make sure that the sugar is dissolved in the milk completely. Once you put it for cooking, it won't dissolve any more.
  • You can replace saffron strands with cardamom powder or nutmeg to get a different flavor.
  • Sugar can be replaced with jaggery for this recipe (depending on your taste). I prefer adding sugar itself.
ಕನ್ನಡದಲ್ಲಿ ಓದಲು ಇಲ್ಲಿ ಕ್ಲಿಕ್ ಮಾಡಿ.

Just think of a situation where you are expecting some guests and confused what to prepare for them. Ideal condition is that it should be a sweet which is neither too simple nor too difficult and it will be nice if it can be stored for few more days..right? Here is one such recipe which I learnt from my mother. Unlike other varieties of Holige (Obbattu) we prepare, it will not be that soft; its kind of crispy and not too sweetish. Best thing I admire is that it can be stored up to 15 days!
All the credit for this recipe goes to my mother. These days, I am out of my kitchen and busy with my little one. I just clicked some photos and noted down the measurements while my mother was preparing Sakkare Holige (Obbattu). I am thinking of posting some more delicacies from mother's kitchen till I am back to cooking.
Hope to see you all with new recipes soon! Here is the recipe of Sakkare Holige (Obbattu)..


Preparation time: 1 1/2 hour
Time for the dough to get set: 1 hour
Yield - 40 pieces
Difficulty level - Medium

Ingredients:
For the filling:
  • Sooji rava (semolina) - 2 1/4 cup
  • Sugar - 2 3/4 cup
  • Fresh grated coconut - 10 cups
  • Salt - 1 1/2 tsp
  • Cardamom powder - 1 tsp
  • Ghee - 2 tsp

For the outer covering:
  • Wheat flour - 1 cup
  • All purpose flour / Maida - 1 cup
  • Salt - 1 tsp
  • Turmeric powder - 1 tsp
  • Water - 1 cup approx.
  • Oil - 1 cup or little more


Method:
  • Combine wheat flour, all purpose flour and turmeric powder in a mixing bowl. Take about a cup of water and add salt to it. Pour the flour mixture to the salt water and knead it nicely. Add 3/4th portion of oil and knead the dough without lumps. Finally, pour the remaining oil on the top of the dough and press it gently. Keep the dough closed ith a lid for an hour.
  • Heat the ghee on a heavy bottom pan and roast sooji rava on medium flame for 5 minutes or till you hear a nice aroma. Just after switching off the flame, combine sugar and grated coconut with sooji rava. Also add salt and cardamom powder and mix it well.
  • Now, take the sooji rava - coconut mixture and grind it without adding water. For grinding, you can use mixie jar - small ones or if you are preparing in large quantity, grinder would be the better option. If you can use use the grinding stone, its very convenient to grind this mixture because the mixture becomes bit sticky and sticks to the mixie jar. Do not grind the mixture very finely, it should be in the consistency of sooji rava.
  • Prepare lemon size balls from the ground mixture. Also divide the covering dough into same number of small parts. Apply oil to your hands and place the covering dough on your palm. Place the filling upon that and cover it completely. 
  • Roll the covered balls on a greased plastic sheet or a plantain leaf into circles. Transfer the rolled Holige to the hot tava and cook it on medium flame till you find brownish spots on one side. Turn it and do the same with other side. 
  • Delicious Sakkare Holig is ready to eat now! Enjoy it with ghee or simply you can eat that!

 Tips:
  • This Holige will be moderately sweet. If you add more sugar, mixture becomes too sticky and it will be very difficult to grind it. So, be sure to make proper measurements. 
ಕನ್ನಡದಲ್ಲಿ ಓದಲು ಇಲ್ಲಿ ಕ್ಲಿಕ್ ಮಾಡಿ.

Here is one more recipe which I learned from my mother recently. In fact its an old recipe, but never I had got a chance to prepare it :) Kadlemaddi is bit similar to the filling which we prepare for Obbattu. This traditional sweet is also called as 'Hayagreeva'. Below is the recipe of this simple sweet which is liked by most of the sweet lovers!   


Preparation time: 40 minutes
Servings: 4
Difficulty level: Medium

Ingredients:
Split chana dal - 3 cups
Jaggery - 1 3/4 cup (according to sweetness)
Sugar - 1/4 cup or according to taste
Salt - 1 1/2 tsp
Fresh grated coconut - 1 1/2 cup (see tips)
Cloves - 2
Cardamom - 2
Ghee (optional) - 2 tsp
Cashews (optional) - 10
Raisins (optional) - 15

Method:
Soak chana dal for about 30 minutes and pressure cook with enough water till very soft. It will get cooked nicely within 1 - 2 whistles.
Drain off all the excess water and mash the cooked mixture lightly using a ladle or a masher.
Take a heavy bottom pan and combine the mashed dal, jaggery, sugar, salt and grated coconut.
Keep mixing it on medium flame till most of the liquid content is evaporated. Once the mixture becomes thick and won't stick to the ladle any more, add cashew pieces, raisins, powdered cloves and cardamom and switch off the flame.  
Finally, add 2 tsp of ghee to the Kadle Maddi, mix it well and close the lid. Allow to get set for 10 minutes before serving.
Serve it warm with a spoonful of ghee on the top. It tastes nice even without ghee.


Tips:
  • Kadle Maddi can be prepared using sugar also. Adding of jaggery is not a compulsion here. But adding of jaggery will definitely make a difference in taste.
ಕನ್ನಡದಲ್ಲಿ ಓದಲು ಇಲ್ಲಿ ಕ್ಲಿಕ್ ಮಾಡಿ.

Normally, the season for Jack fruit starts by the mid or end of summer in rural areas. People will be busy preparing chips, papad and other preserves from raw jack fruit during summer. During rainy days, they will enjoy sweet dishes like Jack fruit Kadubu (Idli). These days, people started preserving jack fruit pulp in refrigerator and use it whenever required.  Even I enjoyed this kind of Kadubu after the jackfruit season this year :)
Sometime back, I had prepared Jack fruit Kadubu in our home. I actually wanted to post the recipe here and clicked some picks too..but couldn't take a picture of the final product that day! Last week, when my mom was preparing Kadubu, I told her the same and she insisted me to continue the recipe by taking some photos here. I did the same thing and now, able to post the recipe finally!
Its the common procedure adopted these days is to prepare the Kadubu using Idli moulds. Traditional way is to cook it using plantain leaf covers. Kadubu cooked in plantain leaf wraps will be tastier than Idli kind of Kadubu.
One more thing I wanted to tell with all my blogger friends.. I am not able to visit any of yours blogs these days. The reason is that I have got shifted to my mom's place now. Usage of internet is very limited and even I am not able to check my mails regularly. This may continue for few more months till I am back to my routine life. But whenever time permits, I will keep posting new recipes.
Here is the recipe of Jack fruit Kadubu for you..

Preparation Time:
Servings: 3 - 4

Ingredients:
Jack fruit pulp - 1 1/2 cup
Akki kadi (coarsely powdered rice) - 3/4 cup (See Tips)
Thick jaggery - 1/2 cup
Sugar - 2 tsp
Salt - 1/2 tsp
Cardamom powder - a big pinch
Cooking oil (preferably coconut oil) - 1 tsp


Method:
Combine jack fruit pulp, jaggery, sugar and salt in a mixing bowl.
Once the jaggery is diluted fully, add Akki Kadi and mix it nicely.
Finally add cooking oil and cardamom powder and mix well.
Kadubu batter should be little watery than dosa batter. If the batter looks too thick, you can add some water to dilute it.
You can cook it like either as Idli or as Kadubu. If you want to cook them as Idli, pour the batter in idli moulds and cook it like idli. It takes at-least 30 minutes to cook them in idli cooker. If you are cooking them like Kadubu, it takes a minimum of an hour to cook.
Cook the Idli / Kadubu till it is done nicely. Pour a spoonful of ghee on hot Kadubu and taste it!


Kadubu once prepared will last for 2 - 3 days. Here is one more way to enhance the taste of Kadubu..mash the Kadubu using your hands after its completely cool. To this, add 4 - 5 tsp of fresh ghee, 1 - 2 tsp of sugar and few strands of saffron (purely optional). Heat it on low flame in a heavy bottom pan for around 5 minutes. Serve it hot!


Tips:
  • Akki Kadi means, coarsely powdered rice. It looks like Idli rava. This can be substituted with Idli Rava also. If using Idli rava, add around 1 to 1 1/4 cup of Idli rava for 1 1/2 cup of jackfruit pulp. Also, its better to roast the Idli rava slightly before mixing with pulp.
  • Adding the oil to the batter makes the Kadubu light. Also, it helps for easy digestion of Kadubu.
ಕನ್ನಡದಲ್ಲಿ ಓದಲು ಇಲ್ಲಿ ಕ್ಲಿಕ್ ಮಾಡಿ.

Last month, we had a great family get together here in Bangalore. My cousin was the host this time and I wanted to prepare some special sweet for all of them. Long back, one of my Andhra friends told me about 'Kaja', a famous sweet from her region. Just checked with my hubby and finalized on this sweet for the occasion!
There are 2 - 3 different varieties of Kaja which are famous in Andhra. I went with Kakinada Kaja this time which tastes bit similar to 'Saate' which we prepare in Karnataka. Kaja can be served as sweet as well as snacks! 


Preparation time: 1 - 1 1/2 hour
Time required for the dough to set: 1 hour
Yield: approx. 45 pieces

Ingredients:
All purpose flour / Maida - 400 gm (plus little more for dusting)
Ghee - 3 to 4 tbsp
Pinch of salt
Water to prepare the dough - 150 ml approx.
Sugar - 400 gm
Cardamom powder - 1/4 tsp
Oil for deep frying


Method:
Mix all purpose flour and ghee in a mixing bowl. To this, add pinch of salt and sufficient water to prepare the dough.
Prepare a non sticky dough ball from the mixture. Dough should be slightly harder than regular roti / chapathi dough. Let it rest for at-least 1 hour before preparing Kaja.
In the meanwhile, mix sugar with little water and bring to boil. Once it reaches one string consistency, switch off the flame. Add the cardamom powder and close it with a lid.
Now, make a big ball from the dough and roll it into a big rectangle on a clean surface using a rolling pin. You can use generous amount for dry flour for dusting.
Roll it as thin as roti / chapathi and cut the edges.
Roll the chapathi tightly like a stick (as shown in the pick) and cut it into pieces of 1 1/2 cm each. 
Flatten the cut pieces slightly using the rolling pin.
Bring the oil to medium heat on a heavy bottom pan. Deep fry the flattened pieces on low flame in batches. For me, it took around 15 minutes to deep fry each batch of Kaja.
Transfer the deep fried Kaja onto a tissue paper to absorb excess oil. Then, soak them in sugar syrup for 5 minutes.
Allow them to get dried after taking out from sugar syrup for 5 - 10 minutes.
Delicious Kaja is ready to serve now! Store them in an airtight container and can use up to a week.


ಕನ್ನಡದಲ್ಲಿ ಓದಲು ಇಲ್ಲಿ ಕ್ಲಿಕ್ ಮಾಡಿ.

Here is a famous sweet dish from my native. Its very royal to prepare Rice Kesaribath in marriages and other functions in our region. 'Kesari' means saffron in Kannada. Kesari or saffron is the key ingredient in this dish, hence the name Kesaribath. Its bit difficult to prepare this sweet in large quantities unless you are an expert, but anybody can prepare it easily in small quantities!
I have enjoyed Rice Kesaribath quite a few times at my sister and sister in law's place, but never thought of preparing my own. But recently, the time has arrived to prepare this sweet dish at my house. I had all the necessary ingredients with me, and hubby was asking me why not to try Kesaribath at our home. Also, mom was there with me, who has got expertise in preparing Kesaribath. I prepared it under the guidance of mom and Kesaribath was a big hit!
For preparing Kesaribath, we have used a variety of rice called Jeera Rice (Sannakki). Experts say that Jeera Rice is perfect for this sweet dish. If you won't get jeera rice, you can use basmati rice.
Today is the first anniversary of my little place. Wish me Happy Anniversary to my blog baby with this sweet recipe :) And thanks to all of you for your love and encouragement!


Preparation time: 45 minutes
Servings: 5 - 6

Ingredients:
Jeera rice (or basmati rice) - 250 gm
Saffron strands - 3/4 gm
Sugar - 375 gm
Pure ghee - 250 gm (can use little less also)
Cloves - 2
Milk 5 - 6 tsp
Lime juice - 4 1/2 tsp
Salt - 1 tsp
Cashews - 10
Raisins 25 - 30


Method:
Cook the rice with enough water and 1 tsp of ghee. Cooking the rice rightly is very important here. All the grains should be cooked nicely, and at the same time, rice should not be sticky. So, be careful.
If any water is remaining in the cooked rice, drain it fully and spread the cooked rice on a wide plate for 5 minutes to cool.
Bring the milk to boil and switch off the flame. Soak the saffron strands in the hot milk for 10 minutes.
Take the cloves and make a fine powder. Cut the cashews into medium size pieces.
Combine the salt the with lime juice to dissolve and keep it ready.
Take a wide vessel preferably with heavy bottom. Combine rice with sugar and ghee. Keep mixing it on slightly high flame.
Once it starts boiling, add milk with saffron strands, salt and lime juice mixture. Keep sauting the mixture to avoid burning.
Once the mixture starts absorbing the ghee, bring the flame to medium.
Add powdered cloves and raisins and mix it well.
Within few minutes, you can see the mixture starts oozing the ghee. Switch off the flame immediately and add the cashew pieces. 
Close the vessel with a lid and allow to set for 10 minutes. 
Delicious Kesaribath is ready to serve now! This tastes very good when its still hot.


Tips:
  • Don't try to replace saffron with turmeric or any other artificial color. Saffron is one of the key ingredients for this sweet dish and it will add a nice flavor to Kesaribath.
  • For good results, use fresh and pure ghee for this recipe.
  • Its very important to saute the Kesaribath mixture till it comes to boil. If done on low flame, mixture will become sticky.
ಕನ್ನಡದಲ್ಲಿ ಓದಲು ಇಲ್ಲಿ ಕ್ಲಿಕ್ ಮಾಡಿ.

This is one of the dessert which I prepare quite frequently during apple season. Also, when I was working, I used to prepare this easy n delicious apple custard to serve the guests most of the time. The reason is that it can be prepared in the morning itself and my cooking time will be reduced little bit! It can be served without ice cream also, but ice cream will add more taste to this dessert. In case you are not adding ice cream, just compensate it with more amount of dry fruits :)
Vanilla ice cream is a good combination with this custard. I didn't had the stock of vanilla ice cream at home, so I have used black currant ice cream for a change. You can decorate it with the dry fruits of your choice.


Preparation time: 1/2 hour
Cooling time: 2 hours
Servings: 3

Ingredients:
Milk - 2 1/2 cup
Apple - 1 halve
1 large banana - fully ripened 
Custard powder - 2 tbsp
Sugar for sweetness (around 5 spoons)
Pinch of salt
Ice cream - 3 scoops
For garnishing: cashews, raisins, cherries 


Method:
Pour the custard powder into 1 1/2 cups of milk and mix it well without any lumps.
Heat it on medium flame. Keep stirring continuously and switch off the flame once it starts thickening and you reach the consistency of dosa batter. Allow it to cool down for few minutes.
In the meanwhile, chop the apple and banana finely. Don't remove the peel from apple.


Add the chopped fruits, sugar, pinch of salt and the remaining milk to the custard mixture and refrigerate it for 2 - 3 hours.
Before serving, distribute the apple custard into 3 bowls. Add 1 scoop of ice cream and put a cherry on the top of each. Garnish it with generous amount of cashews and raisins.


Sending this over to the event Desserts with Apples hosted by Nayana, which was started by Raven.


This is my entry to Midweek Fiesta #5


Sending this over to Contest @ Manjula's Kitchen - Dec 2011

This is my entry to Any One Can Cook: Series 37 @ Taste of Pearl City


Sending this over to Show Me Your Hits - Series # 2 ~ Fiber Rich Foods, ongoing event @ Spicy Treats


ಕನ್ನಡದಲ್ಲಿ ಓದಲು ಇಲ್ಲಿ ಕ್ಲಿಕ್ ಮಾಡಿ.

Due to my passion towards sweets, I will keep preparing some or the other sweet / desserts at home. Believe me, when I visit anybody's food blog / website, first thing I will check for is sweet varieties. I don't know why, but for me, this has become one of the main criteria to make an impression!! No doubt, I will admire other dishes also, but sweets will always occupy the first rank :)
Coming to the recipe, Saate is a special sweet variety which you can find in North Kanara. It looks bit similar to Badusha, but the taste will be different. Badusha will have a smooth texture whereas Saate will be kind of crispy. You will find this sweet dish in almost all the sweet stalls in North Kanara, but nowhere else I have seen this sweet variety in Karnataka.I checked for Saate recipe in the net, but didn't get any postings still!! So, I am very glad to post this recipe.. may be I am the first person to post this ;) I learned this recipe from one of my cousins, who has expert hands for preparing these goodies..


Preparation time: 2 hours
Yield: 13 - 14 pieces

Ingredients:
2 large cups of all purp. flour / maida
Ghee / dalda - 1/4 cup
Sugar - 2 cups
Pinch of salt
Water 
Oil for deep frying
Nylon cloth

Procedure:
Mix all purp flour, salt and ghee / dalda nicely. To this, Add water little by little and prepare a non - sticky dough like chapathi dough.
Close it with a lid and allow it rest for 10 minutes.
Divide the dough into 2 equal parts (this is just for convenience; you can use the whole quantity at once).
Roll the dough like a big chapathi.


Fold it twice and you will get a triangle shape. Roll it again like chapathi and fold it.


Repeat this step at-least 15 - 16 times to get lot of layers.
Finally, roll it into 1 inch thick chapathi and cut into circle or any other shapes.


Combine the remaining dough, roll it 15 - 16 times and cut them.
Prick the circles with a fork to avoid puffing up. Also, it helps to cook the inner layers of saate nicely.
Add very little water to the sugar just to liquidize it and bring to boil. Prepare a thick sugar syrup. Consistency should be such that, if it becomes cool, it should crystallize.
Heat oil in a heavy bottom pan. Deep fry the Saate on low or medium flame for around 20 minutes or until it becomes crispy.
Transfer the deep fried Saate onto a tissue paper to absorb the excess oil.
Once Saate becomes cool, arrange them on a nylon cloth.


Heat the sugar syrup and liquidize it. Pour around 3 spoons of sugar syrup on the top of each Saate and spread it little-bit.
Once the sugar syrup is settled and crystallized, its the time to take out the Saate from the cloth.
Enjoy the Saate with your family and store the remaining in an airtight container. It will last upto a week if preserved properly. 


Sending it to the Event Love Lock With Sweets @ Sweet Karam Kapi.

ಕನ್ನಡದಲ್ಲಿ ಓದಲು ಇಲ್ಲಿ ಕ್ಲಿಕ್ ಮಾಡಿ.

It's a well known sweet prepared during festivals in India. It tastes  very similar to jilebi. I  thought of this recipe to welcome a new member in our family.  It's my first experiment. Even if  I  do not guarantee you about the shape, taste is guaranteed!


Preparation Time: 1 hour
Soaking Time: 6 hours
Fermentation Time: 1 hour
Yield: 20 jangirs

Ingredients:
Black gram  - 1 cup
Sugar - 2 cups
Water - 1 cup
Lemon - 1/2
Oil for deep fry
Food color (optional) - pinch
Zip lock cover -1

Method :
Soak black gram for 5-6 hours and keep in the refrigerator for one hour. This is to make sure that the      batter should not get warmed while grinding.
Mix together a cup of sugar and a cup of water and boil to make a syrup of one thread consistency. Now add lemon juice and turn off the gas and keep it aside covered.
Take out the black gram from the refrigerator and filter it. Grind the gram to get a batter soft like butter by adding very little water. The batter should be thicker than dosa batter. Keep in mind that the batter should not  get even warm.
Add a pinch of food color if you want. I added a pinch of turmeric here.
Make a round hole in a zip lock cover with the help of hot nail. Fill the cover with the batter and lock the cover. Test the cover by pressing it  on a plate  whether the batter is coming out properly.
Heat the oil in a pan on medium heat and put the batter in jangir shape in it. Fry until crispy.
Put these jangirs in sugar syrup for 2 minutes.


8. Take out the jangirs and keep them  on a plate and later transfer them to a storage container.


Jangir will be tastier if you eat after 2-3 hours. Otherwise it might have black gram smell.

ಕನ್ನಡದಲ್ಲಿ ಓದಲು ಇಲ್ಲಿ ಕ್ಲಿಕ್ ಮಾಡಿ.

This Burfi is called as Seven Cup Burfi because its prepared using totally seven cup of different ingredients. Normally, it will be prepared using Besan flour, but I have replaced it with sooji rava / semolina in this recipe. My aunt prepares the burfi in this way, which will be very tasty :P Also, another variation I made here is that, I have used only 6 1/2 cups of ingredients.. i.e., I have reduced the quantity of sugar by 1/2 cup. Somehow, I feel that it will be too sweetish if whole 3 cups of sugar is added. That's why, this small variation in the original recipe!


Preparation time: 35 - 40 minutes
Yield : 25 Burfi of medium size

Ingredients:
Semolina / sooji rava - 1 cup
Ghee - 1 cup
Grated coconut - 1 cup
Milk - 1 cup
Sugar - 2 1/2 cup

Method:
Take a heavy bottom pan and pour ghee and semolina into it. 
Roast the semolina for 4 - 5 minutes and add milk, sugar and grated coconut.
Keep stirring continuously on medium flame to avoid sticking to the bottom.
Keep a wide plate ready, greased with ghee to pour the Burfi mixture.
After stirring for sometime on medium flame, water content in the burfi mixture will start decreasing and it starts forming a kind of dough, without sticking to the bottom. Once you reach this stage, you can confirm yourself that 3/4th of your work is done!
Within few minutes, mixture starts puffing up little-bit and small bubbles will appear.
Switch off the flame immediately and pour the mixture onto the greased plate.
Spread the mixture evenly using a rolling pin. Allow it to cool for few minutes.
Cut it into desired shapes when it is still warm. Transfer the Burfi into an airtight container once it is cool.
This Burfi tastes very good with the nice aroma of ghee :)


Tips:
  • If the burfi mixture has stuck to the bottom, pour the mixture to another pan and continue the process. Else, it will spoil the whole burfi mixture.
  • Use only fresh ghee without any bad smell for this burfi.
  • Adding a few strands of saffron will make this burfi more tasty.

    And one more thing is, my dear friend Julie has passed me 2 Awards :) First award for me..I'm feeling so happy <:-P Do visit Julie's space sometime; she has a nice collection of recipes.


    and


    I want to pass it on to few of my blog friends. Please collect your Awards from my space :)

    Cheers!
    Vani

    Sending this over to Food of the Month Contest at Food Corner.


      ಕನ್ನಡದಲ್ಲಿ ಓದಲು ಇಲ್ಲಿ ಕ್ಲಿಕ್ ಮಾಡಿ.

      In India, Kheer / Payasam is mainly meant for serving to the God. Also, its very convenient to prepare Kheer when you want to prepare some sweet dish in less time. Main ingredients needed for any kind of Kheer are - milk and sugar / jaggery. Different varieties of Kheer are prepared by adding other thing with these main ingredients. When we were in Bangalore, I was getting nice bottle gourd from 'Reliance Fresh' almost throughout the year. I used to prepare Bottle-gourd Kheer frequently. After coming to Australia, I tried preparing same kind of Kheer using Zucchini. To our surprise, it resembled the same taste of Bottle-gourd Kheer! These days, I never look for bottle-gourd in the shops; we got used to the taste of zucchini itself!
      This delicious dessert can be prepared very quickly. If you like a sweet side dish, it goes well with Tellevu also!


      Preparation time: 20 - 25 minutes
      Servings: 2

      Ingredients:
      Zucchini - 1
      Whole milk - 1 1/2 cups
      Water - 1 1/2 cups
      Sugar - 1/2 cup
      Semolina / sooji rava - 3 to 4 spoons
      Pinch of salt
      Cardamom - 2
      Cloves - 2
      Few strands of saffron (optional)

      Procedure:
      Peel the zucchini and cut into medium size cubes.
      Add water to chopped zucchini and bring to boil.
      Once the zucchini cubes are half cooked, add milk, sugar and pinch of salt.   
      Wash the semolina and drain all the water. Add this to the boiling Kheer and mix it well so that no lumps are formed.
      Boil this Kheer for 6 - 7 minutes. If you wish, add few strands of saffron while boiling. This will give a nice aroma and color to the Kheer.
      Powder the cardamom seeds and cloves finely.
      Before switching off the flame, add the powdered cardamom and cloves and stir it once.
      Serve the Kheer hot or cold. For garnishing, you can you some dry fruits if you want.


      Tips:
      • Same way, you can prepare Kheer with bottle-gourd also.
      • Semolina will thicken the consistency. If you want the Kheer to be more thicker, increase the quantity of semolina.
      • Adding 1 - 2 spoons of jaggery along with sugar will give a nice taste to this Kheer.
      Sending my entry to Celebrate Sweets | September 2011 - Sweets / Desserts With Fruits & Vegetables @ Rak's Kitchen, which was started by Nivedita.

        ಕನ್ನಡದಲ್ಲಿ ಓದಲು ಇಲ್ಲಿ ಕ್ಲಿಕ್ ಮಾಡಿ.

        Rava Kesari or Shira is a common sweet dish in all parts of India. Most of the people prefer this for entertaining the unexpected guests Because it is simple to prepare and great to serve! This kind of Kesari can be prepared using the wheat flour also. I always prefer Semolina Kesari than wheat flour one. I prepared it last month to entertain the guests. It was a long time since we have eaten this Kesari and we enjoyed eating this delicious sweet.


        Preparation time: 40 - 45 minutes
        Servings: 4

        Ingredients:
        Semolina / sooji rava - 1 1/2 cup
        Sugar - 3 cup
        Ghee - 1 cup
        Cashews, raisins
        Cardamom powder - 1/2 spoon
        Milk - 1/4 cup
        Few strands of saffron (optional)
        Water - 3 3/4 cup (2 1/2 cup of water for each cup of semolina)
        Pinch of salt

        Procedure:
        Heat half the ghee in a pan. Add semolina to the pan and roast until golden brown or until you get the nice aroma.
        Heat the oil in a vessel and it should be nicely hot (or boiling) by the time semolina is roasted.
        Add the boiling water to the roasted semolina and mix well. Add pinch of salt and close the lid.
        Open the lid after 5 - 6 minutes and check whether the semolina is cooked nicely. Take a little-bit quantity and check it with your fingers. If needed, add little more water and close the lid for few more minutes.
        Once all the water is absorbed and semolina is cooked, add sugar. Again, it will become little bit watery when you add the sugar.
        Cook it for 7 - 8 minutes. Check the sweetness and add some more if needed.
        Add saffron strands or food color if you wish.
        Roast the cashews and raisins with ghee and add the same to the Kesari mixture.
        Add milk and little more ghee and cook it for 8 - 10 minutes in low flame.
        Right consistency is when the ghee starts separating from the mixture. Add the cardamom powder and switch off the flame.
        Serve this delicious sweet wish some spicy snacks!


        ಕನ್ನಡದಲ್ಲಿ ಓದಲು ಇಲ್ಲಿ ಕ್ಲಿಕ್ ಮಾಡಿ.

        Boondi Laddoo is a sweet variety which is popular throughout India. It is common to prepare these laddoos on festival and other occasions. Boondi (small balls) will be prepared from the besan flour and laddoos are made by combining these boondis with sugar syrup; that's the reason its called as Boondi Laddoo! 
        My mom will prepare similar kind of laddoo for Ganesh Chaturthi festival using the jaggery instead of sugar. Even I wanted to pepare the laddoos this time for the festival, but I prepared them using the sugar. This was the first time I prepared these laddoos and it was a great success! Folks liked it a lot and laddoos got over very quickly :)
         
        Preparation time: 1 hour
        Yield: 14 laddoos of medium size

        Ingredients:
        Besan flour - 2 1/4 cup
        Sugar - 2 1/4 cup
        Cardamom - 3
        Cloves - 4
        Cashews, raisins - optional
        Water
        Oil for deep frying
        A ladle with small holes to prepare the boondi 

        Procedure:
        Take the besan flour, add water little by little and make a thick paste without lumps.
        Heat the oil in a pan on medium flame. Pour some batter on the ladle and let the drops of batter fall into the hot oil like tiny droplets. 
        Deep fry the boondi, drain the excess oil and tranfer them to a vessel.
        Prepare a thick, 1 string consistency sugar syrup by adding little water to the sugar.
        Add the crushed cardamom seeds and cloves to the sugar syrup. 
        Roast the dry fruits in ghee / oil and add to the sugar syrup.
        Add the boondi to the syrup and mix thoroughly.
        Laddoo should be prepared when the mixture is still warm. Take small portions of mixture and press then in between your hands to prepare the laddoos.
        If needed, you can warm up the mixture again and prepare the laddoos.
        These laddoos can be preserved upto a week.


        Tips:
        • Add few strands of saffron to enhance the taste of the laddoo.
        • If the batter to prepare the boondi is thick, just add little more water to adjust the consistency. If it looks watery, try adding some dryflour.
        • Food color can be added to make the Laddoo colorful.
        ಕನ್ನಡದಲ್ಲಿ ಓದಲು ಇಲ್ಲಿ ಕ್ಲಿಕ್ ಮಾಡಿ.

        This Burfi is one of the special dishes which my Mom prepares. Using only 3 ingredients, this tasty and easy sweet can be prepared. Whenever I prepare this Burfi at home, I will get over within one day! 


        Preparation Time: 40 minutes

        Ingredients:
        Groundnut - 1 cup
        Sugar - 1 cup
        Milk - 1 cup

        Procedure:
        Dry roast the groundnut and remove the skin.
        Prepare a fine powder from the roasted groundnut.
        Take a thick bottom pan, pour the milk and sugar, and bring to boil.
        Once the sugar dissolves in milk, add the groundnut powder and mix well.
        Keep mixing the mixture till it thickens, separates from the bottom and reach the Burfi consistency. 
        Pour it on a greased plate and spread nicely. You can use the rolling pin to spread it evenly.
        Cut it into desired shapes once it becomes cool.  

        Tips:
        • If you are confused about the right consistency for the Burfi, just put few drops of the Burfi mixture on the plate. If it becomes solid when it becomes cool, that's the right consistency!
        ಕನ್ನಡದಲ್ಲಿ ಓದಲು ಇಲ್ಲಿ ಕ್ಲಿಕ್ ಮಾಡಿ.

        Probably everybody is busy with the festival preparation now.. coz its Ganesh Chaturthi tomorrow! Even I was doing the preparations, and thought of doing this month's last posting :) I will be sharing an easy recipe today, which is very special for this festival! I already prepared some items for tomorrow because I can't prepare all the dishes alone quickly. Today, I prepared Sesame seeds laddoo, which is one of the favorite dishes of Lord Ganesha. One of my Aunt prepares these laddoos very nicely. They will celebrate Sankashtahara Chaturthy every month and she won't miss these laddoos for the Naivedyam. We used to wait for the pooja to end and eat the tasty laddoos!! I have adopted some tips from her for this recipe. But these laddoos will be more tasty and chewy if you use the liquid jaggery which you can get only in rural areas.


        Preparation time: 40 minutes
        Yield: 20 - 21 small laddoos

        Ingredients:
        Powdered jaggery - 1 1/4 cup
        Sesame seeds - 1 1/4 cup
        Cardamom - 1
        Pinch of cooking soda
        Water


        Procedure:
        Roast the sesame seeds to golden color or until you get nice aroma.
        Add little water to the jaggery and bring to boil.
        Keep the cardamom powder ready.
        Crush the sesame seeds in mixer just for 1 - 2 seconds and take out. 
        When the jaggery reaches a thick, one thread consistency, add the cooking soda, crushed sesame seeds and cardamom powder. Mix them well.
        Then, switch off the flame and wait till the mixture cools down little bit.
        Prepare small balls (laddoos) when the mixture is still warm.
        Sesame seed laddoos are ready now. Let me wait till tomorrow to enjoy these laddoos!
        Happy Ganesh Chaturthy to one and all!! Take care :)


        NewerStories OlderStories Home