Showing posts with label Snacks. Show all posts

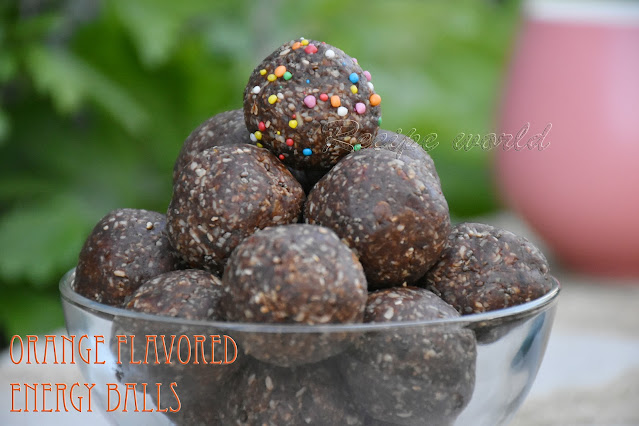
ಕನ್ನಡದಲ್ಲಿ ಓದಲು ಇಲ್ಲಿ ಕ್ಲಿಕ್ ಮಾಡಿ 

Healthy food habits are good for everyone. Our daily food intake should have a balanced portion of pulses, dairy, fruits, nuts and other things. Being hard core vegetarians, I always try to serve the best food for my family.

Today, I am sharing a healthy recipe with you all. These Energy Balls are so delicious to eat, and comes very handy while you are on a trip, hiking, sports activity and also for kids snacks. I have not used any nuts in this recipe since my kids love to carry them for school snacks, and nuts are not allowed in school. You can use any combination of dried fruits and nuts for this recipe.

Preparation time: 20 - 25 minutes

Difficulty level: Medium

Yield: Around 23 balls of medium size

Ingredients:

  • Oats: 1 cup
  • Desiccated coconut: 1/2 cup
  • Pitted dates: 2 1/2 cup
  • Chia seeds: 4 tbsp
  • Cocoa powder: 2 tbsp
  • Orange zest: 1 tbsp
  • Coconut oil: 2 tbsp

Recipe Instructions:

  • Take the oats and make a coarse powder using a mixie or food processor.
  • Lightly roast the coarsely powdered oats, desiccated coconut and chia seeds separately and allow to cool. Each one would take a few minutes to turn aromatic.
  • Roughly chop the pitted dates and transfer it to mixie jar or food processor. Blend the dates till it turns into a sticky mixture. 
  • Add all the remaining ingredients to the dates mixture in 2 - 3 stages and run the mixie or food processor till everything blends well. I have used the 'whip' setting in the mixie to do this. 
  • Take small portions of dough, and shape them into balls of desired size. 
  • Transfer the Energy balls into an air tight container. They stay well at room temperature for 4 - 5 days. Or, you can store them in the refrigerator for 2 - 3 weeks. 

Tips:

  • Replace the ingredients with dried fruits and nuts of your choice.


Who loves chocolates? I know, most of us love chocolates. Chocolates are good to eat in any form and any time. Here is one easy and quick recipe using cooking chocolate and rice bubbles. I guess, rice bubbles can be replaced with our own Murmura (Mandakki) if its not salty; but I have not experimented it yet. These Choco treats are my kiddo's favourite snacks. Also, they are perfect for kids parties, food stalls, picnic and travels.
Here is the recipe of Choco Crackles to munch on any time!


Preparation time: 15 minutes
Difficulty level: Easy
Serves - 27 byte size treats 

Ingredients:
  • Cooking chocolate (I have used dark cooking chocolate)- 100 gram 
  • Rice bubbles (plain, white ones) - 2 1/2 cup
  • Coconut oil (or Copha)- 1 1/2 tbsp 

Cooking method:
  • Heat coconut oil and cooking chocolate in a double boiler. Or, fill water in a wide pan upto 1/4th. Place a vessel inside and start heating. Put the oil and chocolate in the inner vessel. 
  • Keep mixing the mixture regularly. 
  • Once everything is melted and turns into a fine paste, fold in the rice bubbles.
  • Mix everything well and turn off the flame.
  • Scoop the mixture on a plate or into cupcake moulds. I have used small cupcake tray to make them cuter!
  • Keep the tray inside the fridge for 10 minutes.
  • Heat the bottom of the tray / plate for a second or two. This make it easy to unmould the choco crisps in no time. 
  • Have a byte or more. And store the remaining in an airtight container!


As everyone is restricted from going outside due to COVID - 19, its a bit hard to manage the kids at home all day. And, more household work like cooking, cleaning vessels, cleaning and the like. I am trying to involve kids in doing the household chores a bit. Here is a recipe which can be done involving the kids. Potato Podi or shallow fried potato slices are always on demand in our home. 


Preparation time: 20 -25 minutes
Difficulty level: Medium
Serves: 4

Ingredients:
  • Potato (big ones) - 2
  • Sooji rava (Course Semolina) - 3 tbsp
  • Salt - to taste
  • Red chilli powder - 3/4 tsp or to taste
  • Oil - for cooking

Method:
  • Peel off the skin of potatoes and cut them into thin slices.
  • Mix together sooji rava, salt and red chilli powder in a small bowl. 
  • Coat the potato slices with the rava mixture by dipping them in the mixture.
  • Cook them on the hot tawa by drizzling a few drops of oil. Flip them a few times to ensure even cooking.

How to cook in the oven:
  • Pre-heat the oven to 175C.
  • Line the baking tray with baking sheet and arrange the semolina coated potato slices side by side. 
  • Drizzle 4 - 5 drops of oil on each potato slice.
  • Cook them in the pre-heated oven for 15 minutes or till done. 
  • Take out the tray after 5 minutes and serve the hot Potato Podi as snacks or as a side dish with lunch or dinner.


I rarely prepare deep fried items at home. Dishes like Poori, Bajji, Bonda are always tempting. But as far as possible, we want to avoid eating food thats too oily. But I can't avoid making Chaklis when there's huge demand from my daughter!
Months back, I had eaten Chakli at one of my Aunt's home. They were so tasty and I was surprised to hear that she had used Curd for making those Chaklis! Then one fine day, again on daughter's demand, I tried Chaklis using my own selection of ingredients along with curd. They turned out so crunchy and yum! This recipe looks very handy and easy for me now. Here is my easy peasy Chakli recipe for you all.. 


Preparation time: 2 hours
Difficulty level: Medium
Yield: 60 challis (varies depending on the size)

Ingredients:
  • Rice flour - 4 cups
  • Roasted bengal gram dal / Pottu Kadalai - 1/2 cup
  • Butter - lemon size
  • Salt - for taste
  • Sugar - 1 1/2 tsp
  • Red chilli powder - 2 tsp or to taste
  • Carom seeds / Ajwain - 1 tsp
  • Till seeds - 1 tbsp
  • Cumin seeds - 1 tsp
  • Curd - 1/2 cup
  • Water (approx) - 2 1/4 cup


Method:
  • Combine roasted bengal gram dal, carom seeds, till seeds and cumin seeds and make a fine powder.
  • Mix it with rice flour, salt, sugar and red chilli powder in a large bowl.
  • Add heated butter to the flour mixture and mix it well with your hands.
  • To this, add 1/2 cup of curd and mix well.
  • Add water little by little and make a soft, non sticky dough like chapathi dough.
  • Fill the prepared dough in Chakli Press (Chakli Maker). Press the dough and make them into spiral shapes.
  • Heat the oil in a wide pan and deep fry these spirals till they turn crispy.
  • Enjoy crispy, delicious Chaklis anytime!

My school going daughter has recently developed a great craving for snacks. Everyday after coming from the school, she asks for some snacks thats crunchy. I rarely entertain store bought snacks at home and also, she loves homemade food. So, I always keep a stock of 2-3 varieties of homemade snacks for her. One among those is Spiced Phool Makhana. These crunchy balls are very addictive and they are a good source of protein and Vitamin B too!
Puffed Phool Makhana is available in most of the Indian grocery stores here. With this, one can easily prepare this delicious snack anytime. So, here is the recipe of Spiced Phool Makhana or Lotus Seed Snacks..


Preparation time: 15 minutes
Servings: 8 - 10
Difficulty level: Medium

Ingredients:
  • Phool Makhana (Lotus seeds) - 100 gm
  • Cooking oil - 4 1/2 tbsp
  • Turmeric powder - 1/2 tsp
  • Red chilli powder - 1 tsp or to taste
  • Chaat masala - 1 1/2 tsp
  • Salt to taste
  • Sugar powder (optional) - 1 1/2 tsp


Method:
  • Take a wide bottom pan, add Lotus seeds and toast them on low or medium flame for 8 - 10 minutes or till they turn crispy. 
  • Heat oil in the same pan; Add turmeric powder, chilli powder and turn off the flame. Take care not to burn the spice powders. To this, add salt, sugar powder and chat masala powder. Mix it well.
  • Add the roasted Lotus seeds / Phool makhana to the seasoning and toss it nicely to ensure even coating of spices. 
  • Serve this delicious snack along with a cuppa Tea!


Tips:
  • Chat masala can be replaced with amchur powder. 
  • Use your hands for easy and even mixing.
Hi everybody,
I am here with a new recipe after long time. Life has made me busy with the arrival of our second baby. Taking care of two naughty kids is not an easy task. But I'm not exhausted, I'm enjoying this phase of life with them :)
Well, this is the recipe of Chakli which my Mom prepared during her stay with us. My daughter is a big fan of Chakli and this was made on her demand. Try this melt in mouth Chakli and I'm sure you will love it!


Preparation time: 2 hours
Soaking time: 2 - 3 hours
Difficulty level: Difficult
Yield: 60 Chaklis (depending on the size)

Ingredients:

  • Rice - 1 big cup full (1 cup = 175 gms)
  • Roasted rice flour - 3 1/2 cup (approx)
  • Till seeds - 4 tsp
  • Cumin seeds - 2 tsp
  • Carom seeds - 2 tbsp
  • Butter - lemon size
  • Salt to taste
  • Oil for deep frying
  • Water for grinding


Method:

  • Wash the rice 2 times and soak it in water for 2-3 hours. 
  • Drain the soaked rice and grind it along with till seeds, cumin seeds and carom seeds into fine paste. Add water as required. Consistency should be like the Dosa batter.
  • Add 2 1/2 tsp salt and 2 cups of water to the prepared batter and mix well. 
  • Transfer the batter to a thick bottomed vessel and keep stirring on medium flame for few minutes. Add lemon size butter while heating up the batter.
  • When the batter thickens, add around 3 1/2 cups (or as needed) of roasted rice flour and mix it when its still hot.
  • Knead the dough well and prepare a soft, non sticky dough ball. Keep the dough covered with a wet cloth and take out small portions as needed.
  • Fill the dough in a Chakli press and make them into spirals. 
  • Deep fry in hot oil and crispy Chaklis are ready to eat!
Being born and brought up in a village environment, we rarely used to eat the bakery food. All we knew was only Bread those days! We didn't had an oven, so there was no chance to eat any baked food at home. When I started going to college, I came to know about more varieties of bakery food and got addicted to them.
Veg Puffs are one of my favourite bakery food. Making the pastry sheets at home is bit tedious task. These days, puff pastry sheets are available in super markets, so making the Puffs at home is not that difficult. Here is my version of Veg Puffs!


Preparation time: 30 minutes
Baking time: 25 minutes
Difficulty level: Medium
Yield: 6 Veg Puffs

Ingredients:

  • Eggplant - 1 (small sized)
  • Potato - 1 (medium sized)
  • Capsicum - 1 halve
  • Beans - 4 to 5
  • Green peas - 1/2 cup (*see Tips)
  • Onion - 1 large
  • Salt - to taste
  • Amchur powder - 1/2 tsp or to taste
  • Red chilli powder - 1/2 tsp or according to taste
  • Garam masala powder - 1/4 tsp
  • Oil - 3 tbsp (plus more for brushing)
  • Puff pastry sheet - 1 1/2 (can make 4 puffs from 1 sheet)

Method:

  • Cut the potato into two halves, cover with enough water and pressure cook upto 2 whistles. Once they are cool, peel off the skin and chop them into medium sized cubes.
  • Chop eggplant, capsicum, beans and onion into small chunks and keep separately.
  • Heat oil in a heavy bottom pan. Add chopped beans and eggplant. Cook them covered on low flame. Add up to 2 tbsp of water if needed.
  • Once these veggies are almost cooked, add green peas and chopped capsicum.
  • Add chopped onion after a minute and mix well. Cook it on medium flame for 4 - 5 minutes.
  • Add the potato pieces followed by salt, amchur powder, red chilli powder and garam masala powder. Mix everything well and turn off the flame.
  • Pre-heat the oven to 200°C.
  • Thaw the puff pastry sheets according to the instructions on the package.
  • Take one whole pastry sheet and cut it into 4 equal squares. Take one piece and put it on a flat surface. Pour 2 tbsp or little more of stuffing mixture on the middle of the pastry piece. Apply little water to the sides of pastry piece and fold it keeping the stuffing mixture inside. Press the edges and make sure that stuffing won't comes out. Do the same with all the pastry pieces.
  • Line the baking tray with aluminium foil or baking sheet and place the veg puffs on it. Keep some space for them to expand.
  • Brush the puffs with oil or butter and cook them for around 25 minutes or till they turn golden brown.
  • Serve them hot with Tomato ketchup and a cup of hot tea!


Tips:

  • If using dried green peas, you nee to soak it for 4 - 5 hours and pressure cook along with potatoes. I have used fresh ones here hence, no need to cook before using.
  • For the stuffing, use any vegetable which has less water content. Veggies like carrot, beetroot, sweet corn, cabbage also go well for the stuffing. Or if if there is any leftover stir fry, you can use it too!

ಕನ್ನಡ ಆವೃತ್ತಿ 
ಕನ್ನಡ ಆವೃತ್ತಿ

Chips are perfect snacks for tea time! Varieties of chips can be prepared using different vegetables. At my native place, people prepare chips using vegetables like raw banana (plantain) chips, raw jack fruit chips, bread fruit chips, sweet potato chips, etc. Raw banana (plantain)s are available in all the seasons and hence, one can prepare Raw Banana Chips anytime. There are different varieties of bananas, the one known as 'Nendra Baale' is one among them, which is perfect for preparing chips.
Both me and my hubby like varieties of chips prepared at our native place. Since it has been a while we visited native, sometimes we miss the native style food here. Whenever I find raw banana (cooking banana)s in Indian stores, I remember those crunchy and tasty chips prepared at my native. One fine day, I prepared chips using those cooking bananas which were there in the pantry. I came out nice and after adding my mom's style masala powder, it tasted the same like the native one. After this trial, I'm happy that I can prepare my favorite Banana Chips anytime!
Here is the recipe of Raw Banana Chips / Plantain Chips..


Time required: 1 hour
Servings: 5 - 6
Difficulty level: Medium

Ingredients:
Raw bananas - 5
Chips Masala Powder - 4 tbsp
Salt to taste
Oil for deep frying

Method:
Take around 5 cups of water in a wide vessel and add 4 - 5 drops of cooking oil. Peel the raw bananas and keep them in this water.
Take the peeled bananas one - by - one, rub them in a dry cloth, chop them into thin slices.
Heat oil in a heavy bottom pan. Deep fry the sliced bananas on medium flame till crispy and/or golden brown.
Spread the fried chips on a tissue paper for a minute or to in order to absorb the excess oil.
Transfer the chips to a wide bowl. Add Masala powder and salt, as required. Toss it nicely and ensure that masala powder and salt is coated evenly.
Enjoy the crispy crunchy chips with a cup of Tea or Coffee!
If preserved in an airtight container, chips will remain fresh for at least upto a month.


Tips:
Instead of Masala powder, you can add turmeric powder and hing (asafoetida) for flavoring.
Sunflower oil and coconut oil are good for frying raw banana chips.
Soaking the peeled bananas in water is to avoid them from ripening. If you are using the peeled bananas quickly, then no need to soak in water.

After coming back from work, having a cup of hot tea blended with spices is my Hubby's daily routine. We all would like to have some snacks along with evening tea, with lot of talk and laughter since it is the relaxing time for us! Me and Hubby prefer home made snacks all the time and so, I maintain at least 2 - 3 varieties of snacks in my pantry most of the time. Just like every other kid, my daughter also loves the store bought biscuits and snacks. So, we buy her favorite snacks sometimes from the stores.
Cornflakes Mixture is one of the tea time snacks which I prepare. We do buy plain cornflakes to make breakfast on lazy days, but most of the time I will use it for making the Mixture. This mixture is easy to make and goes well with your cuppa tea! 


Preparation time: 5 - 10 minutes
Servings: 15 approx
Difficulty level: Easy

Ingredients:
  • Plain Cornflakes (Breakfast cornflakes) - 5 cup (measured in big cup)
  • Groundnut - 1/2 cup
  • Almonds - 3 tbsp
  • Broken cashews - 1/8th cup or more
  • Raisins - 20
  • Dalia split - 3 tbsp
  • Urid dal - 1 tsp
  • Mustard seeds - 1 tsp
  • Turmeric powder - 1/4 tsp
  • Masala powder - 1 1/2 tsp or to taste
  • Curry leaves - 1 strand
  • Oil - 10 to 11 tbsp
  • Salt to taste
  • Powdered sugar - 1 1/2 tsp or for taste

Method:
  • Cornflakes can be used directly if its crispy. Else, you need to toast them on low flame or oven - roast them for few minutes till it becomes crispy.
  • Heat oil in a heavy bottom pan. Add almonds and ground nuts and saute for 2 - 3 minutes.
  • Add the broken cashews and saute for a minute. Then add raisins, split dalia, urid dal and mustard seeds. Once the mustard seeds start crackling, add turmeric powder. Saute them till raisins puff up.
  • Then add curry leaves and saute for a minute. Add the Masala Powder and turn off the flame.
  • Add salt and sugar powder for taste. 
  • Fold in the cornflakes and mix everything nicely. Check and adjust the taste, it required.
  • Transfer the Mixture onto an air tight container and use as required. 
  • Cornflakes mixture is a perfect snack for tea time. This mixture goes well with Rava Upma and Seasoned Poha too!

There are some well known areas for shopping in Bangalore and one of them I like most is Gandhi Bazar. Evening time will be really good to roam around there, and our shopping will be complete only after having some food, preferably chat food. You can see so many chat shops serving various chat food to the never ending crowd. I had been to Gandhi Bazar with my sister quite a few months back. She knows that area very well and we did plenty of shopping. We were really tired and feeling hungry. She took me to a chat shop in Gavipuram Area. Mango - Sweet Chat from that shop was her all time favorite. So, we ordered the same enjoyed eating. It was so good and so yummy! 
Unripened Totapuri mangoes are perfect for this chat recipe. Grilled sweet corn and finely chopped mangoes are really a wonderful combination. This chat food has become one of our favorite snacks for the evenings. Here is the recipe of Mango - Sweet Corn Chat for you!


Time required: 20 - 25 minutes
Servings: 3
Difficulty Level: Medium

Ingredients:
  • Sweet corn cobs - 2
  • Totapuri mango (medium size) - 1
  • Green chilli paste - 1 tsp (adjust according to taste)
  • Lime juice - for taste
  • Salt - for taste


Method:
  • Roast the corn cobs on direct flame. I did this on my stove top. Separate the kernels when its still hot. You can do this job easily using a knife. 
  • Chop the raw mango finely. I prefer cutting them to the same size as of corn kernels. 
  • Combine corn kernels and chopped mango in a mixing bowl. Add salt, chilli paste and lime juice according to taste. 
  • Toll them quickly and serve immediately! 
  • This delicious chat can be served as salad for the lunch or as evening snacks. 
 
ಕನ್ನಡದಲ್ಲಿ ಓದಲು ಇಲ್ಲಿ ಕ್ಲಿಕ್ ಮಾಡಿ. 

As all of us know, fruits are very good source of nutrients needed for our body. For fruit lovers like me, anything that's made using fruits sounds delicious! Recently, we had enjoyed the season of grapes and enjoyed various dishes with fruits. Apart from regular fruit salad and ice creams, I wanted to try something new with fruits this time. What came to my mind is Fruit Sandwich which I had long back in a restaurant. I still remember the taste of that yummy sandwich filled with lots of seasonal fruits and cream. 
For various salads and ice creams, pineapple makes a good combo along with juicy grapes. I just used these two fruits along with cream for the filling. My family enjoyed eating this delicious sandwich for the evening snacks and everybody liked it. 
Below is the recipe of Fruit Sandwich for you! And here is a small tip before you go ahead for preparation..don't forget to keep all the ingredients refrigerated before using, coz the sandwich tastes better when its cool!


Preparation time: 30 - 35 minutes
Difficulty level: Medium
Yield: 8 pieces

Ingredients:
  • Sweet bread - 16 slices
  • Pineapple chunks - 2 cup
  • Fresh grapes - 2 cup
  • Powdered sugar - 1/4 cup
  • Water - 1 cup
  • Fresh cream - 200 gm

Method:
  • Dissolve 3 tsp of sugar powder in 1 cup of water and keep it aside.
  • Beat the fresh cream well and prepare the whipping cream. Add sugar powder for taste and mix it well. Keep it refrigerated till use.
  • Place two bread slices on the plate. Sprinkle 2 - 3 tsp of sugar syrup on both the sides. 
  • Spread a thick layer of whipping cream on one slice of bread. Top it generously with pineapple chunks and grapes.
  • Cover it with another slice of bread and serve immediately!


Tips:
  • Keep all the ingredients refrigerated before use. Fruit Sandwich tastes better when it is cool!

ಕನ್ನಡದಲ್ಲಿ ಓದಲು ಇಲ್ಲಿ ಕ್ಲಿಕ್ ಮಾಡಿ. 

The season of jack fruit has started now in India. Raw jack fruit is very good for cooking. Various dishes and also papad and chips are prepared from this seasonal vegetable. Some sweet varieties prepared using jack fruit are Jack Fruit Kadubu, Jack Fruit Halwa, and so on.
Jack fruit chips always resembles me the memories of childhood. At my mom's place, my mother and aunts used to prepare jack fruit chips in large quantities with the intention of preserving and using it for the whole year. Ours is a joint family and we were four kids with the same age group. Hiding the chips containers from our eyes was a big challenge for them! It was just like a hide and seek game :) Even now, every time while preparing chips, my mom and aunts will remember this and keep laughing!
Jack fruit chips will remain good for up to a year if prepared using good quality of cooking oil. Below is the recipe of Jack Fruit Chips:  


Preparation Time: 2 1/2 hours (approx.)
Difficulty level: Difficult

Ingredients:
  • Fully grown raw jack fruit - 1 (Medium size)
  • Oil for deep frying
  • Salt - 4 tsp
  • Water - 1 cup
  • Chips masala powder - according to taste

Method:
  • Cut the jack fruit and take out the flesh and take out the seeds which are inside the flesh.
  • Slit the jack fruit flesh into thin pieces lengthwise.
  • Dissolve salt in water and keep the salt water ready.
  • Heat oil in a heavy bottom pan. Deep fry one batch of slit jack fruit flesh on medium flame till it becomes crispy. Add 1 - 2 tsp salt water while deep frying each batch of chips.
  • Spread the deep fried chips on a tissue paper for 5 minutes.
  • Transfer the chips to a mixing bowl. Add Chips Masala Powder (1 - 2 tsp) according to taste. Toss it nicely and check the taste. If needed, add little more masala powder and adjust the taste.
  • Continue the above steps till all the slit jack fruit flesh is done.
  • Transfer the chips to an air tight container to retain the crispiness for long time.
  • Serve it with tea or coffee. Or simply you can enjoy it anytime!


Tips:
  • If the chips not becoming crispy, just deep fry it for 8 - 10 minutes, take out and allow to cool. Again deep fry it for another 4 - 5 minutes. This makes the chips crispy. Or, try adding few drops of vinegar while deep frying.
  • If you want to enjoy fresh chips even after months of preparation, try this tip: Deep fry the chips by adding salt water till crispy. Once cool, store it in an air tight container. When you feel like having it, heat 4 - 5 tsp of cooking oil in a wide pan. Pour some chips into it and add chips masala powder according to taste. Toss it nicely and enjoy fresh chips!
ಕನ್ನಡದಲ್ಲಿ ಓದಲು ಇಲ್ಲಿ ಕ್ಲಿಕ್ ಮಾಡಿ.

Girmit is a special snack variety of North Karnataka region. It looks bit similar to churumuri, but the ingredients used here are totally different. For Girmit, we use split peas (called as Putani in Kannada) powder which will give a unique taste to this snack. Whenever we travel to native by train, we would love to have Girmit / Churumuri which will be sold by Chaatwalas during the journey. 
I hope, this yummy snacks with a cup of hot tea will make a perfect evening for you n your family :)


Preparation time: 10 - 15 minutes
Servings: 2

Ingredients:
Puffed rice / Kadlepuri / Mandakki - 1 1/2 bowl
Oil - 3 tsp
Groundnut - 4 tsp
Mustard seeds - 1 tsp
Cumin seeds - 1/2 tsp
Curry leaves 8 - 10
Turmeric - 1/4 tsp
Green chilli paste - 1 tsp or to taste
Onion - half
Sugar - 1/2 tsp
Lime juice - 2 tsp or to taste
Salt to taste
Chopped coriander leaves (optional) - 2 tsp
Split peas (Putani) powder - 1 1/2 tsp or more

Ingredients:
Chop the onion thinly. Heat the puffed rice on low flame for 4 - 5 minutes or till crispy.
Heat oil in a pan; roast the groundnuts and then, add mustard seeds, cumin seeds, turmeric, curry leaves and green chilli paste. Then add chopped onion, saute for two more minutes and switch off the flame.
Add salt, sugar and lime juice according to your taste.
Now, add the puffed rice to the seasoning and mix it nicely with your hands. Check and adjust the taste.
Finally, add the chopped coriander and split peas (putani) powder and mix it well. Transfer it to the serving bowl and serve immediately!


Tips:
  • If you have added more salt or lime juice to the Girmit, try adding little more split peas powder in order to adjust the taste.
  • If you are serving the Girmit sometime after preparation, keep the seasoning ready and mix it with puffed rice just before serving.
  • Try to finish it off quickly after mixing. Else, the mixture will loose its crispiness and won't taste that good. 
ಕನ್ನಡದಲ್ಲಿ ಓದಲು ಇಲ್ಲಿ ಕ್ಲಿಕ್ ಮಾಡಿ.

This snacks resembles the memories of my childhood. I was born n brought up in a joint family. So, myself and 2 - 3 of my cousins we of the same age group. Daily, we used to have some snacks after coming back from school in the evening. Poha seasoning was our favorite snacks those days and most of the days, we used to demand for the same :D
Even when I was working, I used to carry this poha seasoning for my lunch box. Although its not a stomach filling snack, I was preparing it for lunch box on some lazy days ;) There, it was a big hit! My colleagues were fond of this poha and they used to finish my lunch box whenever I carry poha! And I was satisfying myself with somebody else's lunch box :)
This poha is a perfect snacks for evening time with a cup of hot tea or coffee. 


Preparation time: 15 minutes
Servings: 2

Ingredients:
Thin poha / Paper Avalakki - 2 1/2 bowl
Groundnuts - 3 spoon
Urad dal - 1/2 spoon
Dry red chillies - 2 pieces
Mustard seeds - 1/2 spoon
Coriander seeds - 1 1/4 spoon
Big pinch of turmeric
Green chilli - 1 (adjust according to taste)
Curry leaves 8 - 10
Salt to taste
Sugar - 2 spoons or to taste
Oil - 4 spoons (I prefer using coconut oil)
Grated coconut - 1/2 or 3/4 cup
1 medium size onion
Water - 1/2 cup

Method:
Cut the green chilli into medium size pieces; chop the onion finely.
Transfer the poha to a mixing bowl. Add salt and sugar for taste.
Heat oil in a wok. Add groundnuts, red chilli pieces, urad dal, mustard seeds, coriander seeds, turmeric, green chilli pieces and curry leaves. 
Once it starts spluttering, pour the seasoning on the poha. Add 1/4th cup of water to the wok to clean it and sprinkle the same on the poha.
Also add grated coconut and chopped onion to the poha and mix it nicely with your hands. Add little more water, if needed. Don't add too much water, otherwise poha will become mushy mushy.
Check the taste and add salt or sugar, if needed.
Serve this poha seasoning along with some spicy snacks. Some people love to have it with curd also!


ಕನ್ನಡದಲ್ಲಿ ಓದಲು ಇಲ್ಲಿ ಕ್ಲಿಕ್ ಮಾಡಿ.

Gavvalu is a famous snack item from Andhra. Few months back, one of my Andhra friends offered these lovely goodies to us. We were wondering about the shape of these goodies! They look alike small shells and tastes very nice.Then, she told me the recipe of these sweet shells.
But there was a small confusion. She told that she had used the Gavvalu board, a small board with zig zag surface to give that shape to the Gavvalu. Then, I searched in Google for an alternative for the Gavvalu Board. I ended up with two easy alternatives which are - a fork or a big comb! I tried with both, but for giving a nice shape, I felt the comb better than fork. These days, I am maintaining a separate comb in the kitchen exclusively for Gavvalu preparation!
These sweet shells goes well with a cup of hot tea or coffee. Or simply you can eat them anytime (like me??) :) Be cautious a bit while eating Gavvalu..coz you can't stop munching them!!    

Thanks Usha for this lovely recipe :)


Preparation time: 1 1/4 hours
Servings: 5 - 6 (it depends ;) )

Ingredients:
All purpose flour / Maida - 2 cups
Sooji rava (Semolina) or Chiroti rava - 1/2 cup (see the tips)
Salt - 1/4 spoon
Ghee / clarified butter - 3 spoon
Water to prepare the dough (approx 3/4th cup)
Oil for deep frying
For sugar syrup: sugar - 1 cup, water - 1/2 cup, pinch of cardamom powder
Gavvalu board, a big comb or a fork


Method:
Mix all purpose flour, rava, salt and ghee in a mixing bowl. Add water little by little and prepare a non - sticky dough. Dough should not be too soft, nor too hard.
Cover the dough with a lid or a wet cloth and leave it for 20 minutes. Then, take a lemon size dough and prepare small balls out of it.
Gently press each ball on the comb (or Gavvalu Board) as shown in the picture. Keep the designed surface out and carefully roll the Gavvalu little bit to give the Shell shape.
Heat oil in a heavy pan and deep fry the prepared Gavvalu in batches on medium or low heat for around five minutes.
Once the Gavvalu becomes crispy and golden brown, drain the oil and transfer them onto a tissue paper to absorb the excess oil.
In the meanwhile, combine sugar and water and prepare a thick syrup (may be 2 1/2 thread consistency). Add pinch of cardamom powder and keep it aside.
Transfer the deep fried Gavvalu to a mixing bowl. Pour 3 - 4 spoons of sugar syrup and mix it thoroughly. Adjust the quantity of sugar syrup according to your taste.
Spread the sugar coated shells on a plate for 2 minutes to get dried up. Once they are dried up, they won't be sticky anymore.
Enjoy the sweet shells with a cup of tea / coffee!


Tips:
  • For giving a crispy touch, I have added sooji rava here. I have got very good results with chiroti rava also. If you wish to use chiroti rava, you can add 2 spoons of sooji rava along with chiroti rava. 
  • If the dough has become too soft and you are not able to give a nice shape to the Gavvalu, try adding little more sooji rava to the dough.
  • Keep the dough closed to avoid becoming dry.   

ಕನ್ನಡದಲ್ಲಿ ಓದಲು ಇಲ್ಲಿ ಕ್ಲಿಕ್ ಮಾಡಿ.

Onion Samosa is a famous snack of Hyderabad. I heard about this samosa from some of my friends and tried it at home. It was so good and tasty n we liked it a lot. It will have a crispy outer layer and will be smooth from inside. For learning this recipe, first thing I did is I checked the Vah chef video and followed the same procedures. Later, wanted to go for a healthier version. I tried my own variations in the original recipe and prepared Oats Samosa!
As all of us know, oats is low fat healthy food and many people prefer having oats for their breakfast to reduce the fat.
These samosas can be preserved for 1 - 2 days and are perfect for evening snacks.


Preparation Time: 1 hour
Servings: 3

Ingredients:
1) For the dough:
    Wheat flour - 1 cup
    All purpose flour / maida - 1 cup
    2 tbsp oil
    Salt to taste
    Water

2) For stuffing:
    Chopped onion - 1 cup
    Instant Oats - 1 cup
    Chaat masala - 1 tsp
    Chilli powder - 1 tsp
    Cumin powder - 1/2 tsp
    Chopped green chillies - 2
    Chopped coriander leaves - 1/2 cup
    Salt to taste

3) Other things needed:
    Oil for deep frying
    All purpose flour - 3 tbsp (approx)
    Water

Method:
Mix wheat flour, all purpose flour and salt in a mixing bowl. Add 2 tbsp of oil and mix well.
To this, add water little by little and prepare a smooth, non - sticky dough. Close the lid and let it rest for 15 - 20 minutes.
For stuffing, mix all the ingredients mentioned above and keep aside. Check and adjust the taste according to your preference.
Prepare lemon size balls from the dough and roll them into thin circles. Use enough dry flour for dusting.
Cut the rolled circle into rectangles of around 15 cm length and 7 cm width.


Heat the dosa pan / skillet and put the rectangle sheets on it for a while. Once you see small bubbles on the sheet, just take them out.
Take around 3 tbsp of all purpose flour / maida, add little water and prepare a thick paste.
Prepare small cones from the sheets using the maida paste.
Put around 2 tbsp of stuffing inside the cone and seal it firmly using the maida paste.
Heat oil in a heavy bottom pan and deep fry the samosas on medium flame till they are crispy.
Serve hot with sauce or ketchup. Or, simply you can eat the samosa as it is!

Tips:
  • To make the samosa more crispy and nicely colored, deep fry them twice. But samosa will absorb more oil if you deep fry twice. 

This is my entry to the Event Fast Food, Not Fat Food, # 7 hosted by Priya of Now Serving.


    ಕನ್ನಡದಲ್ಲಿ ಓದಲು ಇಲ್ಲಿ ಕ್ಲಿಕ್ ಮಾಡಿ.

    Spring roll is a kind of Chinese appetizer which will be perfect for evening snacks. It will have a nice crispy layer from outside and a smooth and spicy stuffing inside. The name 'Spring Roll' is because of Chinese people who eat this dish during Spring festival. 
    Spring roll sheets will be available in supermarkets and I used to buy the same earlier. Then, I tried preparing these sheets at home. Preparing the sheets at home is bit time consuming, but if you can't get them from the shop, definitely you can try preparing the sheets at home.   


    Preparation Time: 1 1/4 hour
    Yield: 8 spring rolls

    Ingredients:
    1 ) For Spring Roll sheet: (you can buy it from supermarket as well)
         All purpose flour / maida - 1 cup
         Pinch of salt
         Water to prepare the dough

    2 ) For stuffing:
         Thinly sliced (lengthwise) onion - 1 cup
         Grated carrot - 1 cup
         Grated capsicum - 1 cup
         Thinly sliced cabbage - 1 cup
         Soya sauce - 1 spoon
         Tomato sauce - 1 spoon
         Red chilli powder - according to taste
         Salt to taste

    3 ) Other ingredients:
         Oil for deep frying
         1 spoon of all purpose flour / maida 
         Water 

    Method:
    1 ) Spring roll sheet:
    Mix all purpose and salt in a mixing bowl. Add water little by little and prepare slightly stiff, non sticky dough. Knead the dough well, close the lid and let it rest for 10 minutes.
    Divide the dough into 8 equal parts and prepare the dough balls. Roll them into very thin sheets using the rolling pin. Use the dry flour generously while rolling.
    Roll the sheets into the shape of circle or square. Cut the edges to give a nice shape. Anyways, shape doesn't matter coz it will be covered once you fold them ;)
    2 ) Stuffing:
    Squeeze off excess water from the grated vegetables.
    Heat 2 - 3 spoons of oil in a frying pan. Add sliced onion once the oil becomes hot.
    Fry the onion for 2 - 3 minutes and add grated carrot, capsicum and salt to taste.
    Fry the vegetables for 5 - 6 minutes or until they become slightly crispy.
    Then, add soya sauce, tomato sauce and red chilli powder. Saute them for 2 - 3 minutes and switch off the flame. Less the water content, it will be better.


    Take around 1 spoon of all purpose flour / maida and prepare a thick paste using water.
    Take a spring roll sheet and pour around 2 table spoons of stuffing on one edge.
    Roll the sheet upto half by keeping the stuffing inside. 
    Fold both the edges of the rolled portion into inside and press it gently.
    Then, apply the maida paste to the edges and roll the sheet fully. Fix the edges properly so that stuffing won't com out.
    Heat oil in a frying pan and deep fry the spring rolls on medium heat. Once they are 3/4th done, take them out and allow to cool for few minutes.
    Then, put them in hot oil again and fry until golden brown.
    Deep frying twice will make them nicely crispy and will give a nice golden brown color.
    Transfer the spring rolls onto a tissue paper to absorb excess oil.
    Serve the vegetable spring rolls with tomato sauce.


    Sending this over to the event Christmas Delicacy hosted by Julie. 


    Sending it to Food of the Month Contest at Food Corner.


    ಕನ್ನಡದಲ್ಲಿ ಓದಲು ಇಲ್ಲಿ ಕ್ಲಿಕ್ ಮಾಡಿ.

    My hubby loves to have a cup of tea once he is back from office. If he comes home bit early, I would like to prepare some or the other snacks along with tea. We both enjoy having some snacks while watching the TV programs. My sister used to prepare this kind of snacks at the evening time. Thanks to my dear sister for this recipe :)
    Don't get confused, its chana dal & not sweetcorn ;)


    Preparation Time: 5 minutes
    Soaking Time: 1 hour
    Servings: 2

    Ingredients:
    Chana dal - 1 1/2 cup
    2 green chillies - chopped
    Chopped coriander leaves - 2 table spoon
    Mustard seeds - 1/2 spoon
    Pinch of asafoetida
    Oil - 1 spoon
    Lime squeeze - for taste
    Salt to taste

    Method:
    Soak chana dal for at-least 1 hour.
    Heat around 1 spoon of oil in a pan. Add mustard seeds and let it splutter. 
    Then, add chopped green chillies and saute for a minute. 
    Add soaked chana dal and asafoetida. Add salt and 1/4th cup of water.
    Cook it closed for 5 minutes and saute it 1 - 2 times occasionally.
    Once the chana dal is 3/4th cooked and the water is evaporated, switch off the flame and add lime squeeze and chopped coriander leaves.
    Serve it hot with a cup of tea!


    Tips:
    • Don't cook the chana dal till very soft. Otherwise, it will not be nice to eat.
    ಕನ್ನಡದಲ್ಲಿ ಓದಲು ಇಲ್ಲಿ ಕ್ಲಿಕ್ ಮಾಡಿ.

    Bakarwadi is a famous snack item from Maharashtra. This crispy snack will have a spicy stuffing with the hint of sweet and tanginess. Chitale Bandhu is a famous brand who are very popular in India for preparing Bakarwadi. I love the Mini Bakarwadi of Haldirams too! After making few trials, finally I was able to prepare these nice snacks at home :) 


    Preparation Time: 1 1/2 to 2 hours

    Ingredients:
    1 ) For the dough:
         All purpose flour / Maida - 1 cup
         Besan flour - 2 tbsp
         Salt to taste
         Red chilli powder - 1/2 spoon
         Water - little more than 1/4 cup
         Oil - 1 spoon

    2 ) For the stuffing:
         Dessicated coconut - 3 tbsp
         Poppy seeds - 1 tbsp
         Red chilli powder - 2 spoon (according to taste)
         Sugar - 2 spoon
         Salt to taste
         Amchur powder - 1/2 spoon
         Cloves - 1
         Cumin coriander powder - 1/2 spoon
         Fennel seeds / saunf - 1 spoon

    3 ) Other ingredients:
         Around 2 spoons of tamarind (soaked in water for 20 minutes)
         Oil for deep frying
         1 spoon all purpose flour and little water to prepare the paste

    Method:
    Start with preparing the dough. Mix all purpose flour, besan flour, salt and chilli powder in a mixing bowl. Add oil and mix it well.
    Add water little by little and prepare a stiff dough. Better you use as much less water as possible.
    Knead the dough well and apply some oil to the dough ball. Close it with a lid and let it rest for atleast 20 minutes before we start working.

    For the stuffing, mix all the ingredients and make a coarse powder. Check and adjust the taste according to your preference.


    Prepare small lemon size balls from the dough and roll them into thin circles using some dry flour (all purpose flour).
    Apply the tamarind paste lightly to the rolled circle spread the stuffing evenly. Quantity of stuffing depends on the size of rolled roti. A thin layer of stuffing will be ideal.
    Lightly press the stuffing with your fingers to set it properly. Don't put the stuffing till the edges. Otherwise, stuffing will come out while deep frying.


    Apply tamarind pulp to the edges of circle and roll the circle tightly.
    press the roll lightly with your hands to make it set well. Then, cut it into pieces of 1 cm or required size.


    Prepare the paste using 1 spoon all purpose flour and little water.
    Dip both the sides of bakarwadi in the paste and deep fry on medium heat. This dipping will prevent the stuffing from coming out while deep frying.
    Deep fry the bakarwadi in batches on medium flame for atleast 10 to 15 minutes. Just 3 - 4 minutes taking them out, increase the flame lillte-bit to make them nicely colored.


    Keep them for cooling on a tissue paper and then, store in an air tight container. It will be nice to have them with a cup of tea or coffee.  

    Sending it to Midweek Fiesta # 7 @ Food Corner

     
    OlderStories Home