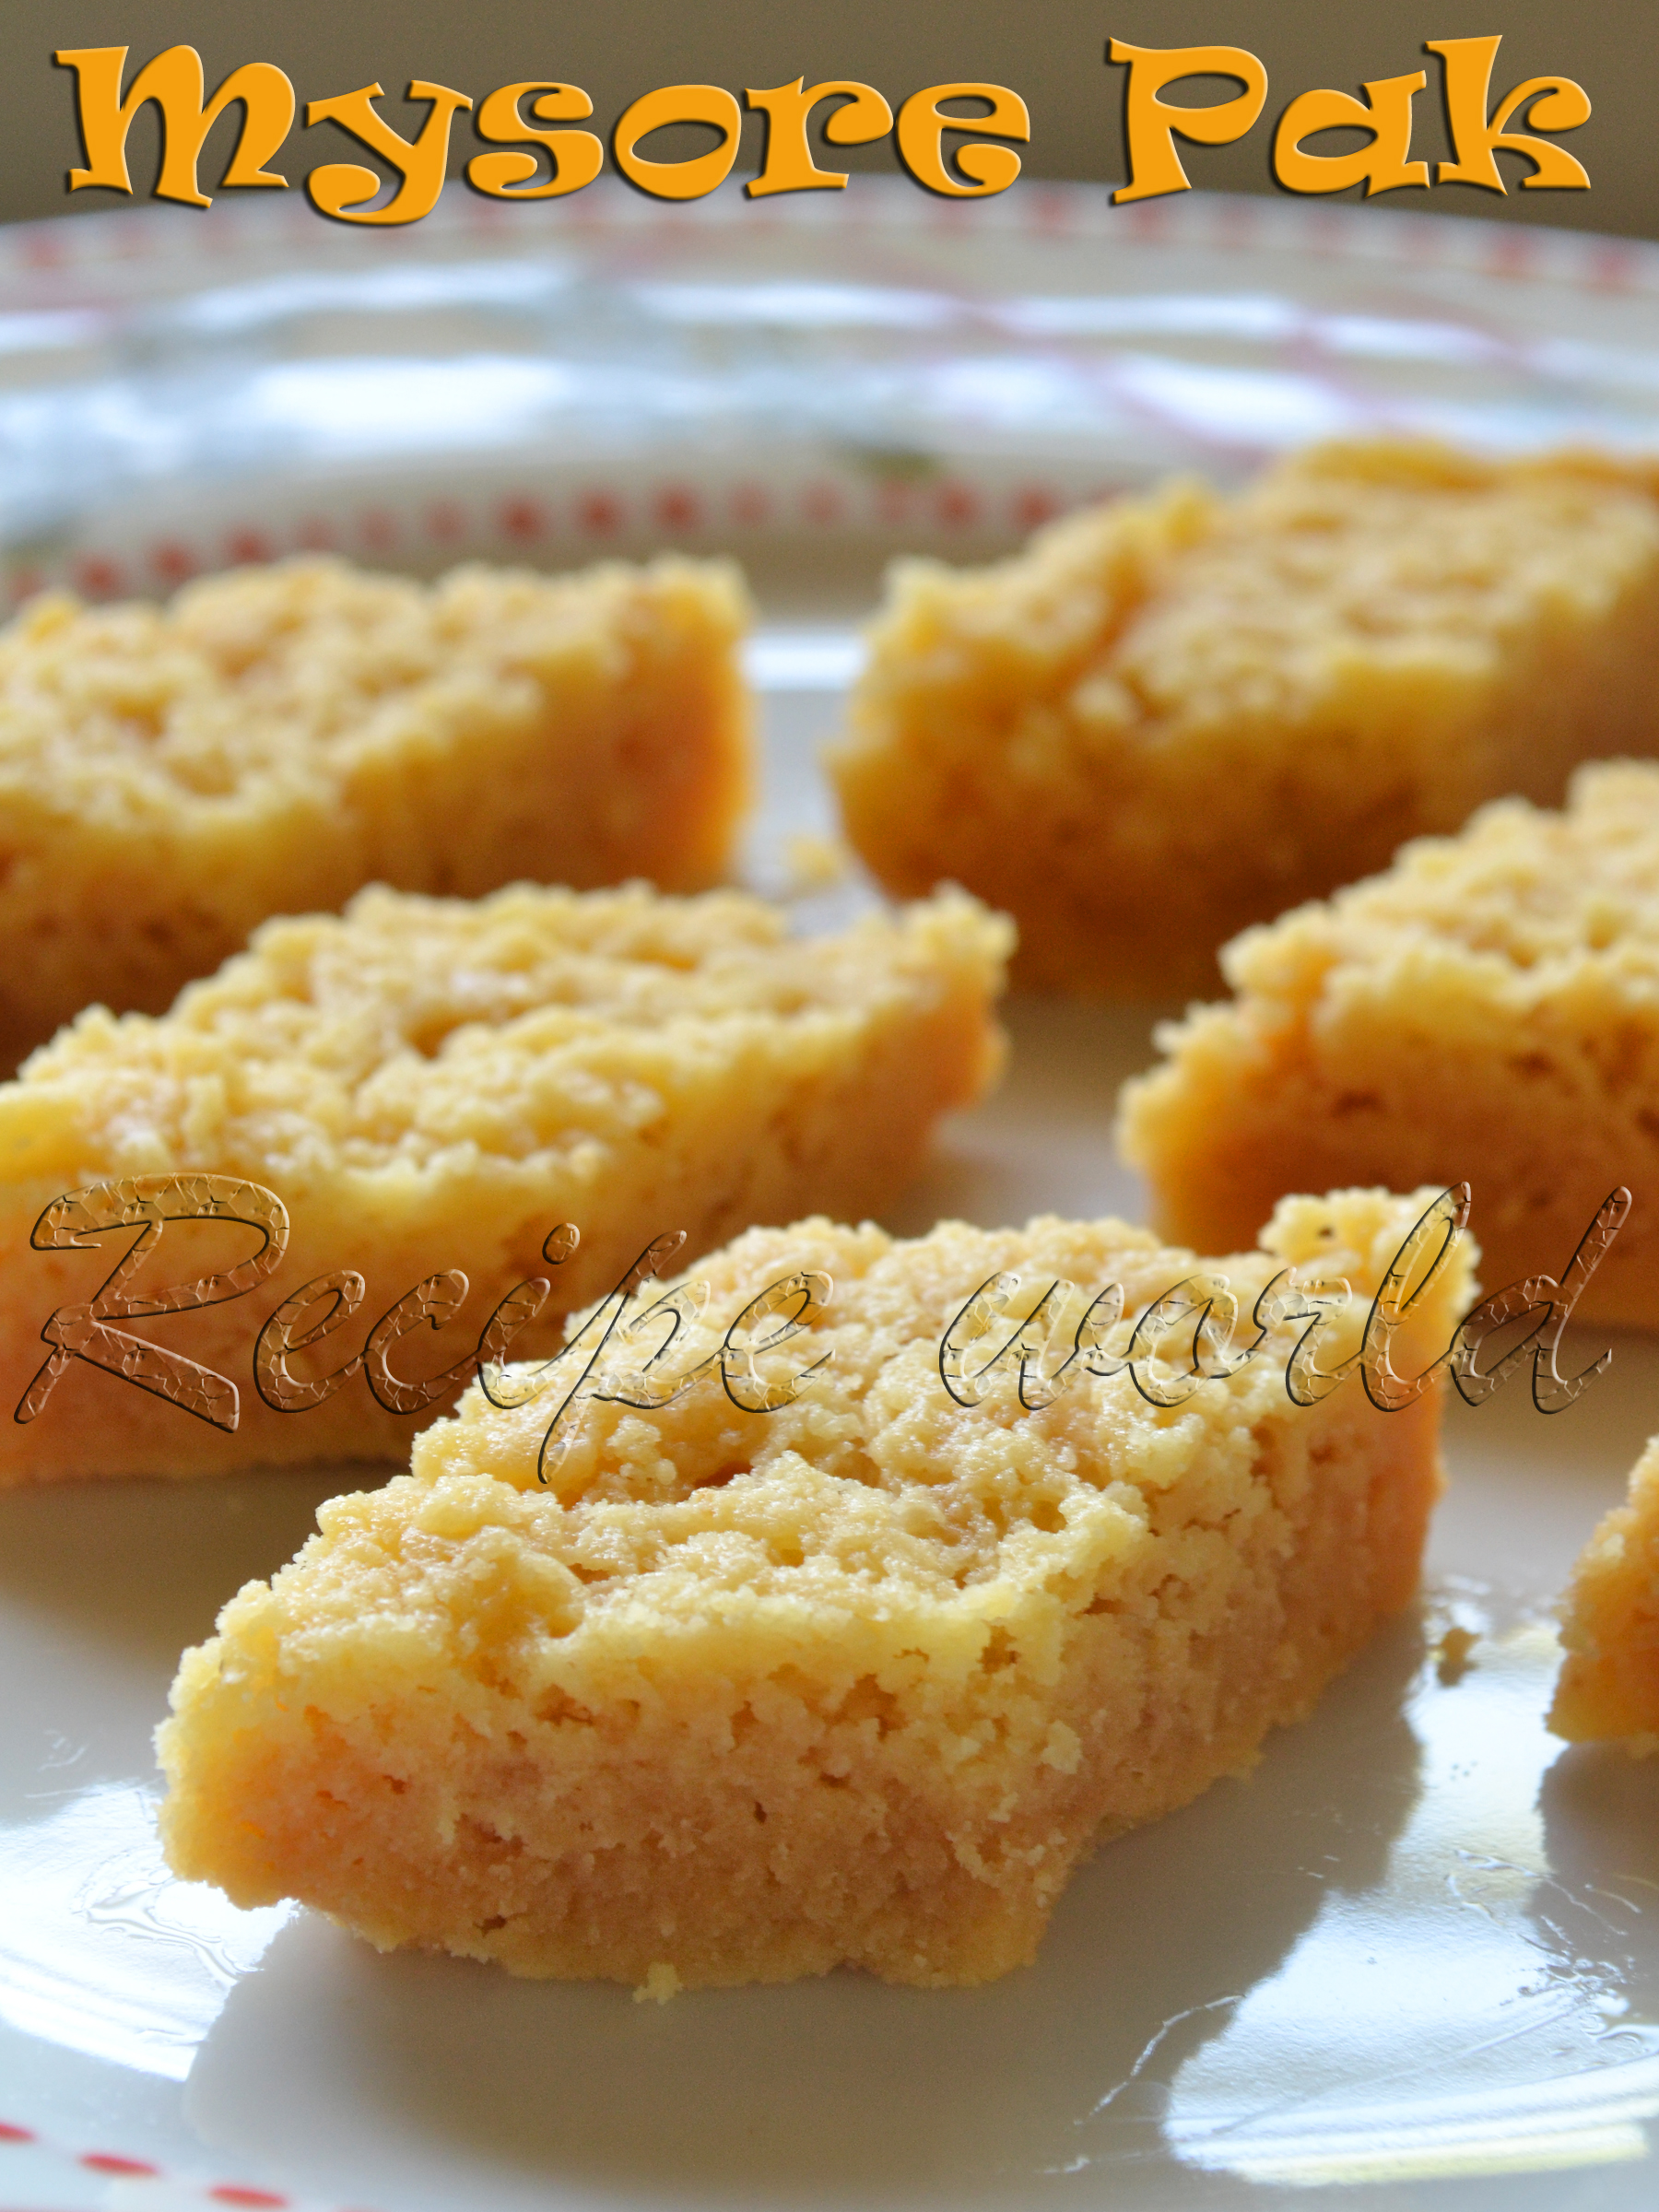
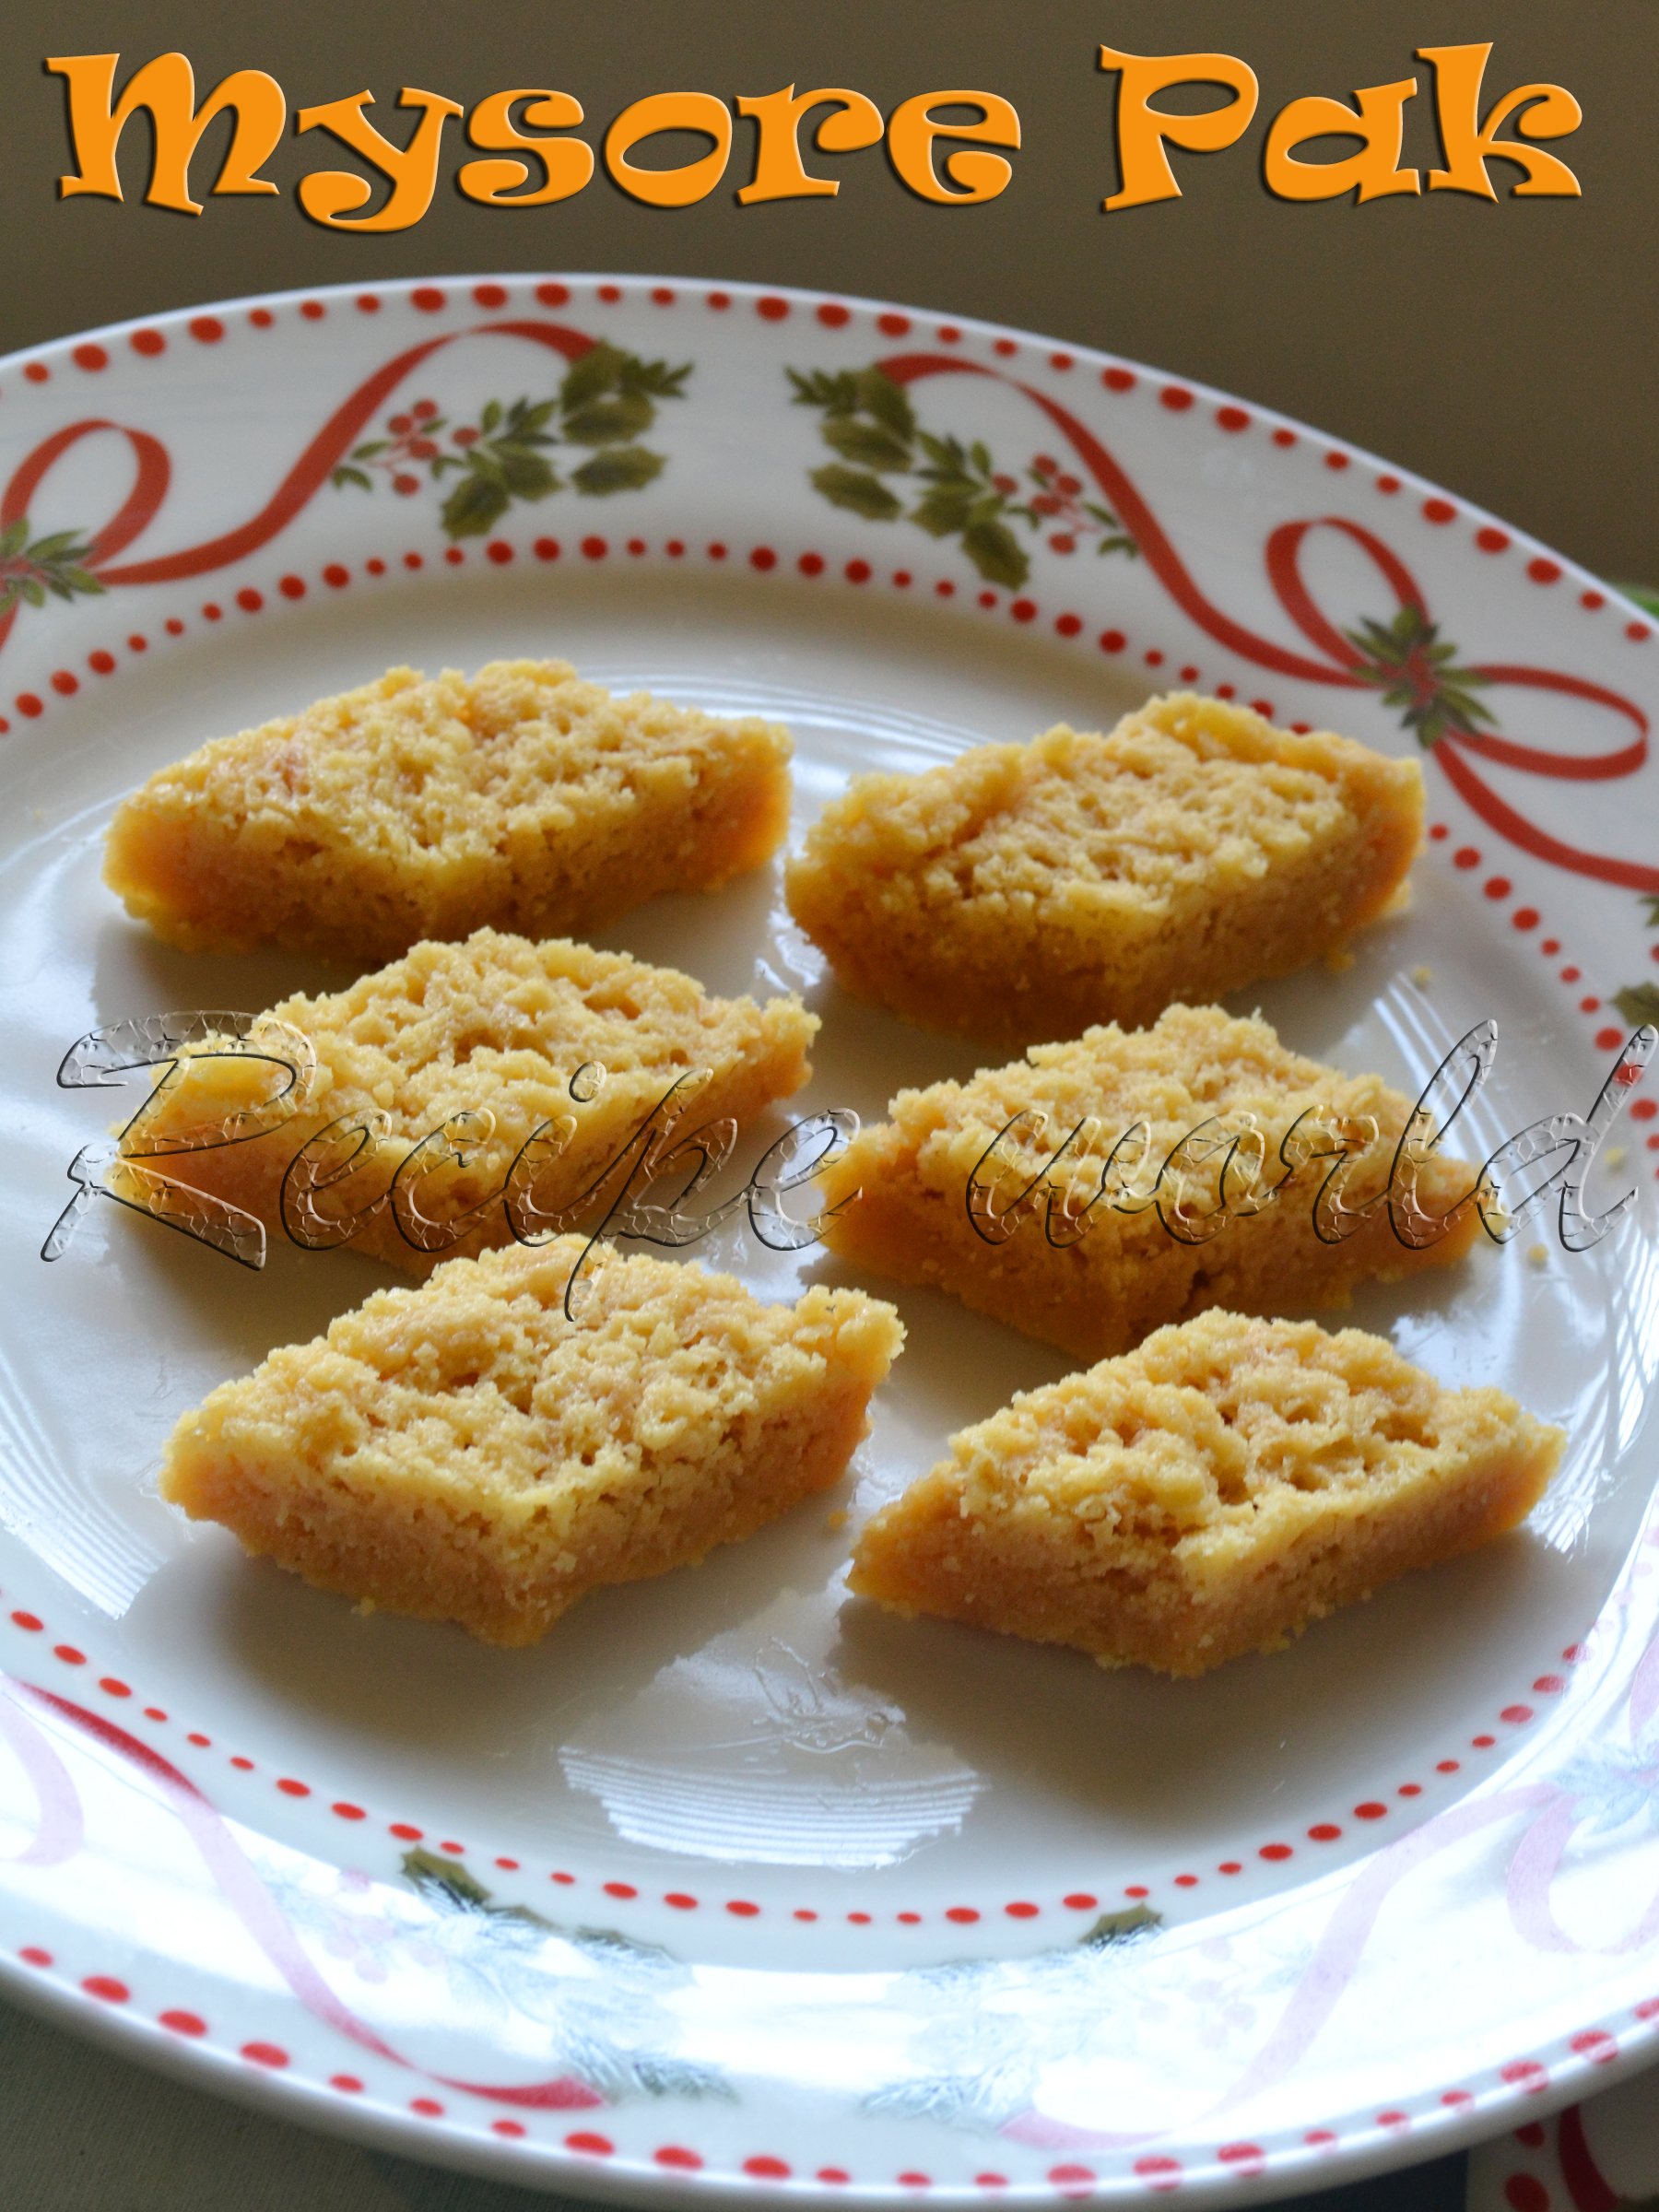
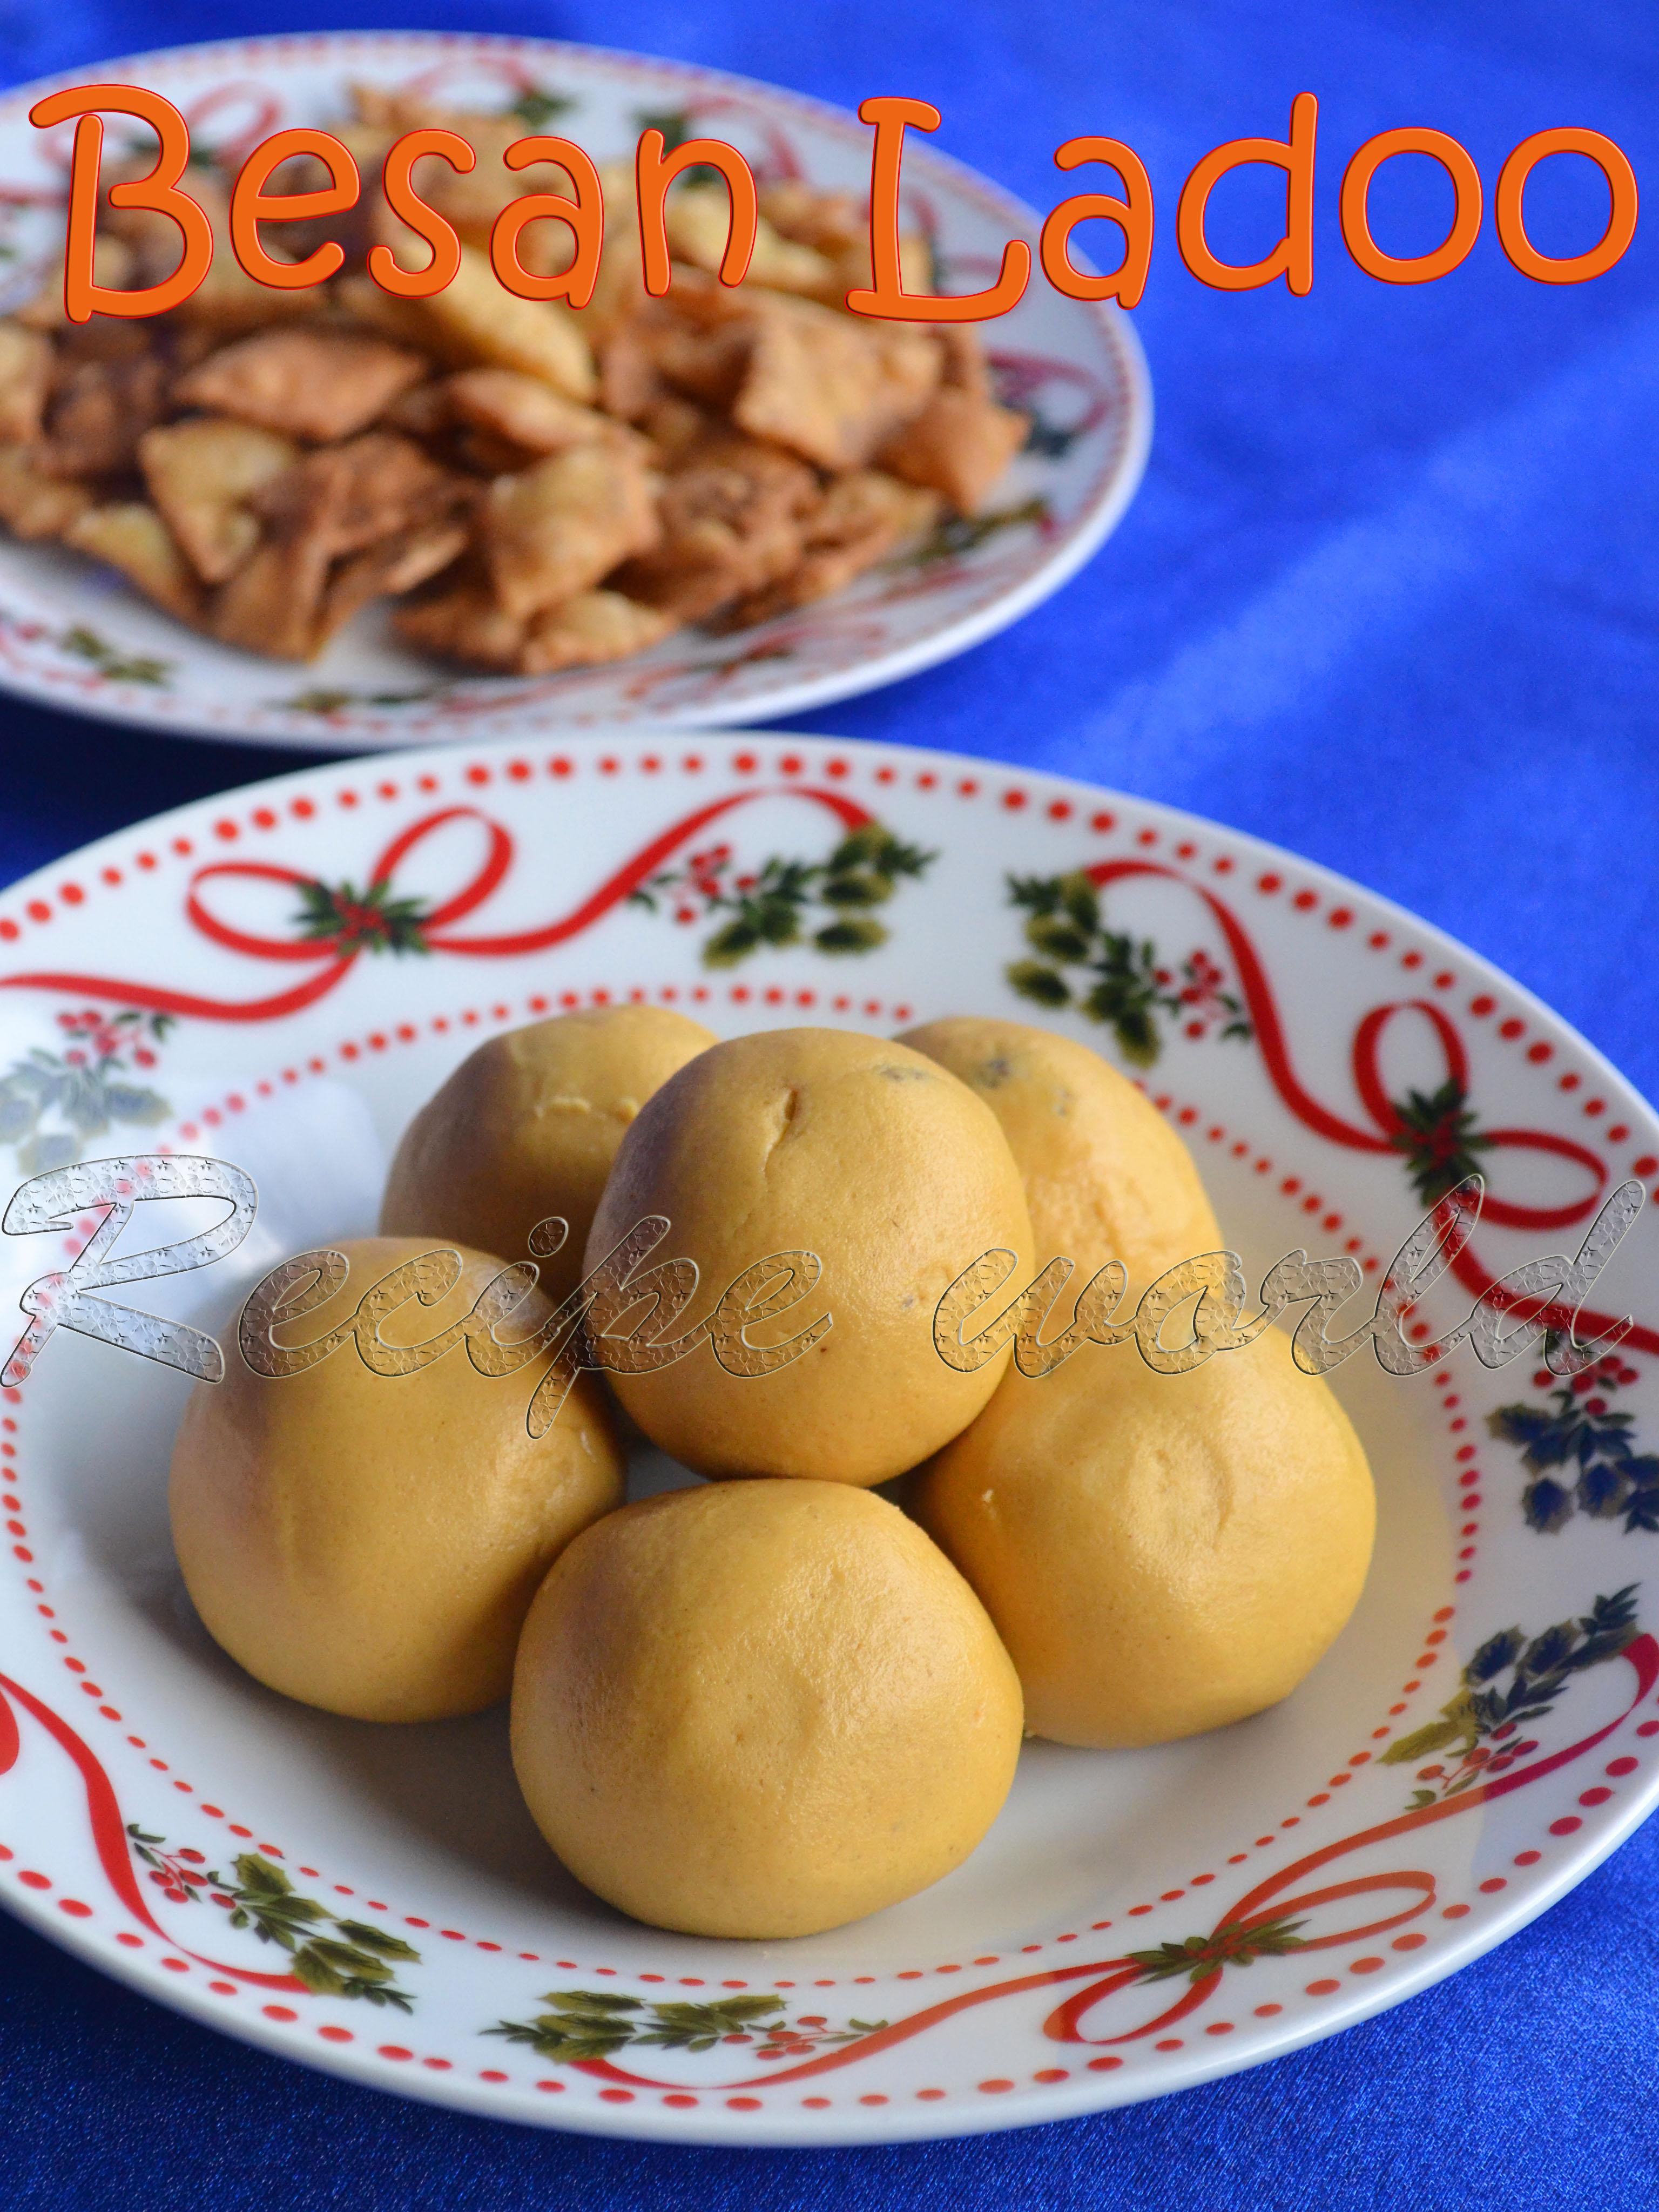
Besan Ladoo is one among those famous sweets which are prepared during special occasions in India. In my home, we three are huge fans of these delicious sweet balls. Being made of besan flour along with generous amount of ghee, sugar, dry fruit and nuts, its good for health too.
Below is the recipe of Besan Ladoo, try them and enjoy with your loved ones!


Preparation time: 40 minutes
Yield: 8 Ladoos
Difficulty level: Medium

Ingredients:

  • Besan flour / Gram flour - 2 cups (1 cup= 125 gm)
  • Sugar - 1 cup
  • Ghee / clarified butter - 3/4 cup minus 1 tbsp
  • Cardamom / Elachi powder - 1 tsp (See Tips)
  • Raisins - 15
  • Broken cashews - 2 tbsp


Method:

  • Combine besan flour and ghee in a heavy bottom pan and keep stirring it on low flame till nice aroma comes.
  • When the flour is toasted half - way, add raisins and broken cashews and continue toasting. Otherwise, you can toast them separately with few drops of ghee and mix with the flour after its toasted.
  • Take the sugar and make a fine powder out of it.
  • Allow the toasted flour to cool down for a while till it becomes lukewarm. Add powdered sugar and cardamom powder. Mix it well. 
  • Make equal sized balls from the mixture. Store them in an air tight container.


Tips:
  • If you add more ghee to this recipe, mixture will become very soft and the ladoos won't hold the shape. In such cases, you can refrigerate the ladoos for around 15 - 20 minutes immediately after preparing them.
  • If cardamom powder is not there, mix the cardamom seeds along with sugar while powdering it.


Its the summer season in India now. We were on a vacation to India last month. Since the mango season has started, we enjoyed eating varieties of mangoes there. In my home, everyday we were having one or the other dish prepared from mango for the lunch. 
Ripened mangoes are also good for preparing few types of curries like Neer Gojju, Sasive, etc. We get a wild mango variety called 'Sasive Maavu' at our place which has a sweet and sour taste. It is good for preparing curries like Saasive and Neer Gojju. I am sharing the recipe of Mango Neergojju with you all today. Try this simple and tasty curry before the mango season ends!


Preparation time: 20 minutes
Serves - 4
Difficulty level: Medium

Ingredients:

  • Saasive mango / wild mangoes - 5 to 6
  • Liquid jaggery (Joni bella) - 7 tbsp or to taste
  • Salt - 1 1/4 tsp or to taste
  • Water - 2 cups


For tempering: Oil - 3 tsp, Dry red chilli- 1, Urid dal - 1 tsp, Mustard seeds - 1 1/4 tsp, Asafoetida / Hing - a pinch, Green chilli - 1, Curry leaves - 4 or 5

Method:

  • Wash the mangoes cleanly. Peel off the green skin and put them in a mixing bowl.
  • Add salt and jaggery to the mangoes and squeeze the mangoes nicely. Add water and leave it for ten minutes. Check and adjust the taste.
  • Heat oil in a small wok. Add red chilli pieces, urid dal, mustard seeds and asafoetida. Once the mustard seeds start crackling, add curry leaves and slit green chilli. Saute it for a minute and switch off the flame. 
  • Add the seasoning to the mango mixture and mix it nicely.
  • Serve this sweet - sour curry along with rice!


ಕನ್ನಡ ಆವೃತ್ತಿ 
Amla or Indian Gooseberry is well known in Ayurveda because of its medicinal values. It is told that eating one Gooseberry daily is good for our health. Gooseberry is commonly used in varieties of pickles, murabba, squash, chyavan prash, chutney, tambli, etc. Gooseberry is good for keeping the hair and skin healthy. For all the stomach related problems, gooseberry is a good remedy.
During our school days, we used to pick fresh gooseberries when its the season and were dipping them in water with added salt and crushed hot chillies. They taste very good and we enjoyed eating them daily.
One of my friends was asking me couple of months back to share the recipe of Gooseberry Pickle. I prepared the pickle and clicked the picks to share, but didn't get time to share! Now, after coming back from my India trip, I am sharing the recipe of Gooseberry Pickle with you all. Do try this pickle when you get gooseberries next time and share your feedback!


Preparation time: 35 - 40 minutes
Difficulty level: Medium
Yield: 400 to 450 gm pickle (approx)

Ingredients:

  • Indian Gooseberry / Amla - 340 gm (14 - 15 large gooseberries)
  • Water - 2 cups (1 cup = 180 ml)
  • Salt - 10 tbsp or as needed
  • Asafoetida / hing - 1/2 tsp
  • Jeera / Cumin seeds - 1 1/2 tsp
  • Turmeric powder - 1/2 tsp
  • Mustard seeds - 3 1/2 tsp
  • Red chilli powder - 6 tbsp (or as needed)
  • Lemon - 1 large


For tempering: Oil - 5 tbsp, Mustard seeds - 1 tsp, Asafoetida - big pinch

Method:

  • Take 2 cups of water, add around 4 table spoon of salt to it. Bring it to boil. After its boiled for 4 - 5 minutes, add gooseberries. Cook them for 4 - 5 minutes and switch off the flame. Close the lid and allow to cool.
  • Dry roast cumin seeds, mustard seeds and asafoetida till aromatic. Add turmeric powder and switch off the flame. Make it a fine powder along with 2 tbsp of salt.
  • When the gooseberries are cool, cut them and separate the seeds. Don't discard the salt water.
  • Take the gooseberry pieces in a mixing bowl. Add the pickle masala powder you prepared before. Add red chilli powder as required. Add around 7 tbsp of salt water to adjust the consistency. Also add lime squeeze and mix it nicely. Check and adjust the taste. 
  • Heat oil in a wok. Temper with mustard seeds and asafoetida. Once it cools down, mix it with the pickle.
  • Enjoy the tasty pickle with rice and curd!


Tips:

  • If fresh gooseberries are not available, you can you frozen ones! I have used frozen gooseberries here.


ಕನ್ನಡ ಆವೃತ್ತಿ 
Its the peak summer here..hot days makes us feel tired all the time. Drinking plenty of water and other cool drinks will give some kind of relief. Since its too hot outside, we prefer having more of juice and milkshakes these days instead of tea and coffee. These home made cool drinks are good for our health more than tea and coffee!
My daughter is a big fan of strawberries these days. Whenever we insist her to have some fruits, she demands for strawberries! So whenever I have more strawberries in the fridge, I will preserve some in the freezer for her emergency needs! And sometimes, those fruits will be used to prepare delicious milkshakes just like this!


Preparation time: 10 minutes
Servings: 2
Difficulty level: Easy

Ingredients:
Strawberries (fresh / frozen) - 250 gm
Cold milk - 300 ml
Sugar - 2 to 3 tbsp or to taste
Ice cream - 2 tbsp

Method:
Clean the strawberries and chop them roughly.
Combine sugar and chopped strawberries in a mixie or blender and make a smooth paste. Add little milk, if needed.
Once its blended nicely, add the remaining milk and blend it till everything is combined well.
Finally, add ice cream and blend it for half a minute.
Thats all, delicious Strawberry milkshake is ready to serve!


Tips:
If you want to reduce the quantity of milk, use 200 ml milk and 100 ml of water.

Gadbad Ice cream is a famous dessert of Karnataka. As I read in Wiki, its the signature dish of a ice cream parlour based at Mangalore. Me and my Hubby both are big fans of Gadbad Ice cream. Every time we visit our native place Sirsi, we will visit the ice cream parlour at least 2 - 3 times just to enjoy Gadbad Ice cream!
Layers of chopped fruits, ice cream jelly, dry fruits and nuts make this ice cream delicious and rich in taste. I love to prepare Gadbad Ice cream at home when I have ripened mangoes in my pantry. Try this delicious ice cream and let me know your feedback!


Preparation time: 30 - 35 minutes
Refrigeration time: 1 hour
Servings: 2
Difficulty level: Medium

Ingredients:
  • Ripened mango - 1
  • Apple - half slice
  • Banana - 1
  • Sugar - 2 tbsp
  • Raisins - 3 tbsp
  • Broken cashews - 4 to 5 tbsp
  • Cherries (for decoration) - 2
  • Tutti frutti (optional) - 2 to 3 tbsp
  • Ice cream - as required

Method:
  • Chop apple, mango and banana finely. Combine them in a mixing bowl. Add around 2 tbsp of sugar or according to taste. Mix it well and keep in the refrigerator for an hour.
  • Meanwhile, dry roast the broken cashews into golden brown and keep aside.
  • Take 2 serving glasses. Add one layer of chopped fresh fruits in both the glasses. Top it with raisins and cashews. You can also add tutti frutti. Add around 2 tbsp of ice cream on its top. Repeat these layers again one or two times as per your wish. 
  • After you add the final layer of ice cream, garnish it with raisins, cashews and tutti frutti. Top it with cherry and serve immediately.


Tips:
  • Orange, sapota (chikkoo) and pineapple fruits also go well for this ice cream. Fruits which I have mentioned in the recipe are not compulsory; You can try it with your favorite combo of fruits.
  • You can add different flavors of ice cream for each layer to make it rich and more colorful.

ಕನ್ನಡ ಆವೃತ್ತಿ
Different kinds of leafy vegetables are part of our healthy diet. They are good source of various nutrients and taste delicious as well. One among those leaves is Amaranth Leaves. We buy it often from the vegetable market. Amaranth leaves are a good source of calcium, iron and vitamins. They are good for preparing stir fry, sambar, hashi, saasive and other side dishes.
Below is the recipe of Amaranth Leaves Stir Fry / Harive Soppina Palya..


Preparation Time: 20 - 25 minutes
Serves: 2
Difficulty level: Medium

Ingredients:
  • Amaranth leaves / Harive soppu - 1 bunch
  • Dry red chillies - 2 or 3 (adjust according to taste)
  • Urad dal - 1 tsp
  • Mustard seeds - 1 tsp
  • Asafoetida / Hing - a pinch
  • Turmeric powder - 1/8 tsp
  • Cooking oil - 3 tbsp
  • Grated coconut - 1/2 cup
  • Salt to taste
  • Amchur powder - for taste
  • Jaggery / sugar - 1/4 tsp or according to taste (see Tips)
  • Onion (optional) - 1

Method:
  • Wash the amaranth leaves in clean water thoroughly. Chop them finely. Include the tender stems also while chopping.
  • Heat the oil a heavy bottom pan. Add broken red chillies, urid dal and roast them for a minute. When the urid dal turns into light brown color, add mustard seeds and asafoetida. 
  • When the mustard seeds start crackling, add the turmeric powder and saute it once. Now add the chopped amaranth leaves and mix it well. Quickly find the broken red chillies in them which are crunchy after frying, powder them coarsely using your fingers or with the help of laddle. Add the powdered chillied back to the seasoned mixture.
  • Cover the lid and allow the mixture to cook on medium flame. No need to add any water, since the water content in the leaves will be enough for cooking them.
  • Stir the mixture regularly. Once the leaves are almost cooked, add salt, amchur powder and jaggery / sugar for taste.
  • Add grated coconut after 2 - 3 minutes. Also add the chopped onion, if using. I have added onion here.
  • Cook it for 5 more minutes and turn off the flame.
  • This stir fry tastes delicious with rice, chapathi or poori.


Tips:
  • Add only 1/4 tsp of jaggery / sugar for this stir fry if you don't want to make it sweet. If you like sweet taste, add more jaggery / sugar according to taste. And if making it sweet in taste, don't add onion.


Makara Sankranti is one of the famous festivals which is celebrated by Hindus. January is the month when different agricultural crops are ready for harvest. Makara Sankranti is known as the festival of harvests. In different parts of India, this festival is celebrated with different names like Pongal, Bogi Pallu, etc.
At my native, we prepare 'Sankranti Kalu', tiny balls of sugar syrup which will have sesame seeds inside. Being kids, we were enjoying eating them during those days. All the people in the household along with friends and relatives enjoy eating them with other festive specials. This festival will end up with a sweet note - 'Eat sweet and talk sweetly'!
Most of the people prefer buying Sankranti Kalu from the shops since preparing them at home is a hectic job. At my moms place, they usually prepare Sankranti Kalu at least in small quantity for offering to the God. Me too prepared it at home this time for my Kiddo :)


Preparation time: 4 hours approx
Difficulty level: difficult
Yield - 1 small bowl full

Ingredients:
  • White sesame seeds / Till seeds - 4 tsp
  • Sugar - 3 cups (1 cup = 110 gm)
  • Water - 1 1/4 cup
  • Milk - 4 tbsp
  • Lime juice - 1 tsp
  • Muslin cloth
  • Food colors - optional

Method:
  • Combine sugar and water in a vessel and bring it to boil. Once it starts boiling, add 2 tbsp of milk and 1/2 tsp lime juice to it. This is to remove any impurities in it.
  • After boiling it for 3 - 4 minutes, it curdles and you can see a white layer on the top of syrup. Filter the syrup using a muslin cloth. Repeat this step one more time.
  • When the sugar syrup reaches one string consistency, turn off the flame and allow it to cool. Now, purified sugar syrup is ready to use.
  • While making Sankranti Kalu, if the sugar syrup gets thick at any stage, add a little water and heat it to attain one string consistency again.
  • Take a wide pan and allow to heat it on low flame. Add 4 tsp sesame seeds and 3 drops of sugar syrup. Keep mixing it nicely with your fingertips and take care not to burn the hands. Try to keep the seeds separately; Make sure that sesame seeds not sticking to one another by the time the sugar syrup coating is dried.
  • Whenever you feel like the pan is hot, take the pan out of the stove top and keep mixing the sesame seeds continuously till its warm enough. Put it back on the stove top again and continue the process. 
  • Once the sugar syrup on the sesame seeds is completely dried, add 3 - 4 drops of again and keep mixing them continuously. Repeat this process till they reach the size of coriander seeds. 
  • If adding colors, add a pinch / drop of food color to 1/2 tsp of sugar syrup and mix it. Add 3- 4 drops of this colored syrup to a small quantity of Sankranti Kaalu and mix it on the stove top till its dried. Do it one more time so that the color will be coated nicely. You can add different colors like this.


Tips:
  • Fennel seeds / Saunf or groundnuts will also taste good when they are coated with sugar syrup in the above way. I have 2 batches here, one with sesame seeds and another with fennel seeds and have mixed both of them.
  • Preparing Sankranti Kalu at one stretch is very hard. If the sugar syrup is ready, you can invest 1hour daily and finish doing it within 4 - 5 days.
  • Natural colors like turmeric, beetroot juice, saffron, etc.are good to use instead of artificial food colors. 
  
ಕನ್ನಡ ಆವೃತ್ತಿ

Chips are perfect snacks for tea time! Varieties of chips can be prepared using different vegetables. At my native place, people prepare chips using vegetables like raw banana (plantain) chips, raw jack fruit chips, bread fruit chips, sweet potato chips, etc. Raw banana (plantain)s are available in all the seasons and hence, one can prepare Raw Banana Chips anytime. There are different varieties of bananas, the one known as 'Nendra Baale' is one among them, which is perfect for preparing chips.
Both me and my hubby like varieties of chips prepared at our native place. Since it has been a while we visited native, sometimes we miss the native style food here. Whenever I find raw banana (cooking banana)s in Indian stores, I remember those crunchy and tasty chips prepared at my native. One fine day, I prepared chips using those cooking bananas which were there in the pantry. I came out nice and after adding my mom's style masala powder, it tasted the same like the native one. After this trial, I'm happy that I can prepare my favorite Banana Chips anytime!
Here is the recipe of Raw Banana Chips / Plantain Chips..


Time required: 1 hour
Servings: 5 - 6
Difficulty level: Medium

Ingredients:
Raw bananas - 5
Chips Masala Powder - 4 tbsp
Salt to taste
Oil for deep frying

Method:
Take around 5 cups of water in a wide vessel and add 4 - 5 drops of cooking oil. Peel the raw bananas and keep them in this water.
Take the peeled bananas one - by - one, rub them in a dry cloth, chop them into thin slices.
Heat oil in a heavy bottom pan. Deep fry the sliced bananas on medium flame till crispy and/or golden brown.
Spread the fried chips on a tissue paper for a minute or to in order to absorb the excess oil.
Transfer the chips to a wide bowl. Add Masala powder and salt, as required. Toss it nicely and ensure that masala powder and salt is coated evenly.
Enjoy the crispy crunchy chips with a cup of Tea or Coffee!
If preserved in an airtight container, chips will remain fresh for at least upto a month.


Tips:
Instead of Masala powder, you can add turmeric powder and hing (asafoetida) for flavoring.
Sunflower oil and coconut oil are good for frying raw banana chips.
Soaking the peeled bananas in water is to avoid them from ripening. If you are using the peeled bananas quickly, then no need to soak in water.

Palak Paneer, is a famous side dish from North Indian cuisine. Paneer cubes are dipped in Spinach gravy with added spices, which tastes delicious with Chapathi, Roti and Poori. 
Palak plants are easy to grow even in your balcony. One of my friends have gone for vacation last month and she had left her plants at my place. She gave me her spinach plants and shared a nice tip. Don't take out the whole plant when it is ready for plucking. Take out only the grown up leaves and leave the plant to grow again. This works nicely and the leaves are again ready for plucking within 3 weeks! I had planted some spinach plants in our backyard when we were in Adelaide, but I didn't knew about this. Hope this tip will be useful for you as well!
And, wish you all a very happy and prosperous new year! 
Below is the recipe of Palak Paneer:


Time required: 30 minutes
Servings: 3
Difficulty level: Medium

Ingredients:
  • Spinach leaves - 1 big bunch
  • Tomato - 1
  • Onion - 1, medium sized
  • Grated ginger - 1 tsp
  • Grated garlic - 1 tsp
  • Cumin seeds - 1 tsp
  • Coriander powder - 1 1/2 tsp
  • Garam masala powder - 1/2 tsp
  • Red chilli powder - 1 1/4 tsp or according to taste
  • Salt to taste
  • Lime squeeze - 1 tsp or to taste
  • Paneer / Cottage cheese - 300 gm or as required
  • Cooking oil - 7 tbsp
  • Water - 3 cups approx


Method:
  • Chop the tomato finely. Grate the onion using a vegetable grater and keep ready.
  • Wash the spinach leaves thoroughly and cook them in 1 1/2 cups of water. Add more water if required. 
  • Once the spinach is cooked, turn off the flame and allow to cool. Drain the remaining water and keep aside. Grind the spinach leaves into smooth paste.
  • Cut the paneer / cottage cheese into medium size cubes. Shallow fry them with little oil on hot tava till golden brown and keep aside.
  • Heat 5 - 6 tbsp of oil in a heavy bottom pan. Add cumin seeds and saute for a while. Then, add grated ginger and garlic. Saute them till the raw smell is gone.
  • To this, add grated onion and cook it till turns into light brown color.
  • Add finely chopped tomato and 1/4 tsp salt and mix well. Cook it covered. 
  • Keep mixing it regularly and once tomato is cooked and the mixture starts leaving oil from the sides, add the spinach paste. Add water as required to make it gravy and salt to taste. You can use the drained water left after cooking the spinach. 
  • Now add the coriander powder, garam masala powder and red chilli powder. Mix it nicely and allow the mixture to boil for 3 - 4 minutes.
  • After you turn off the flame, add lime juice for taste and mix it well. 
  • Finally add the Paneer cubes and mix everything slowly.
  • Serve it hot with Chapathi, Roti or Poori.


Tips:
  • If you have the paneer at home, you can use the left over paneer water for this recipe instead of plain water.
  • Green chillies can be used instead of red chilli powder. If using green chillies, you can combine ginger, garlic and green chillies and make a fine paste for using here.

Paneer or Cottage Cheese is a common ingredient in most of the North Indian side dishes. Also, there are varieties of sweets which calls for Paneer as the primary ingredient. Since Paneer is easily available in super markets and convenience stores, most of the people prefer to buy them instead of preparing it at home. If you have enough time, preparing Paneer at home is not a big deal. 
Here is the recipe of Home - made Paneer..


Time required: 30 - 35 minutes
Hanging time and refrigeration time: 2 hours
Yield : 25 pieces

Ingredients:
  • Full cream milk: 1 1/4 liter
  • Half lime
  • A Muslin cloth


Method:
  • Heat the milk in a vessel and bring to boil. 
  • Once it starts boiling, add 1 table spoon of lime juice and stir it nicely. Keep it on medium flame and stir regularly.
  • After 1 - 2 minutes, add one more spoon of lime juice. You can see the milk starts curdling slowly. 
  • Add little more lime juice if required. Keep stirring the mixture regularly. 
  • After boiling it for 15 - 20 minutes, all the fat separates and the water turns into pale green color. 
  • Switch off the flame and pour the mixture onto the muslin cloth. 
  • Expose the mixture to tap water once, to remove the citrus content. 
  • Tie the paneer mixture inside the cloth and hang it onto a hook or tap for 1 1/2 hours.
  • Then, spread the paneer mixture on a flat surface and knead it nicely without any lumps.
  • Pat it into a square or rectangular shape and keep refrigerated for 30 minutes.
  • Take out the paneer and cut into desired shapes.
  • While adding paneer cubes to any side dishes, shallow fry them on the tava to avoid them from breaking.
 

Tips:
  • Dont discard the water which you get while preparing the paneer. This water, known as Paneer Ka Pani is good for health. You can replace the plain water for side dishes with Paneer Ka Pani.

Don't know whether I am becoming more busy (or lazy!) these days, its becoming tough for me to invest time for blogging. We were roaming around different places during the week-ends and kiddo keeps me busy during the week days! Even I tried varieties of dishes, but couldn't click the picks being with her.
We had a memorable Diwali celebration this time. There are more Indians in our locality. So, we took part in Diwali celebrations at different places. We celebrated the festival at home one day. I had prepared Holige / Obbattu for Diwali this time. In fact I prepared Seven Cup Burfi and Mysore Pak too! But they were for kiddos playgroup and hubby's office.
There are different ways to prepare this Tovve. My version was slightly different earlier; after I learned this version from my friend Maitri, I just shifted to this method. Try this simple and easy curry and let me know your feedback!


Preparation time: 20 minutes
Serves: 2
Difficulty level: Easy

Ingredients:
  • Moong dal - 1/3 cup (1 cup = 70 gm approx)
  • Water - 4 cups
  • Turmeric powder - big pinch
  • Ginger (crushed) - 1 1/2 inch
  • Green chilly - 2 nos (adjust according to taste)
  • Asafoetida / hing - big pinch
  • Salt - for taste
  • Finely chopped coriander leaves - 2 tbsp
  • Lime - half slice

For tempering: Ghee / clarified butter - 1 1/2 tsp, cumin seeds - 1 tsp, Mustard seeds - 1 tsp


Method:
  • Wash the moong dal in clean water. To this, add around 3 cups of water, big pinch of turmeric and 2 - 3 drops of cooking oil. Pressure cook for 1 whistle. You can cook it directly on the stove top; it takes little longer to cook. 
  • Once the moong dal is 3/4th cooked, add crushed ginger, slit green chillies, hing, salt and lime squeeze for taste. Add little more water if required. Let it boil nicely for 5 minutes and then, add the chopped coriander and turn off the flame.
  • Heat ghee in a small wok. Add mustard seeds and cumin seeds. Once it starts crackling, mix it with the prepared Tovve or Dal mixture.
  • Serve it hot with rice and pickle!

Tips:
  • Lime squeeze can be added either before boiling the mixture or at the end. Anything is fine!

Mysore Pak is one among those famous Indian sweets which are prepared during festivals and special occasions. With the nice aroma and flavor of ghee, this sweet tastes divine and just melts in your mouth!
Mysore Pak is my favorite sweet ever and of course, this is the first sweet recipe I learnt! My Aunt is an expert in preparing Mysore Pak. She uses fresh home made ghee for preparing this sweet and everybody at home loves to have this delicious sweet. Preparing Mysore Pak is not that difficult, but experience makes you perfect! You need to know the right time and consistency to take out the mixture from the flame. And freshness of the ingredients i.e., ghee and gram flour / besan flour also matters a lot.
Mysore Pak can be prepared using Dalda/Vanaspati or other oils also, instead of ghee. I prefer using half - ghee and half - sunflower oil. Try this Mysore Pak recipe at your home and let me know your feedback!


Preparation time: 35 minutes
Yield: 45 small pieces
Difficulty level: Difficult

Ingredients:
  • Besan flour / chickpea flour / gram flour - 1 cup (1 cup = 100 gm approx)
  • Sugar - 1 1/2 cup
  • Ghee / clarified butter - 1 cup
  • Sunflower oil - 1 cup
  • Salt - a pinch
  • Cooking soda - a pinch
  • Water - 3/4th cup + 3 tbsp


Method:
  • Combine sugar and water and bring to boil. By the time it reaches two string consistency, we need to roast the besan flour.
  • Take 1/2 cup of ghee in a wide pan. Add besan flour and roast it on low flame till nice aroma comes. Add a pinch of salt once its done.
  • Heat the oil and the remaining ghee separately and keep ready.
  • Once the sugar syrup reaches 2 string consistency, add it to the roasted besan flour and mix well. Keep mixing it continuously on medium flame.
  • Add 2 - 3 table spoons of oil at a time to the flour mixture. Once the oil is absorbed in the mixture, add 2 - 3 tbsp of oil again. Repeat it till all the oil gets over. Then repeat the same thing with ghee.
  • At one stage, the mixture starts leaving the oil from the sides or bubbles start coming up and the mixture starts leaving the ladle. 
  • Quickly add a pinch of cooking soda, mix it nicely and turn off the flame.
  • Pour the mixture onto a wide plate and allow to set down.
  • After 3 - 4 minutes when the mixture becomes slightly hard, cut it into desired shapes using a knife. Allow it to cool completely.
  • Separate the pieces after its completely cool. Enjoy the home made Mysore Pak with your family!


Tips:
  • If you wont like to use any oil, can use 2 cups of ghee instead.
  • If the quality of besan flour is not good, you may not be able to get the perfect Mysore Pak sometimes.
  • Make sure that the ghee and oil will be slightly hot while preparing this sweet. It will give a nice crispy texture to the Mysore Pak. 


After coming back from work, having a cup of hot tea blended with spices is my Hubby's daily routine. We all would like to have some snacks along with evening tea, with lot of talk and laughter since it is the relaxing time for us! Me and Hubby prefer home made snacks all the time and so, I maintain at least 2 - 3 varieties of snacks in my pantry most of the time. Just like every other kid, my daughter also loves the store bought biscuits and snacks. So, we buy her favorite snacks sometimes from the stores.
Cornflakes Mixture is one of the tea time snacks which I prepare. We do buy plain cornflakes to make breakfast on lazy days, but most of the time I will use it for making the Mixture. This mixture is easy to make and goes well with your cuppa tea! 


Preparation time: 5 - 10 minutes
Servings: 15 approx
Difficulty level: Easy

Ingredients:
  • Plain Cornflakes (Breakfast cornflakes) - 5 cup (measured in big cup)
  • Groundnut - 1/2 cup
  • Almonds - 3 tbsp
  • Broken cashews - 1/8th cup or more
  • Raisins - 20
  • Dalia split - 3 tbsp
  • Urid dal - 1 tsp
  • Mustard seeds - 1 tsp
  • Turmeric powder - 1/4 tsp
  • Masala powder - 1 1/2 tsp or to taste
  • Curry leaves - 1 strand
  • Oil - 10 to 11 tbsp
  • Salt to taste
  • Powdered sugar - 1 1/2 tsp or for taste

Method:
  • Cornflakes can be used directly if its crispy. Else, you need to toast them on low flame or oven - roast them for few minutes till it becomes crispy.
  • Heat oil in a heavy bottom pan. Add almonds and ground nuts and saute for 2 - 3 minutes.
  • Add the broken cashews and saute for a minute. Then add raisins, split dalia, urid dal and mustard seeds. Once the mustard seeds start crackling, add turmeric powder. Saute them till raisins puff up.
  • Then add curry leaves and saute for a minute. Add the Masala Powder and turn off the flame.
  • Add salt and sugar powder for taste. 
  • Fold in the cornflakes and mix everything nicely. Check and adjust the taste, it required.
  • Transfer the Mixture onto an air tight container and use as required. 
  • Cornflakes mixture is a perfect snack for tea time. This mixture goes well with Rava Upma and Seasoned Poha too!

Shrikhand is one of the famous sweet dish from Indian cuisine. This delicious sweet is prepared using minimal and easily available ingredients. Adding of saffron, dry fruits and nuts makes it more rich in taste. Amrakhand is also a variation of Shrikhand, which contains the goodness of mangoes. 
Shrikhand can be served as a dessert or side dish. It tastes good with Poori, Dosa and Tellevu. Try this easy dessert at home and let me know your feedback!


Preparation time: 15 - 20 minutes
Time to hung the curd: 7 - 8 hours
Serves: 5 - 6 
Difficulty level: Easy

Ingredients:
Hung curd - 1 1/2 cup
Powdered sugar - 3/4 cup or to taste
Cardamom / Elachi powder - 1/2 tsp
Saffron strands - 10 to 12

Method:
Take the hung curd in a large vessel and beat it for few minutes without lumps.
To this, add the powdered sugar, saffron strands and cardamom powder. Beat it till everything is combined well. 
Serve is as it is or refrigerated. Add few pieces of pista if you would like to.
It can be served as dessert or as side dish with Poori, Dosa and Tellevu.


Tips:
How to prepare hung curd: Pour the curd on a muslin cloth, tie it and hang it to a hook or a tap. Put a vessel below the hung curd to collect the excess water. Keep it overnight or 7 - 8 hours and then, take out the curd.
If not using saffron strands, add 3/4 tsp of cardamom powder instead of 1/2 tsp. 


Blueberries are one of among the Baker's favorite fruits. As the name indicates, these pretty fruits are blue in color and have a sweet and a bit sour taste. I had eaten fresh blueberries quite a few times, but never used them in baking. Last month, we bought the frozen ones to prepare smoothie and I thought of preparing Blueberry Muffins for the kiddo with the leftover fruits. 
Whenever I plan to bake something, I need to think of the egg substitute first, since we wont eat eggs. This time, I decided to use milk to prepare my muffins. Experiment went on well and the muffins tasted good. But I felt like some more improvement is needed. Next time, I replaced milk with curd in the same recipe and yippee..muffins came out perfect!
I have tried this recipe several times and yes! now its the time to share the recipe with you all!! Here is the recipe of Egg less Blueberry Muffins..


Preparation time: 15 minutes
Baking time: 23 - 25 minutes
Yield: 6 muffins 
Difficulty level: Medium

Ingredients:
  • All purpose flour / Maida - 2 1/2 cup (1 cup = 70 gm)
  • Sugar - 1 cup
  • Curd - 1 cup
  • Baking powder - 1 1/4 tsp
  • Baking soda - 3/4 tsp
  • Cooking oil - 1/2 cup
  • Vanilla essence - 3/4 tsp
  • Salt - pinch
  • Blueberries - 1/2 cup

Method:
  • Preheat the oven to 200°C. 
  • Sieve all purpose flour 2 - 3 times and keep aside.
  • Combine curd and sugar in a mixing bowl and dissolve the sugar completely.
  • To this, add baking powder, baking soda and mix it slowly. Leave it for 2 - 3 minutes to rise.
  • Add oil, pinch of salt and vanilla essence to the curd mixture and mix it lightly.
  • Fold in the all purpose flour in small batches and mix it slowly without lumps. This batter will be thicker than the regular cake batter. If you find it too hard to mix, you can add 1 - 2 spoon of milk. For me, it was fine and I didn't add any milk.
  • Finally add the blueberries to the muffin batter and mix it well.
  • Fill the batter in lined muffin cups up to 3/4th level and leave some space for them to rise. This batter would be sufficient to make 6 medium sized muffins.
  • Keep the muffin tray inside the oven and bake for 23 - 25 minutes or till done. Check the muffins after baking for 20 minutes. If the toothpick or knife inserted comes out clean, its the indication that the muffins are done.
  • Take out the muffins and keep them on a cooling rack. 
  • Enjoy the home made Egg less Blueberry Muffins with your family!


Tips:
  • I have used frozen blueberries here; fresh blueberries also goes well for this recipe.
  • Don't add more blueberries than mentioned above. Once I had added 3/4th cup of blueberries instead of 1/2 cup. It was too moist and the texture was not to good.


Ash gourd, also known as winter melon or white pumpkin, is used for preparing various dishes in Indian cuisine. Apart from regular dishes like Sambar, Majjige Huli, Palya and so on, delicious sweets like Petha and Halwa can also be prepared with this vegetable. Ash gourd is a good source of various nutrients like iron and calcium. Due to its nutritional facts, I love to use it in my cooking frequently.
Kashi Halwa is a well known sweet dish prepared using Ash Gourd. Its a traditional sweet in Indian cuisine, I had tried it this time with slight variation. It was delicious and my family liked this sweet. I am sharing the recipe of Kashi Hawa / Ash Gourd Halwa here..try it and enjoy with your family!


Time required: 30 - 35 minutes
Servings: 6
Difficulty level: Medium

Ingredients:
  • Grated ash gourd (after squeezing the water content) - 1 cup (1 cup = 300 gm approx)
  • Khova - 100 gm (yield from 1/2 ltr milk)
  • Sugar - 1 1/2 cup or to taste
  • Ghee / clarified butter - 1/4 cup
  • Chiroti rava - 1/4 cup
  • Salt - pinch
  • Elachi / Cardamom powder - 1 tsp
  • Saffron strands (optional) - 10 to 12  
  • Broken cashews - 3 tbsp


Method:
  • Pressure cook the ash gourd for 2 whistles on medium flame.
  • Melt the ghee in a heavy bottom pan. Fold in the chiroti rava and roast it till aromatic.
  • To this, add the cooked ash gourd and saute it for 2 - 3 minutes. 
  • Add sugar, saffron strands, pinch of salt to the mixture. Cook it on low flame till it becomes thick. 
  • Add Khova and cook it for 5 more minutes and switch off the flame and add the cardamom powder. 
  • Roast the cashew pieces in 1 tsp ghee till golden brown and mix it with Halwa.
  • Thats all, delicious Halwa is ready to serve!
ಕನ್ನಡ ಆವೃತ್ತಿ

At many rural places like my native, various fruits and vegetables are grown in their own estate. Rarely they buy veggies from the markets. Home grown vegetables are always healthy, tasty and are free from harmful chemicals and pesticides. 
Here in Australia, we will grow few veggies like fenugreek leaves, tomato, chillies, etc. in our balcony garden. I love to use various leafy vegetables in my cooking. Few days back, we had got a big bunch of drumstick leaves from the grocery store. I remembered my Mom's way of preparing the Stir Fry and tried the same. It was so tasty and I prepared it one more time! Some recipes like this are always a hit at my home.
Try out this recipe of Drumstick Leaves Stir Fry and enjoy with hot rice!


Preparation time: 25 - 30 minutes
Servings: 6 - 7
Difficulty level: Medium

Ingredients:
  • Drumstick leaves - 1 big bunch
  • Amchur powder - 3/4 tsp or to taste
  • Sugar - 1 1/2 tsp or to taste
  • Salt - for taste

 - For Masala Powder:
  • Cinnamon stick - 1 inch
  • Cloves - 3 or 4
  • Dry red chillies - 7 (adjust according to taste)
  • Shredded coconut or fresh grated coconut - 3/4 cup
  • Chana dal (split) - 4 tbsp
  • Urad dal - 2 tsp
  • Fenugreek seeds - 3/4 tsp
  • Coriander seeds - 1 1/2 tsp
  • Cumin seeds - 3/4 tsp
  • Mustard seeds - 1/2 tsp
  • Asafoetida / hing - pinch
  • Turmeric powder - 1/4 tsp
  • Oil - 1 1/2 tsp

- For seasoning:
  • Oil - 3 tbsp
  • Urid dal - 1 tsp
  • Mustard seeds - 1 tsp
  • Turmeric powder - a pinch


Method:
  • Separate the drumstick leaves from the stems and wash them thoroughly.
  • Next thing is to prepare the Masala Powder. Roast all the ingredients under the heading Masala Powder except shredded coconut in oil. Powder them coarsely. Finally add the shredded coconut and run the mixie for few seconds to make it a course powder.
  • Heat 3 tbsp of oil in a heavy bottom pan. Do the seasoning with urid dal, mustard seeds and pinch of turmeric powder. 
  • Addthe drumstick leaves to the seasoning and fry them on low flame for 8 - 10 minutes or till it gets cooked and changes the color.
  • Add the Masala Powder, salt, sugar and amchur powder and mix it well. Cook it on low flame till it gets nicely hot and switch off the flame.
  • Serve this stir fry as a side dish with Rice or Roti.


Tips:
  • Add chopped onion for this stir fry if you would like to. Add it to the stir fry along with Masala Powder and cook it till the raw smell is gone.
  • You can prepare Capsicum Stir Fry in the same way. Just replace the drumstick leaves with capsicum.
  • I have used shredded coconut for this stir fry. Fresh grated coconut also goes well for this recipe.

Kesari, Shira or Sheera is a popular sweet dish in South India. It is one of the most common sweets prepared in festivals, marriages and other occasions. Also, its one of the easy n rich treats for the unexpected guests! Main ingredient for this dish is Semolina / Sooji Rava. I had posted the Kesari / Shira recipe long back. Pineapple Kesari is a variation of that recipe, with added pineapple and of course, more flavorful!
We had bought pineapple few days back for preparing Pineapple Jam. The fruits were large enough and juicy. There was a quarter piece left after preparing the jam and I used the same for making this Pineapple Kesari. Try this yummy Pineapple Kesari / Sheera and enjoy with your family :)


Time required: 35 - 40 minutes
Servings: 8
Difficulty level: Medium

Ingredients:
Medium semolina / Sooji rava - 1 cup
Sugar - 2 cups
Salt - big pinch
Ghee / clarified butter - 2/3 cup
Hot water - 2 1/2 cup
Grated pineapple (including the juice) - 1/2 cup
Broken cashews - 3 to 4 tbsp
Raisins - few (as needed)
Cardamom / Elachi powder - 1 tsp


Method:
Heat the ghee / clarified butter in a heavy bottom pan. Add the semolina and roast it on low flame for 8 - 10 minutes or till you hear a nice aroma of roasted semolina.
Meanwhile, bring the water to boil and let it be ready by the time semolina is roasted.
Add 2 1/2 cup water and a big pinch of salt to the roasted semolina and mix it nicely. Close the lid and cook it for 7 - 8 minutes. Stir it occasionally.
Once all the water is evaporated and the rava is cooked, add 2 cups of sugar. Mix it, close the lid partially and cook for 8 - 10 minutes on low flame.
Roast the broken cashews in 1 tsp of ghee. Add it to the Kesari mixture.
Finally, add the grated pineapple and mix it well. Cook it for 5 more minutes and turn off the flame.
Serve it hot along with some spicy snacks. Kesari and Kharabath / Uppittu is a well known combo!


Tips:
I usually great the pineapple and use it for this Kesari. Alternatively, you can chop the pineapple into small chunks, puree the same and use it for this sweet.

We have a big Indian grocery store nearby. I love buying few veggies from there which are rarely available in other shops. This time, I bought drumstick leaves from there and enjoyed preparing different dishes. Drumstick leaves has lot of health benefits. Its a good source of Vitamin A, Vitamin C, Calcium and anti oxidants. It helps in the well functioning of heart, eyes and nerves system.
Drumstick leaves add a nice taste to the dishes. I love to prepare delicious Sambar, Stir fry, Dal, Tambli, etc, using these leaves. Let me share Drumstick Leaves - Tomato Sambar recipe today. Its quite easy to prepare, and tastes awesome with rice.


Time required: 30 minutes
Servings: 3 - 4
Difficulty level: Medium

Ingredients:
  • Toor dal - 1 cup (1 cup = 50 grams)
  • Moong dal - 2 tbsp
  • Drumstick leaves - 1 cup
  • Tomato - 1
  • Salt to taste
  • Sugar / jaggery (optional) - 1/4 tsp
  • Tamarind - 1 1/2 tsp or to taste
  • Onion (optional) - 1 small
  • Water - 5 cups approx

Masala for grinding:
  • Dry red chillies - 3 (adjust according to spiciness required)
  • Fenugreek seeds - 3/4 tsp
  • Coriander seeds - 2 tsp
  • Cumin seeds - 3/4 tsp
  • Mustard seeds - 3/4 tsp
  • Asafoetida / Hing - Big pinch
  • Turmeric powder - 1/4 tsp
  • Oil - 1 1/2 tsp
  • Fresh grated / desiccated coconut - 3 tbsp


Method:
  • Chop tomato into medium size pieces.
  • Wash toor dal and moong dal together in clean water. Cook them till soft by adding few drops of oil, pinch of turmeric and 4 cups of water or as required. I have pressure cooked them till 3 whistles.
  • Roast all the ingredients except coconut in oil. Add grated coconut and tamarind with roasted spices and grind them into a smooth paste. Add water as required.
  • Add drumstick leaves and chopped tomato to the cooked dal. Add 1 cup of water, salt and sugar / jaggery for taste. Boil it for 5 minutes.
  • Add the ground masala paste and allow it to boil for 8 - 10 minutes. After boiling for 6 - 7 minutes, add the chopped onions. Boil it for 3 - 4 more minutes and turn off the flame.
  • Serve this delicious Sambar along with hot rice and Papad.

ಕನ್ನಡ ಆವೃತ್ತಿ

If there are kids at home, demand for snacks will obviously be more. This holds good for our house as well and not only the kiddo, we are also snacks lovers! More than deep fried items, we like the baked goodies.
This biscuit recipe caught my eyes sometime back while reading a local magazine. I just gave it a try and the biscuits tasted delicious! Original name of this biscuit is 'ANZAC Biscuit'. As I read in Wiki, the name of these biscuits is associated with Australian and New Zealand Army Corps (ANZAC). During the time of 1st World War, wives of the soldiers were preparing biscuits using flour, rolled oats, desiccated coconut, sugar, etc. They were sending those biscuits to the soldiers which had a good shelf life. There are several ways to prepare these ANZAC biscuits. This recipe was published in a local magazine during the time of ANZAC Day. Original recipe called for Golden Syrup. I have replaced it Honey and it worked out well!
Recipe courtesy: Coles Magazine


Preparation time: 15 - 20 minutes
Baking time: 15 minutes
Yield: 25 - 30 biscuits
Difficulty level: Medium

Ingredients:
  • All purpose flour / Maida - 1 cup (1 cup = 150 gm)
  • Rolled oats - 1 cup
  • Desiccated coconut - 1 cup
  • Butter - 125 gm
  • Brown sugar - 55 gm
  • Caster sugar - 110 gm
  • Honey / Golden syrup - 2 tbsp
  • Bi Carbonate soda - 1/2 tsp
  • Hot water - 1 1/2 tbsp


Method:
  • Preheat the oven to 180°C.
  • Transfer the rolled oats into mixie jar and make it a course powder.
  • Combine all purpose flour, rolled oats, desiccated coconut, brown sugar and caster sugar in a mixing bowl and mix it well. 
  • Heat the honey and butter together and allow the butter to melt on low flame. Stir it occasionally. Once the butter is completely melted, turn off the flame and keep it aside for cooling down.
  • Mix 1/2 tsp of Bi Carbonate soda with 1 1/2 tbsp hot water. Add it to the melted butter and honey.
  • Fold in the flour mixture into melted butter and mix it nicely.
  • Take tablespoons of mixture and roll them into balls. Pat the dough balls and arrange them on a lined baking tray. 
  • Bake the biscuits for 15 minutes and allow to cool.  

NewerStories OlderStories Home