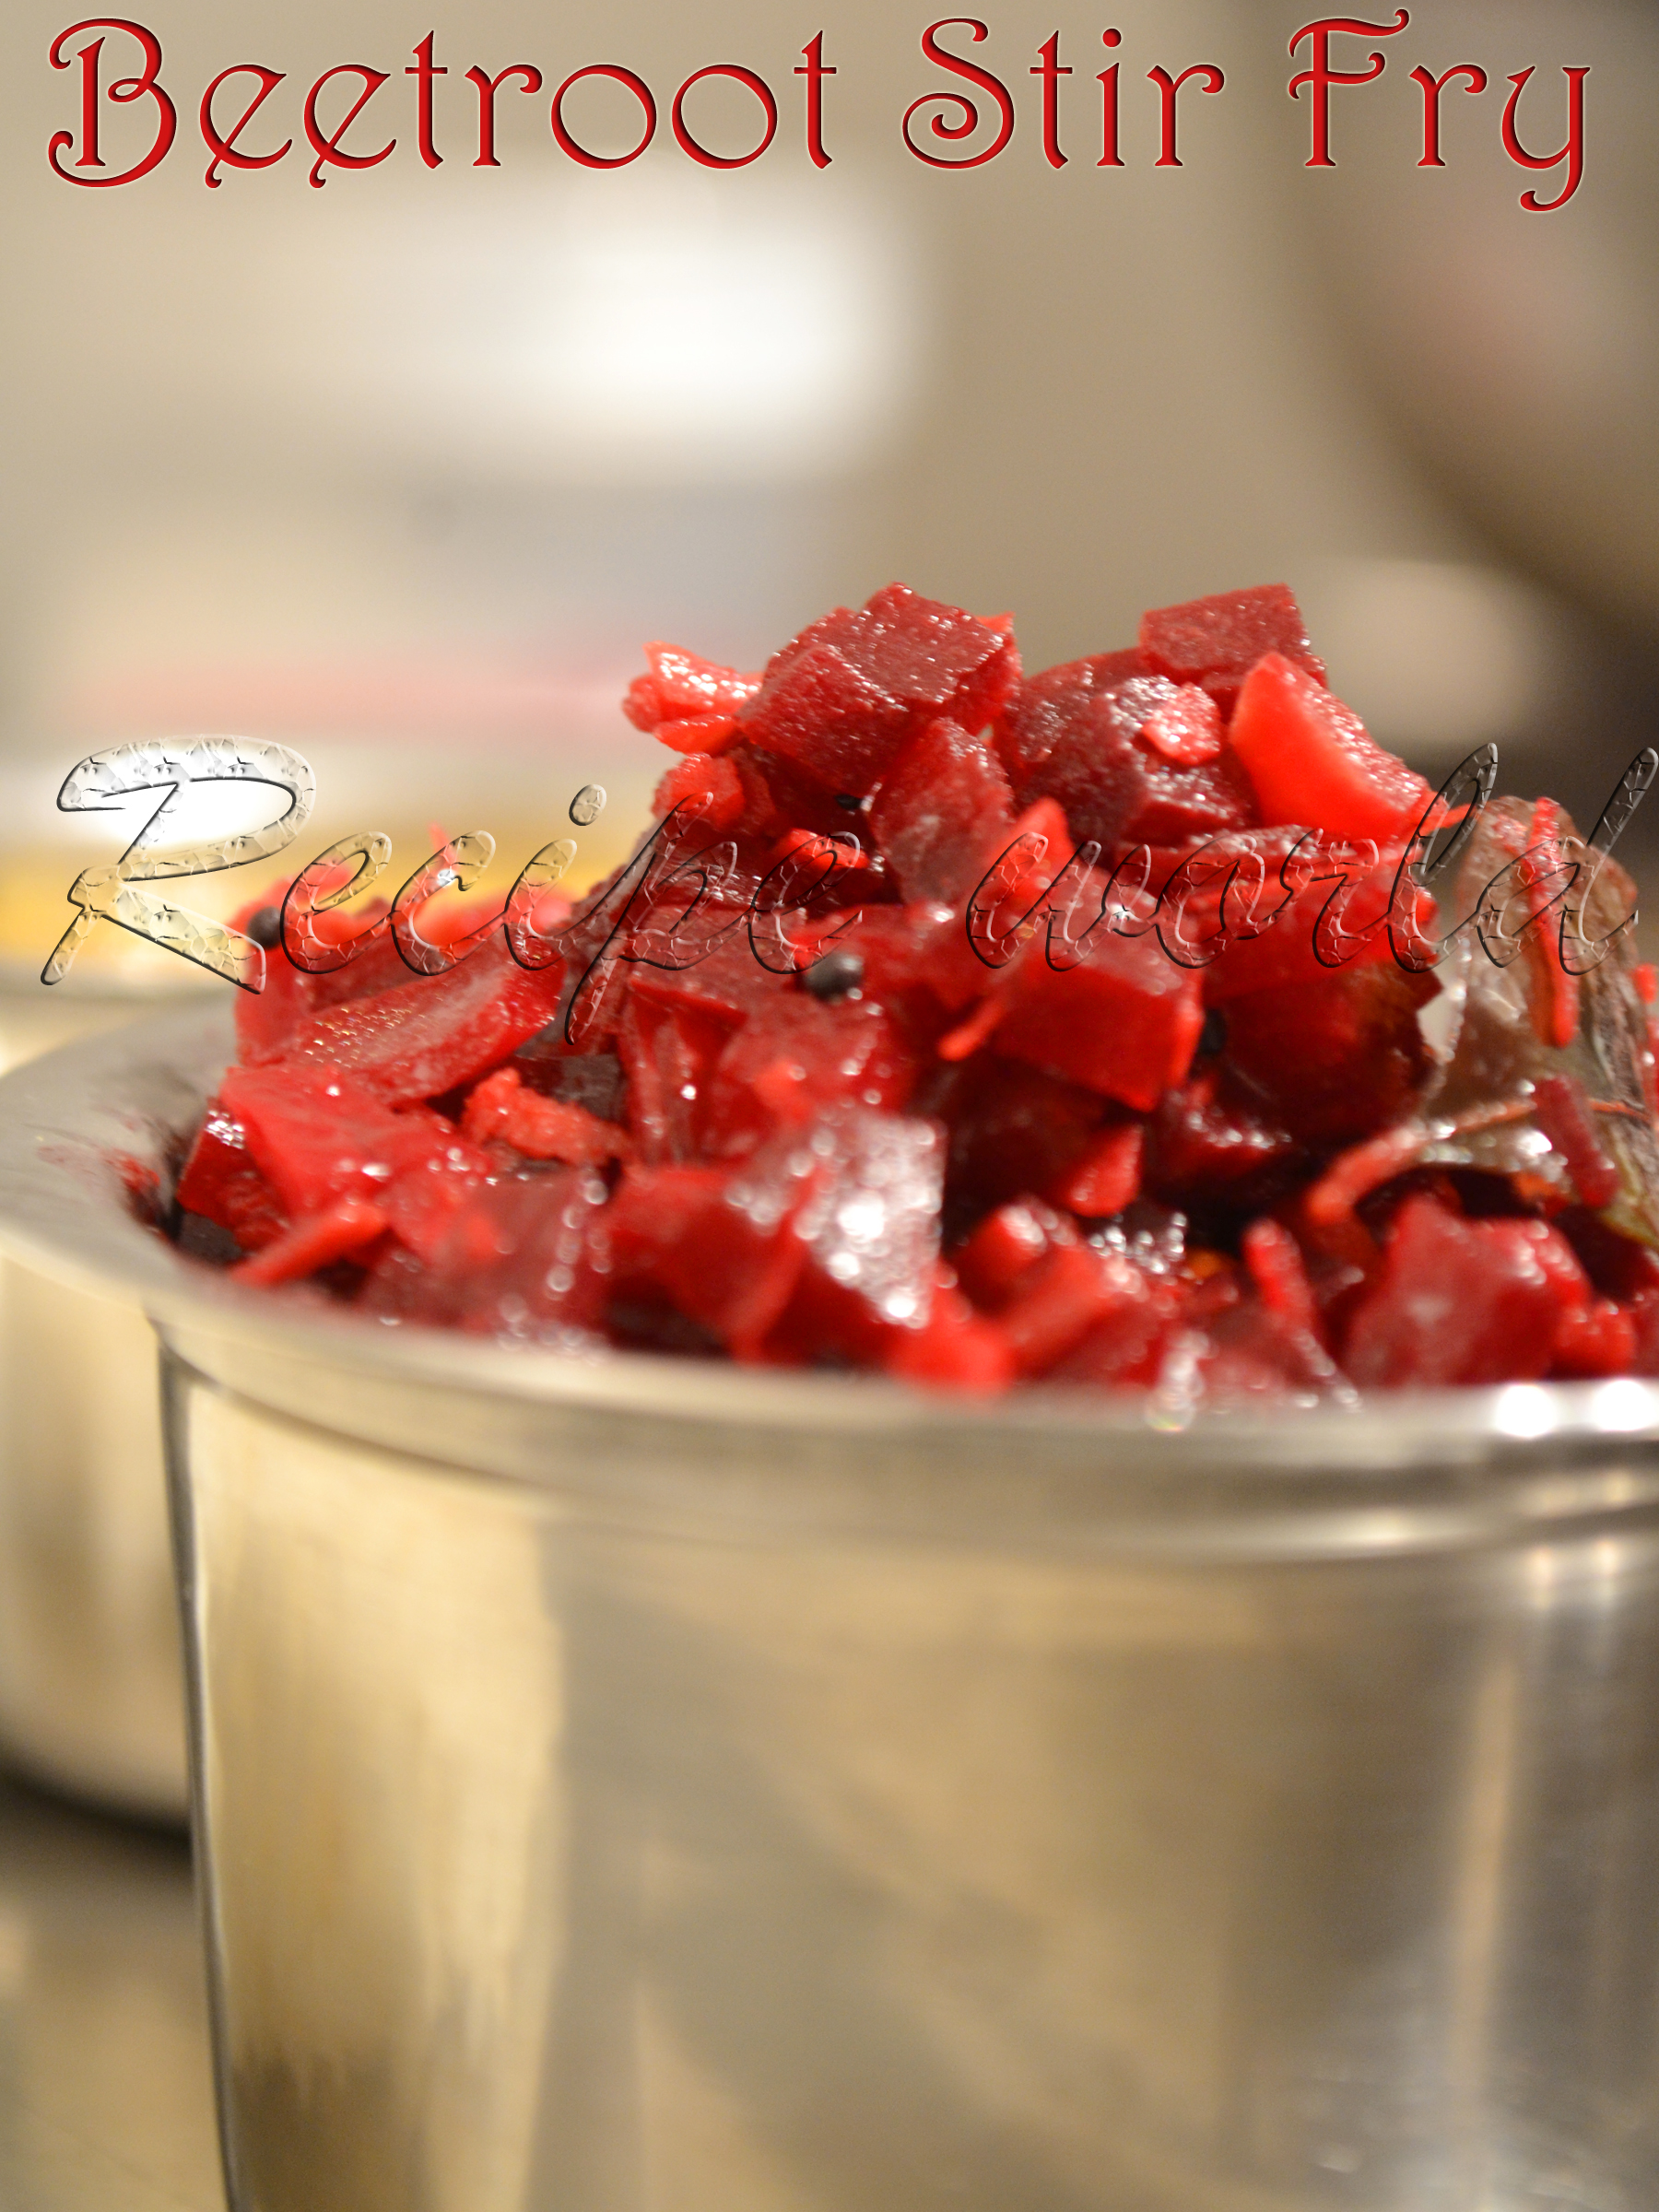
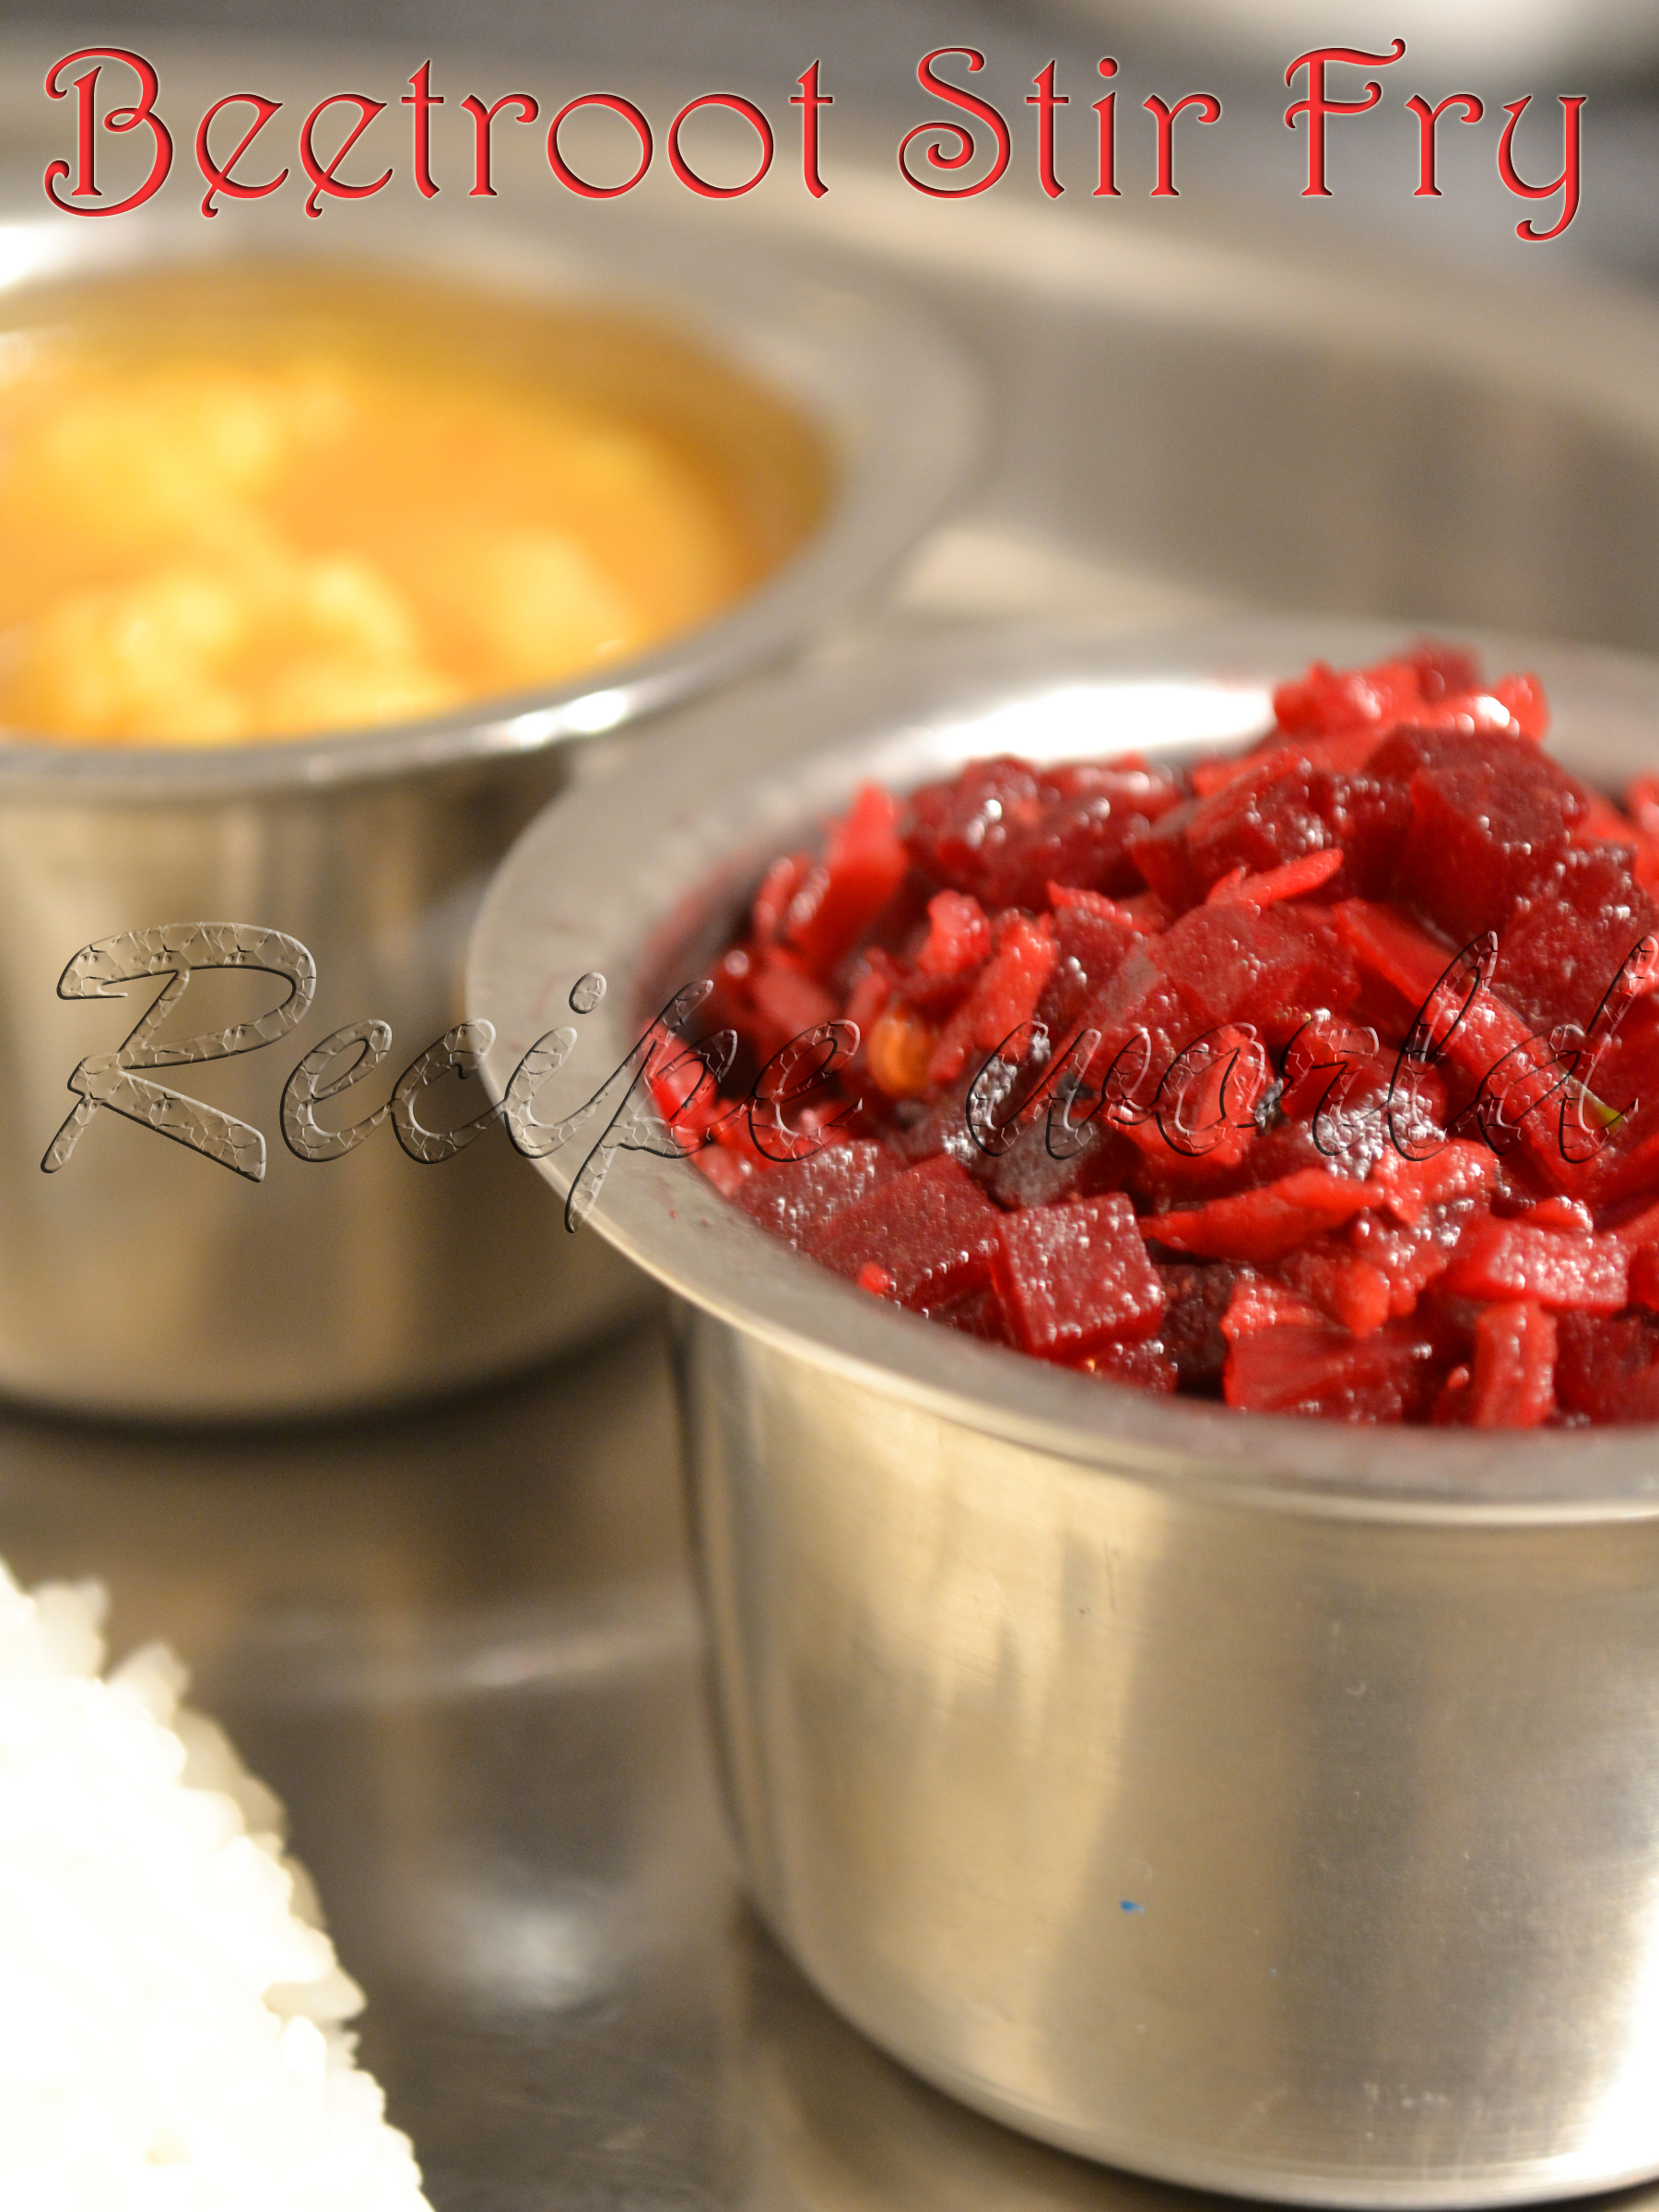
Beetroot is one of the nutritious vegetables which tastes awesome with its natural sweetness. This root vegetable is good for preparing delicious stir fry, sambar, salads and sweets. Beetroot Palya / Stir Fry and Sambar are my family favorites. My little one also loves to have it because of its nice red color!
Here is the recipe of Beetroot Palya / Poriyal. This tastes very good with rice, chapathi, roti and poori. Give it a try and let me know your feedback :)


Preparation time: 40 - 45 minutes
Servings: 5
Difficulty level: Medium

Ingredients:
  • Beetroot - 1 1/2 bulb
  • Dry red chilli - 1
  • Urid dal - 1 tsp
  • Mustard seeds - 1 tsp
  • Asafoetida / hing - big pinch
  • Turmeric powder - 1/4 tsp
  • Green chilli - 1 (adjust according to taste)
  • Curry leaves - 4 to 5 leaves
  • Cooking oil - 3 tbsp
  • Grated coconut - 1/2 cup
  • Onion - half
  • Salt - for taste
  • Amchur powder - for taste
  • Sugar - 1 tsp or according to taste
  • Water - 1 1/4 cup or little more (as needed for cooking)


Method:
  • Wash the beetroot cleanly and peel off the skin. Chop them finely.
  • Heat oil in a heavy bottom pan. Add broken red chilli pieces, urid dal, asafoetida and then mustard seeds. Once the mustard seeds start crackling, add turmeric powder, slit green chillies and curry leaves.
  • Saute it for a while and add finely chopped beetroot and mix it well. 
  • Add 1 1/4th cup of  water for cooking the mixture. Close the lid and cook it for 18 - 20 minutes. Stir the mixture occasionally. Add more water if needed.
  • When the mixture is almost cooked and water is evaporated, add salt, amchur powder and sugar and adjust the taste. Also add the chopped onion and grated coconut and mix well.
  • Cook it for 8 - 10 minutes more and turn off the flame. 
  • Serve this Palya along with rice, chapathi or poori.


Tips:
  • Beetroot bulbs are bit hard. If you find it difficult to chop them finely, just cut them into 2 or 3 pieces and pressure cook till 2 whistles. Then, chop them finely and follow the above recipe. Only change you need to consider is no need to add water after doing the seasoning since the veggie will already be cooked.

Here comes a simple and quick Ladoo recipe which can be prepared to serve the guests, or to munch on just like that! Its good for kids as well since all the ingredients used here are good for health. My kiddo loves to have it anytime and she renamed it as 'Tun Tun Laadu'! No need to worry about the calories, we are going to add less ghee for this Ladoo :)
Wheat Flour Laddu is one of my favorite sweets from childhood. There is one more method to prepare Wheat Flour Ladoos where we need to make the sugar syrup. Anyways, I love to prepare Ladoos with powdered sugar which is simple and quite easy!
Try these yummy ladoos and enjoy with your family..


Preparation time: 20 minutes
Yield: 12 ladoos of medium size
Difficulty level: Medium

Ingredients:
Wheat flour - 1 cup (1 cup = 200gm) 
Ghee / clarified butter - 1/2 cup
Powdered sugar - 3/4 cup
Cashews - 4
Raisins - 15 to 20
Cardamom - 2
Cloves - 1


Method:
Melt the ghee in a heavy bottom pan. 
Add the wheat flour and broken cashews. Toast it on medium or low flame till you get a nice aroma. 
Turn off the flame and allow the mixture to cool down.
In the meanwhile, make a fine powder of cardamom and cloves and keep it ready. You can powder them along with sugar to make it easy.
Once the roasted mixture is cool, add powdered sugar, cardamom - cloves powder and raisins.
Mix it nicely and make sure that everything is combined well.
Take small portions of mixture in your hands and make lemon size balls.
Store them in an airtight container and use as required.


Tips:
If the ladoo mixture looks too dry and you are not able to make the ladoos, add 1 - 2 tsp of heated ghee and mix well.

Fruit Biscuits from Karachi Bakery situated at Hyderabad are one of our family favorites. These biscuits are unique in taste and flavor. They just melt in your mouth and are truly addictive. Since these goodies are not available for us here in Australia, we always had missed them. 
Ever since I started my baking journey, I was trying to replicate the taste of these fruit biscuits. After some experiments and guess works, finally I got it perfect!
Here is my version of Fruit Biscuits or Tutti Frutti Biscuits. Try these delicious biscuits and enjoy with your family :)


Preparation time: 15 - 20 minutes
Refrigeration time: 30 minutes or more
Baking time: 20 - 25 minutes
Yield: 40 - 45 pieces (depending on the size)

Ingredients:
  • All purpose flour / Maida - 5 cups (1 cup = 70 gm approx)
  • Unsalted butter - 185 gm (at room temperature)
  • Sugar - 1 cup (110 gm)
  • Milk powder - 1/2 cup (25 gm)
  • Custard powder - 1/4 cup (13 gm)
  • Vanilla essence - 1 tsp
  • Rose water - 3 tsp
  • Tutti frutti - 100 gm


Method:
  • Take the sugar and make a fine powder in a mixie. Alternatively, you can use the caster sugar available in stores. 
  • Beat the butter in a mixing bowl till creamy. I have used the electric beater to ease this process. 
  • Add the powdered sugar in 2 - 3 batches to the butter. Continue beating till the mixture is fluffy and creamy. 
  • Now, add the vanilla essence and rose water and mix gently.
  • Pour in the custard powder and milk powder and mix it nicely.
  • Add the all purpose flour in small batches and keep mixing till you get a soft, non - sticky dough. If needed, you can add little more extra flour than mentioned above, absolutely no probs!
  • Finally, add the tutti frutti and mix it nicely. 
  • Divide the dough into two equal parts. Take each part of dough, and make it into the shape of a log or as you like.
  • Wrap it in a butter paper and keep refrigerated for 30 minutes or more.
  • Pre heat the oven to 175°C. Line the baking tray with butter paper.
  • Take out the dough from the refrigerator. Cut them into slices of 1 cm width. 
  • Arrange them on the lined baking tray.  Leave some space in between for the biscuits to expand.
  • Bake them for 20 minutes or till done. 
  • Enjoy the delicious biscuits with a cup of tea or just like that!


Tips:
  • You can keep the dough refrigerated even for more than 30 minutes. For me, it took 5 minutes more to bake when I kept the dough in the refrigerator for 1 1/2 hours.

Banana is one of those healthy fruits which is commonly available everywhere. This nutritious fruit can be eaten as it is and also can be used in preparing ice-creams, cakes and delicious desserts. It works as egg re-placer for some cakes and hence, is good for egg-less baking.
When I find over ripened bananas in my pantry, either I will prepare Banana Rotti or go for baking something. Over ripened bananas are perfect for preparing cakes and muffins. I had posted Banana Cupcake / Muffins recipe some time back. Here is the recipe of perfect Banana Bread..hope you like it!


Preparation time: 10 - 15 minutes
Baking time: 45 minutes
Yield - 1 loaf (serves 5)
Difficulty level: Medium

Ingredients:
Over ripened banana - 1 (equal to 2 cups of puree)
All purpose flour - 2 1/2 cup (175 gm)
Salt - pinch
Sugar - 1 1/2 cup
Curd - 1/2 cup
Melted butter - 1/2 cup
Baking powder - 2 tsp
Baking soda - 1 tsp
Vanilla essence - 1 tsp

Method:
Pre-heat the oven to 175°C.
Cut the peeled banana into medium size cubes. Combine sugar and banana pieces in a blender or mixie and prepare the puree.
Melt the butter in a bowl and allow to cool.
Sieve together all purpose flour, salt and baking soda and keep aside.
Take the banana puree in a mixing bowl. Add melted butter, baking powder and vanilla essence. Mix it gently.
Fold in the flour mixture little by little and mix it well without lumps.
Transfer the batter onto the greased loaf pan and spread it evenly.
Bake it for around 45 minutes or till done. Keep an eye on the loaf after baking for 35 minutes.
Take the loaf out of the pan before it cools down completely. Put the loaf on a cooling rack to allow proper air circulation.
Cut down into slices once it is completely cool and enjoy it with a cup of hot coffee or tea!


Tips: 
If you want to avoid using butter, just replace it with cooking oil. 

Hibiscus is one of the most common garden plants which is easy to grow and lasts for years. We can find varieties of hibiscus plants everywhere. This plant has got lot of uses. People use hibiscus flowers for offering to God. Hibiscus leaves are good for hair growth and remedy for all hair problems. We can prepare Juice and Tea using hibiscus flowers, which is good for health.
We had a Hibiscus plant in our backyard. It was full of flowers all the time except during peak winter. We used to pick the flowers daily for offering to God. Kiddo also wanted some flowers for playing and she never missed her share :) Even after picking so many flowers, we could see many flowers still on the plant.
These days, I have learned a new recipe using hibiscus flowers. Hibiscus Juice is damn easy to prepare and tastes really yum! I just love that sparkling red color of this juice. Ingredients for this juice are also simple..one can give it a try anytime!


Preparation Time: 15 minutes
Servings: 2
Difficulty level: Easy

Ingredients:
  • Red hibiscus flowers - 3
  • Ginger - 2 inch (sliced)
  • Sugar - 4 tbsp or according to taste
  • Water - 1 1/2 cup (1 cup = 400 ml)
  • Lime - half piece


Method:
  • Heat water in a vessel. Add the ginger slices and hibiscus petals and boil it for 8 - 10 minutes.
  • Filter the boiled water using a tea strainer. 
  • Add sugar and lime juice according to taste. You can see the color of juice changes to sparkling red now.
  • Make it cool before serving. Also, you can refrigerate it or add ice cubes if desired.


Ganike Soppu, also known as Kage Soppu in Kannada, is a medicinal plant which is not familiar to many people. Scientific name for this plant is Solanum Nigrum (Black Nightshade). Leaves of this plant are used as a good remedy for cold, cough, mouth ulcer and stomach related problems. Kids love to eat the small, black colored fruits of this plant. 
I use Ganike soppu as medicine for my daughter whenever she gets cold. I will crush the leaves with little water, collect about 2 table spoons of extract, then mix it with sugar / jaggery and make her drink. This works really well for her. I have few Ganike Soppu plants in my backyard just for kiddo. She loves to pick and eat those small berries from these plants daily!
Few days back, I was talking to Mom something about my plants. She told me that delicious Chutney can be prepared using Ganike leaves. I just tried her recipe and it tasted really well. Its so easy to prepare and also good for health.
Sharing the Ganike Soppina Chutney with you now..hope you like it!


Time required: 10 minutes
Servings: 6 - 7 
Difficulty level: Easy

Ingredients:
  • Ganike / Kage leaves - handful (I have used 30 - 32 leaves here)
  • Grated coconut - 1 1/4 cup
  • For seasoning:
          Oil - 3 tsp (divided)
          Green chillies - 2 (adjust according to taste)
          Cumin seeds - 1 1/4 tsp
          Sesame seeds - 1 1/4 tsp
          Mustard seeds - 1 tsp
  • Tamarind - gooseberry size (around 1 1/2 tbsp)
  • Salt to taste
  • Water for grinding

Method:
  • Heat 1 1/2 tsp of oil in a heavy bottom pan. Add cumin seeds and sesame seeds and roast them till nice aroma comes. 
  • Then add the cleaned Ganike leaves. Saute them for 1 - 2 minutes till it changes the color and switch off the flame.
  • Grind together the roasted ingredients along with grated coconut, tamarind and salt to taste into fine paste. Add water as required.
  • Heat oil in a heavy pan. Add mustard seeds and when they start crackling, switch off the flame. Add this seasoning to the ground paste.
  • Delicious Chutney is ready now. Serve it as a side dish with rice.


Tips:
  • Instead of 2 green chillies, 2 red chillies and 1 green chilli can be used here.
  • If you don't want to preserve it in the refrigerator, heat the Chutney nicely and it will be good for few more hours.

Carrot Halwa also called as Gajar Ka Halwa, is a delicious sweet prepared on festivals and such special occasions in India. Being prepared using healthy and rich ingredients like carrot, milk, sugar, Khoya, Ghee, dried fruits and nuts, it tastes delicious! 
Carrot Halwa is one of our family favorite sweets. My daughter is not crazy about eating the sweets..but she loves to have this Halwa anytime! Since its made of all healthy ingredients, its good for kiddos health as well. Adding of khova is not a must for this Halwa, but it increases the taste. I had tried adding some quantity of paneer when I had a small quantity of Khoya with me. It was truly delicious and nobody could  make it out that I had replaced some quantity of Khova with Paneer!
There are different versions of preparing Carrot Halwa and here is the one which I usually follow. Hope you like this recipe :)


Preparation Time: 1 1/2 hour
Servings: 10 - 12
Difficulty level: Difficult

Ingredients:
  • Carrot - 1 kg
  • Sugar - 800gm (adjust according to taste)
  • Salt - a big pinch
  • Milk - 1/2 litre
  • Ghee / clarified butter - 6 tbsp
  • Khova / Khoya - yield from 1 litre milk (or around 200 gm)
  • Cardamom powder - 1 1/2 tsp
  • Raisins, Almonds and Pista - handful


Method:
  • Wash the carrots cleanly and grate them using a vegetable grater. 
  • Heat ghee in a heavy bottom pan. Add the grated carrots and saute them for 5 minutes or till the raw smell is gone. 
  • Add half litre of milk to the carrot mixture and cook it partially covered. Stir it regularly.
  • When the carrot mixture is cooked and the milk is almost evaporated, add sugar and pinch of salt.
  • You can notice the mixture becoming watery after adding the sugar. Continue cooking on medium flame, it will thicken after some time.
  • When the mixture becomes thick, add the Khova and mix it nicely. Cook it for 10 - 12 minutes and turn off the flame.
  • Finally add the cardamom powder and mix well. 
  • Garnish with ghee roasted raisins, and pieces of almonds and pista.
  • Serve it warm or cold.

Khoa or Khoya, also called as Mawa, is a product of milk which is widely used in Indian cuisine. This is prepared by boiling the milk till it gets thick. For preparing Indian sweets like Halwa, Barfi, Pedha, Gulab Jamoon, etc., Khoa is used to make them rich in taste.
In India, Khoya is easily available in most of the supermarkets and grocery stores. When I was in Bangalore, I always used the store bought Khoa for my sweets. I had tried preparing Khoa at home sometime back and it was really good. These days, I am making Khoya at home whenever needed. Preparing Khoa at home is not at all difficult. The only thing is it takes lot of time to prepare.
Here is the recipe to prepare your Khoa at home..


Time required: 1 hour
Difficulty level: Medium

Ingredients:
Full cream milk - 1 litre

Method:
Transfer the milk into a wide pan with thick bottom and bring to boil. I prefer using non-stick pan to avoid milk sticking to the bottom.
Keep stirring the milk with a spatula occasionally. 
Slowly, the water content in the milk gets evaporated and milk starts thickening. 
Keep stirring the mixture, and when it starts leaving the bottom of the pan and comes to ball stage, its time to turn off the flame.
Once it cools down completely, knead the Khoa nicely. Transfer to an airtight container and store it in the refrigerator. Use when required.
Khoa gives a richer taste to Indian sweets like Barfi, Halwa, Gulab Jamoon, Pedha, etc.


When its summer, something cold would be perfect to have when we feel thirsty. I prepare varieties of milkshakes, juices, smoothies, Lassi, etc. healthy n refreshing drinks at home using fresh ingredients. Since its the mango season now, we all love to have mango milkshake and juice whenever mangoes are there at home. Mango Milkshake is my daughter's all time favorite. She will be happy to have this drink anytime! 
Try this easy and delicious milkshake and let me know how you liked it!


Time required: 10 minutes
Cooling time: 1 hour
Servings: 3
Difficulty level: Easy

Ingredients:
  • Ripened mango (medium size) - 2 nos
  • Sugar - 5 tbsp (adjust according to taste)
  • Full cream milk - 300 ml (see Tips)
  • Water - 100 ml
  • Salt - a big pinch

Method:
  • Peel and chop the mangoes roughly into medium size cubes.
  • Blend the mango pieces along with sugar and pinch of salt into fine paste. Add little milk if required.
  • Once it becomes a fine paste, add the remaining milk and water and adjust the consistency. 
  • Blend it for one more minute so that everything is combined well.
  • Check and adjust the taste. 
  • Serve it chilled.


Tips:
  • You can reduce the quantity of milk by adding more water.
  • If the milkshake need to be served immediately, use the chilled milk for preparing it!

Fenugreek / Methi seeds, even though used in very small quantities, are very much necessary for our day-to-day cooking. Without fenugreek seeds, preparing Dosa, Sambar Powder, Methi Powder, etc. will not be perfect. These seeds are having some health benefits as well. For all sorts of hair problems, fenugreek seeds works as a good remedy. Not only the seeds, fresh fenugreek leaves are also good for cooking. Roti, Paratha, Stir Fry and various rice items can be prepared using Fenugreek / Methi leaves.
Sometimes, I need fresh methi leaves for my cooking, but we get them very rarely in the convenience stores here. So, since the summer has started, I am growing the fenugreek leaves in our backyard and using the same for cooking. Every week, I will sow the seeds in 1 - 2 rows and within the next 3 weeks, it will be available for cooking. 
Both fenugreek leaves and dill leaves can be interchanged for some variety of dishes. I had posted the Dill Leaves Stir Fry recipe long back. The same way, you can prepare the Fenugreek Leaves Stir Fry. Since fenugreek leaves are slightly bitter in taste, it tastes better if we add little more sugar to this stir fry. 


Preparation time: 20 minutes
Servings: 2 - 3
Difficulty level: Easy

Ingredients:
  • Fenugreek leaves - 3 big bunch
  • Urid dal - 1 tsp
  • Mustard seeds - 1 tsp
  • Asafoetida - a pinch
  • Sambar powder - 2 tsp or according to taste (see Tips)
  • Sugar - 1 tsp or to taste (see Tips)
  • Amchur powder - 1/2 tsp
  • Salt to taste
  • Grated coconut - fistful
  • Oil - 4 tsp


Method:
  • Wash and clean the fenugreek leaves. Chop them finely including the tender stems. 
  • Heat oil in a heavy bottom pan. Add urid dal, asafoetida and mustard seeds. Once the mustard seeds start crackling, add the sambar powder followed by chopped fenugreek leaves.
  • Add salt, sugar and amchur powder according to your taste. Cook the mixture half covered.
  • Saute the mixture regularly. Cook it for around 7 - 8 minutes or till its dried out fully and looks too dark. 
  • Add grated coconut and cook for 2 - 3 minutes more and switch off the flame. 
  • Serve this delicious stir fry along with Roti, Chapathi or rice.


Tips:
  • Any type of sambar powder, saarina pudi or palyada pudi can be used for this recipe. 
  • Since the fenugreek leaves are bitter in taste, I have made this stir fry slightly sweet in taste. Those who won't like sweet taste, can add less sugar for this recipe.

If there are any special occasions like birthday or anniversary of near and dear ones, it calls for a celebration. Baking a cake at home is not a big deal, but decorating the cake needs some thinking and more efforts. Depending on the type of cake, we need to decide which type of frosting will be suitable.
I tried chocolate frosting for my chocolate cake few days back. Chocolate cake with layers and yummy frosting..it was divine! You can remember my earlier recipe of Egg-less Chocolate Cake which I shared sometime back. I just prepared 2 chocolate cakes in that way, layered and decorated them and finally, here is the outcome!


Time required: 45 - 50 minuted
Cooling time: 2 - 3 hours
Servings: 10 - 12
Difficulty level: Difficult

Ingredients:
- Egg-less chocolate cakes - 2 nos (prepare and keep them ready)
- For Frosting:
  • Unsalted butter (at room temp) - 1 cup
  • Icing sugar - 3 cups (adjust according to taste)
  • Vanilla essence - 1 tsp
  • Dark chocolate - 200 gm
  • Milk - 1/2 cup
  • Big pinch of salt
  • Chocolate shaves - as needed (see Tips)
  • Chocolate coated peanuts (or any other chocolate bytes) - few


Method:
- How to prepare frosting:
  • Melt the dark chocolate and allow to cool.
  • Beat butter using a beater or hand mixer till creamy. 
  • To this, add melted chocolate, salt and 1 cup of icing sugar. Beat them for a minute.
  • Add 2 - 3 tbsp of milk and one more cup of sugar. Beat the mixture again. 
  • Continue adding milk followed by sugar till you are done. 
  • Adjust the consistency and taste.
  • Beat the mixture for 2 - 3 minutes or till its light and creamy. 

- How to assemble the cake:
  • Slice each cake carefully into two layers. You will have 4 separate layers in total now.
  • Keep the first layer on the cake base or on a plate. Cover it with one layer of chocolate frosting.
  • Put the second layer of cake upon that and cover with frosting.
  • Fix all the four layers in the same way and cover the top and sides with frosting.
  • Decorate the sides with chocolate shaves. Arrange the choco-coated peanuts / your favorite chocolates on the top. Sprinkle some chocolate shaves as you like.
  • Refrigerate the cake for 2 - 3 hours before cutting. 


Tips:
  • Dark chocolate which I used for frosting was sweet and hence, 3 cups of icing sugar was enough. If using unsweetened chocolate, add more sugar accordingly.
  • You can prepare the chocolate shaves easily at home. Refrigerate the chocolate block and once it becomes really hard, peel them using a peeler. Your chocolate shaves are ready to use!

There are some well known areas for shopping in Bangalore and one of them I like most is Gandhi Bazar. Evening time will be really good to roam around there, and our shopping will be complete only after having some food, preferably chat food. You can see so many chat shops serving various chat food to the never ending crowd. I had been to Gandhi Bazar with my sister quite a few months back. She knows that area very well and we did plenty of shopping. We were really tired and feeling hungry. She took me to a chat shop in Gavipuram Area. Mango - Sweet Chat from that shop was her all time favorite. So, we ordered the same enjoyed eating. It was so good and so yummy! 
Unripened Totapuri mangoes are perfect for this chat recipe. Grilled sweet corn and finely chopped mangoes are really a wonderful combination. This chat food has become one of our favorite snacks for the evenings. Here is the recipe of Mango - Sweet Corn Chat for you!


Time required: 20 - 25 minutes
Servings: 3
Difficulty Level: Medium

Ingredients:
  • Sweet corn cobs - 2
  • Totapuri mango (medium size) - 1
  • Green chilli paste - 1 tsp (adjust according to taste)
  • Lime juice - for taste
  • Salt - for taste


Method:
  • Roast the corn cobs on direct flame. I did this on my stove top. Separate the kernels when its still hot. You can do this job easily using a knife. 
  • Chop the raw mango finely. I prefer cutting them to the same size as of corn kernels. 
  • Combine corn kernels and chopped mango in a mixing bowl. Add salt, chilli paste and lime juice according to taste. 
  • Toll them quickly and serve immediately! 
  • This delicious chat can be served as salad for the lunch or as evening snacks. 
 

When its mango season, raw mangoes are generously used for cooking in most of the Indian homes. Raw mangoes are perfect for preparing tangy and spicy Indian side dishes like Chutney, Gojju, Appehuli, etc. Here in Australia, whenever we get raw mangoes, I will prepare these yummy dishes. These days, frozen raw mango cubes are available in Indian convenience stores and hence, we are able to enjoy raw mango dishes whenever we feel like. 
During my last visit to native, I had got a nice tip from one of my relatives. She told that she will cut the raw mangoes into cubes in mango season and preserve them in the freezer. They will be good for months and when needed, they can be used for cooking. Hope this tip will be useful for you as well!
I had shared another version of Mango Chutney long back. That was using green chillies and, here is one more version of Mango Chutney. For this recipe, we use dry red chillies and it tastes delicious with the nice aroma of fenugreek and asafoetida. Try this Mango Red Chutney with rice and let me know how you liked it!


Preparation time: 15 minutes
Servings: 5 - 6
Difficulty level: Easy

Ingredients:
  • Raw mango, chopped into medium size cubes - 1 1/2 cup
  • Grated coconut - 1/2 cup
  • Dry red chillies - 2 or 3 (adjust according to taste)
  • Fenugreek seeds - 3/4 tsp
  • Asafoetida / Hing - big pinch
  • Cooking oil - 3/4 tsp
  • Sugar - 1/4 tsp
  • Salt to taste
  • Water - 3/4 cup approx.
For Seasoning: Oil - 1 tsp, Mustard seeds - 1 tsp, Pinch of asafoetida


Method:
  • Heat 3/4 tsp of oil in a small wok. Add broken red chillies and fenugreek seeds. Once they are roasted nicely, add big pinch of asafoetida and turn off the flame. 
  • Grind the roasted ingredients along with grated coconut, mango cubes, salt and sugar into a fine paste. Add water as required while grinding. But don't make it too watery.
  • Check and adjust the taste of Chutney. 
  • Heat 1 tsp of oil for seasoning. Add the mustard seeds and asafoetida. Once the mustard seeds start crackling, turn off the flame. 
  • Add this seasoning to the Chutney. Serve with rice and see how delicious it is!

Tips:
  • Peel off the green skin of mango if it tastes bitter. If not bitter, no need to peel off the skin.

Happy new year to everyone! I was planning to post this recipe on the first day of new year. But it was time to enjoy the long holidays and I couldn't find any time for blogging. We were busy with shopping and roaming around here and there. Holidays got over like that and now, I am back to my routine!
First recipe for this year is dedicated to all the chocolate lovers! I have adopted this recipe from a fellow blogger's site. Few years back when I started my baking journey, I used to keep browsing for varieties of cake recipes. I think, this was the first chocolate cake I prepared. It was so yummy and we just loved it! Then onwards, I have prepared this soft and delicious chocolate cake many a times. I have tried few other versions of chocolate cake recipes, but very much addicted to this recipe.
This recipe is from Raks Kitchen. She has a wonderful collection of recipes with mouth watering picks. I have tried this recipe exactly the same way she wrote and didn't make any changes. Try this yummy cake and let me know how it turned out!


Preparation time: 15 minutes
Baking time: 35 - 40 minutes
Servings: 10
Difficulty level: Medium

Ingredients:
  • All purpose flour / Maida - 1 1/2 cup
  • Cocoa powder - 3 tbsp
  • Baking soda - 1 tsp
  • Salt - 1/4 tsp
  • Sugar - 1 cup
  • Water - 1 cup
  • Oil (vegetable oil or sunflower oil) - 1/4 cup
  • Lime juice / vinegar - 1 tbsp
  • Vanilla essence - 1/2 tbsp


Method:
  • Pre-heat the oven to 180°C. 
  • Grease the baking tray and dust with some flour. Dusting with flour is to avoid the cake sticking to the vessel.
  • Combine all purpose flour, cocoa powder, baking soda and salt in a mixing bowl. Sieve it once so that everything will be mixed properly. 
  • Powder the sugar and mix it with water. Once sugar is diluted, add lime juice, oil and vanilla essence. Mix it well.
  • Fold in the flour mixture into this water and mix it nicely. 
  • Transfer the batter onto the greased baking tray and bake it for 35 - 40 minutes. To check whether its done or not, insert a tooth pick upto the bottom of the cake. If batter is not sticking to the toothpick, its clear that the cake is done. 
  • Allow the cake to cool down. Then, cut it into pieces and enjoy!


Biscuits are the snack time favorites of people of all the ages. We are also biscuit lovers and keep browsing for new varieties of them. Apart from store bought ones, I would love to prepare different types of biscuits at home. When it comes to bakery style food like Benne (Butter) Biscuit, Nippattu, etc., hubby prefers and love to eat the home made ones.
Many of you must have heard of Karachi Bakery in Hyderabad. They are famous for their food products especially Fruit Biscuit and Cashew Biscuits. When we were in Bangalore, we were sure to get a parcel of these goodies if anybody among the friends or family is visiting Hyderabad! My sister's family who stays in Hyderabad, will bring Karachi Biscuits every time when they are coming for vacation. These days, we can find these biscuits in some of the shops in Bangalore as well. 
I was planning to prepare this kind of biscuits at home and was not sure how to prepare. I just went with my recipe of Orange Shortbread, made slight changes and prepared Cashew Biscuits. Hubby and daughter appreciated these biscuits a lot and I was up in the air! Prepared it several times already and the biscuits were sold out quickly! 
Sharing the recipe of these tasty and addictive Cashew Biscuits here with you. Merry Christmas to all!


Preparation Time: 25 - 30 minutes
Baking Time: 20 minutes
Yield: 30 biscuits (depending on the size)
Difficulty level: Medium

Ingredients:
  • All purpose flour / Maida - 4 1/2 cup
  • Butter (at room temperature) - 185 gm
  • Sugar - 3/4 cup + 1 tbsp
  • Vanilla essence - 3/4 tsp
  • Broken cashews - 1 1/4 cup (as desired)


Method:
  • Take out the sugar and make a fine powder using an electric mixer or blender.
  • Beat the butter till its creamy. I have used hand mixer for beating. It can be done using the egg beater as well.
  • Add the sugar powder in 2 - 3 batches to this butter and beat till its fluffy and creamy. Finally add the vanilla essence and beat it for a while.
  • Add the all purpose flour gradually and make a soft, non - sticky dough ball. 
  • Pre-heat the oven to 170°C and line the baking tray with parchment paper. 
  • Divide the dough into two or three equal parts according to your convenience. Roll each dough ball into a square or rectangle of half inch thickness. 
  • Spread the broken cashews generously on the top of rolled dough. Roll it gently to make sure that the cashews are fixed into the dough properly. 
  • Cut them into squares or rectangles and line them on the baking tray. 
  • Bake the biscuits for about 18 - 20 minutes till they turn into light golden color. Mine got done exactly at 20 minutes. 
  • Take the biscuits out after 4 - 5 minutes and allow to cool on a cooling rack.
  • Enjoy the delicious biscuits with a cup of tea or coffee!


Normally it happens every time when we bring big bag of onions to home. We won't use them daily and hence, most of them will be spoiled and become waste. This time also, leaves started coming out from the onions. What I did was I just planted those onions in the backyard. They grew up nicely and I was so happy to use those spring onions for cooking! 
Spring Onion Rotti is my new experiment using these home grown spring onions. We usually prepare different varieties of roties with various vegetables. How about preparing Rotti with spring onion? I just tried it and rotti came out really well! Since these leaves won't have much water content like most other vegetables, I have used some curd and little water in this recipe. 
Below is the recipe of Spring Onion Rotti..hope you like it and give it a try!


Time required: 1 hour
Yield: 8 roties of medium size
Difficulty level: Medium

Ingredients:
  • Spring onion - 1 bunch
  • Onion - 2 (large)
  • Rice flour -1 1/2 cup (my cup weighs around 200 gms)
  • Green chillies - 2 or red chilli powder - 1 1/2 tsp (adjust according to taste)
  • Curd - 3/4 cup (see Tips)
  • Salt to taste
  • Sugar (optional) - 3/4 tsp
  • Water - 1/4 cup
  • Oil or butter - for cooking the Rotti

Method:
  • Chop the spring onion, green chillies (if using) and onions finely and and combine in a mixing bowl. 
  • Add salt and sugar to this mixture and mix it well. Keep it for 10 minutes and allow them to leave off the water content. 
  • Then, add the rice flour and mix it nicely. If not using green chillies, add the red chilli powder at this stage. 
  • Add the curd little by little and prepare a smooth, non sticky dough ball. Add some water (I added 1/4th cup), if needed. 
  • If you have time, leave the dough for 10 minutes before using. If in a hurry, it can be used instantly, no worries!
  • Prepare big lemon size balls from the dough. Grease the plantain leaf or plastic sheet with a tea spoon of oil. Pat the ball into a thin circle using your fingers. 
  • Take out the rotti carefully and cook it on the hot tawa on both the sides. Add little oil or butter while roasting the rotti which makes it more tasty.
  • Serve the hot Rotti along with butter. This Rotti tastes better when its hot.


Tips:
  • I have used sweet curd (regular ones) here. If the curd is sour in taste, use less curd and increase the quantity of water you are adding.

Mangoes are my all time favorite. For mango lovers like me, anything with mango tastes good! This year, we had enjoyed the mango season in India to the full extent and now, its the time for mangoes here in Australia! Last week, we had been to the market and saw plenty of delicious mangoes on the store racks. I just picked some and brought them home. Whenever there are plenty of mangoes, I love to prepare Mango Seekarane / Rasayana. This time also, I prepared Mango Seekarane and wanted my daughter to taste it. She is not very much fond of sweets and said 'no' to it, as expected. Instead, she wanted me to bake a cake for her. I just googled for the mango cake recipes and finally, this is the outcome!
This was my first baking attempt using mango. While searching the recipes, I just stopped at Julie's space and found her Mango Cake recipe interesting. I have made some small changes in the original recipe according to my preferences and prepared this delicious loaf cake. This cake is perfect for tea time and also for kids snacks. Give it a try and enjoy eating!


Preparation time: 15 minutes
Baking time: 35 - 40 minutes
Yield: 1 loaf
Difficulty level: Medium

Ingredients:
  • Maida / All purpose flour - 2 cups (my cup weighs around 75 gms)
  • Fine rava (semolina) - 1/2 cup
  • 1 large mango - fully ripened (which amounts to 2 cups of puree)
  • Sugar - 1 1/2 cup
  • Big pinch of salt
  • Milk - 1/2 cup
  • Oil - 1/2 cup
  • Baking powder - 2 tsp
  • Baking soda - 1 tsp
  • Saffron strands (optional) - 8 to 10

Method:
  • Combine maida and baking powder in a mixing bowl and sieve it 2 - 3 times. Fold in the rava and mix it once.
  • Pre heat the oven to 175 °C. Grease the loaf pan and keep it ready.
  • Remove the peel and the seed part of mango. Chop it and blend them along with saffron strands and make a thick puree.  
  • Add salt, sugar and milk to this puree and mix it till sugar dissolves completely. Add beking soda and oil and mix it lightly. 
  • Fold in the sieved maida little by little and prepare the dough.
  • Transfer the dough onto the greased loaf pan and bake it for 35 - 40 minutes until the toothpick inserted comes out clean. Mine got done exactly at 38 minutes. 
  • Allow it to cool down and cut into slices once it becomes cool. 


Tips:
  • You can substitute the fresh mango puree with store bought mango pulp.
ಕನ್ನಡದಲ್ಲಿ ಓದಲು ಇಲ್ಲಿ ಕ್ಲಿಕ್ ಮಾಡಿ. 

Deepavali or Diwali is one of the important festivals we celebrate at home. We had a wonderful festival this time with our daughter darling. This was the second Deepavali for her. Even though we celebrated other Hindu festivals like Nagara Panchami, Ganesh Chaturthi, Navarathri, etc. she enjoyed the Deepavali celebration more than other festivals. Decorating the home, wearing the new clothes, enjoying the delicious food, lighting the candles, all these made her so happy. The next day after the festival, I just asked her how was the festival. She told, 'It was very nice, we will celebrate it today also'!! Ha Ha! Somehow I was able to convince her that we will celebrate it later :)
Maida Halwa is one of the sweet delicacies from India which is perfect for festivals and such occasions. It tastes very similar to Wheat Halwa which will be prepared at my Mom's place for every Diwali. Preparing Wheat Halwa is bit difficult as well as time consuming task. Whole wheat need to be soaked for 2 days in water, then need to be cleaned and ground into fine paste, later it needs filtering..keep stirring the batter on the stove top for at-least an hour..uff! such a lengthy and stressful job it is.
We were really happy to find a substitute for lengthy procedure of preparing the Wheat Halwa. My sister was going through a recipe collection sometime back and she found this Maida Halwa recipe interesting. We all loved this Maida Halwa which tasted the same as Wheat Halwa. Then onwards, this recipe has become very popular in our family circle.
This year, Maida Halwa was one of my special preparations for the Diwali festival. We enjoyed the festival of lights with all the sweet and savory preparations at home. Preparing this Halwa is bit stressful, but you feel really its worth preparing when you taste it!


Time required: 35 - 40 minutes
Yield: Around 33 pieces depending on the size
Level of difficulty: Difficult

Ingredients:
  • Maida / All purpose flour - 1 large cup
  • Sugar - 1 1/2 cup
  • Pinch of salt
  • Water - 1 3/4 cup
  • Ghee - 1/2 cup or little more
  • Broken cashew pieces - 2 tbsp
  • Raisins - 2 to 3 tbsp
  • Saffron strands - 1/2 tsp (or 3/4 tsp cardamom powder)


Method:
  • Soak the saffron strands in 2 tbsp of hot water.
  • Take maida in a mixing bowl, add around 1 1/4 cup of water gradually. Prepare the batter without any lumps. Consistency of the batter is the same as dosa batter. 
  • Roast the cashew pieces and raisins in ghee and keep aside. 
  • Take a heavy bottom pan, pour the sugar and add 1/2 cup of water. Bring it to boil. 
  • Once the syrup reaches 2 string consistency, add the maida batter and keep stirring continuously for 2 minutes. 
  • Add the saffron strands (and also the water), pinch of salt and ghee and stir it continuously on low or medium flame. 
  • When the mixture thickens, you feel it really hard to stir the mixture well. Once the mixture starts leaving the edges, take a spoon full of mixture out and make it cool. If you are able to form a ball and its not sticking to the hands, thats the right consistency. 
  • Stir in the roasted cashews and raisins and mix it well. 
  • Spread the mixture on a greased plate (or plates) evenly and allow to cool. 
  • Cut it into desired shapes once its cool. That's all, delicious Maida Halwa is ready to enjoy!


Tips:
  • I have used 1/2 cup of ghee here. Little more ghee can be added if you would like to. Adding more ghee will make it even more delicious.
  • As far as possible, try to consume it fresh. It will be good for 3 - 4 days if kept outside. If kept in refrigerator, taste of Halwa will change a bit.
ಕನ್ನಡದಲ್ಲಿ ಓದಲು ಇಲ್ಲಿ ಕ್ಲಿಕ್ ಮಾಡಿ. 

Motherhood is always an amazing thing which every woman will cherish. Every mother looks after her child with all the affection and care. Little kids need lot of love and care. When it comes to their food, they need healthy and nutritious food which is tasty and easily digestible. Cooked and mashed fruits, Ragi malt, fresh fruit juice, oats porridge, etc. are some of such foods which are good for children. 
I was thinking of posting some baby food recipes from long time. While preparing different variety of foods for my daughter, it comes to my mind and somehow, I was not able to make it out. Last week, I was preparing the Ragi Sari (Ragi Malt) for my kid. Suddenly, it came to my mind that why not I post this recipe! I just took the camera and clicked couple of photos of the same.
I had started giving this ragi malt to my daughter from her 10th month. Not only kids, this healthy mix is good for elders as well. You can prepare them in large quantity and use upto 4 - 5 months. For little ones, better to prepare this malt powder in small quantities so that you can give them the fresh stock. Ragi Malt powder recipe is as follows:


Preparation Time: 8 - 10 days (that's huge!)
Difficulty level: Medium 
Yield: Approx. 2.5 kg malt mix

Ingredients:
  • Finger millet - 1/2 kg
  • Kuchchalakki / boiled rice - 1/4 kg
  • Whole wheat - 1/4 kg
  • Mung bean - 125 gm
  • Almonds - 125 gm
  • Barley - 125 gm
  • Corn kernels - 125 gm
  • Ground nuts - 125 gm
  • Cloves - 15
  • Ondelaga / Centella asiatica - 15 to 20 stalks

Method:
  • Wash finger millet, whole wheat and mung beans separately and soak them in water for a day. Then, wash them and drain all the water. Put them on a thin, wet cloth, tie it tightly and keep it in a vessel for a day or two, till you get nice sprouts. Spread them on a cloth or on the plates and put the  under the sun for drying. 
  • Wash and clean the boiled rice, almonds, barley, corn kernels and ground nuts and dry them nicely under the sun. Better you keep these grains covered with a thin cloth while drying to ensure they are hygienic.  
  • It takes at least 3 - 4 days to get these grains dried completely. 
  • Clean the Ondelaga / Centella asiatica including the leaves and roots and dry them nicely.
  • Once all the ingredients are ready, roast them separately in a heavy bottom pan on law flame till you get a nice aroma. Roast the cloves for 2 - 3 minutes.
  • Mix all the ingredients together once they cool down. Don't forget to put the Ondelaga / Centella asiatica with them!
  • Make a fine powder of these ingredients. You can get it done in a flour mill or even do it at home using the mixer grinder. If done in a mixer grinder, you will get a course powder, not very fine. 
  • Once the malt powder is cool, transfer it to an air tight container. Take out small quantities of flour in small container for regular use.


How to prepare the Malt drink: Take around 1 1/2 tbsp of malt powder and mix it with 3 tbsp of water. Add 1 or 1 1/2 cup of milk and 1/4th tsp of ghee (optional). Add sugar / jaggery for taste. Bring it to boil and stir it occasionally. When it starts boiling, switch off the flame. Serve the malt once it is cool.

Tips:
  • You can add few pods of cardamom while preparing the malt powder to make the drink fragrant. I love adding few strands of saffron as well sometimes. 
  • Mung bean and wheat grains can be added without sprouting also. 
  • If you can't get the finger millets, can add the readily available finger millet flour instead. 

ಕನ್ನಡದಲ್ಲಿ ಓದಲು ಇಲ್ಲಿ ಕ್ಲಿಕ್ ಮಾಡಿ. 

There are some vegetables which have become part of our daily cooking, without which we can't do full pledged cooking. For eg: Tomato, Green beans, etc.. These veggies are easily available everywhere in all the seasons. Preparing the rice items like Pulao and some common daily dishes like Sambar, Palya (Stir fry) or Rasam will become really difficult without such veggies. 
I always love to use green beans (also called as French beans) in my cooking. Delicious Sambar, Stir Fry, Pulav, Hashi (Rayita), etc. can be prepared using this beans along with other different vegetables. These days, my little one loves to eat fresh green beans. She enjoys eating all the dishes prepared using green beans. Because of her love towards green beans, we are buying this vegetable every time when we go for buying vegetables!
Below is the recipe of Green Beans Palya / Stir Fry. This simple and delicious Palya suits well with rice, roti and dosa. 


Preparation Time: 20 - 25 minutes
Servings: 3
Difficulty level: Medium

Ingredients:
  • Fresh green beans - 300 gm
  • Dry red chilli - 1/2 piece
  • Green chilli - 1 (adjust according to taste)
  • Urad dal - 1 tsp
  • Mustard seeds - 1/2 tsp
  • Pinch of asafoetida
  • Turmeric powder - 1/4 tsp
  • Curry leaves - 1 strand
  • Salt to taste
  • Amchur powder - 1/2 tsp or to taste
  • Sugar - 3/4 tsp or to taste
  • Cooking oil - 2 tbsp
  • Grated coconut (optional) - 2 to 3 tbsp
  • Water - 1/2 cup or more


Method:
  • Wash and clean the green beans, chop them finely. 
  • Heat oil in a heavy bottom pan. Add dry red chilli pieces, urad dal, mustard seeds, asafoetida and turmeric powder. Saute them on low flame. Once the mustard seeds start spluttering, add chopped green chillies and curry leaves. 
  • Saute it for a while and add the chopped green beans. Add around 1/2 cup of water and cook it covered. If the beans is tender ones, this much water will be good enough for cooking. If its grown ones, you may have to add more water. 
  • Saute the mixture occasionally. Once its half cooked, add salt, sugar and amchur powder for taste and mix it well. 
  • If the beans is tender ones, it will get cooked by 10 - 12 minutes. Else, it may take more time. 
  • Once its cooked completely, add the grated coconut and cook it for 5 more minutes. 
  • Serve this healthy n delicious Palya / Poriyal along with rice, roti or dosa. 


NewerStories OlderStories Home