ಕನ್ನಡದಲ್ಲಿ ಓದಲು ಇಲ್ಲಿ ಕ್ಲಿಕ್ ಮಾಡಿ.

The season of mangoes is coming to end now in India. I was in my native this year throughout the mango season. There are lot of mango trees in our backyard, but this year, we couldn't get any mangoes there! Of course we bought mangoes from the city, but its not at all equal to the home grown ones.
It was during our childhood days we were running to my Grandma's place to enjoy those delicious mangoes. Going to their place was the happiest thing for us during those times! Grand parents are no more now, but my Mom's brothers invite my Mom's family every year to enjoy the mangoes at their place. This year, nobody could visit their place during mango season even after frequent invites by them. Finally, the kind hearted brothers sent a big parcel of both ripened and unripened mangoes to my mom's place! Everybody felt so happy and enjoyed the delicious mangoes up to a week. Even my little one enjoyed eating mangoes :)
When it is the mango season, most common dessert we prepare at home is Mango Seekarane (Rasaayana). Either it can be served as dessert or as side dish with Dosa or Roti. Click here to know more about Mango Seekarane. 
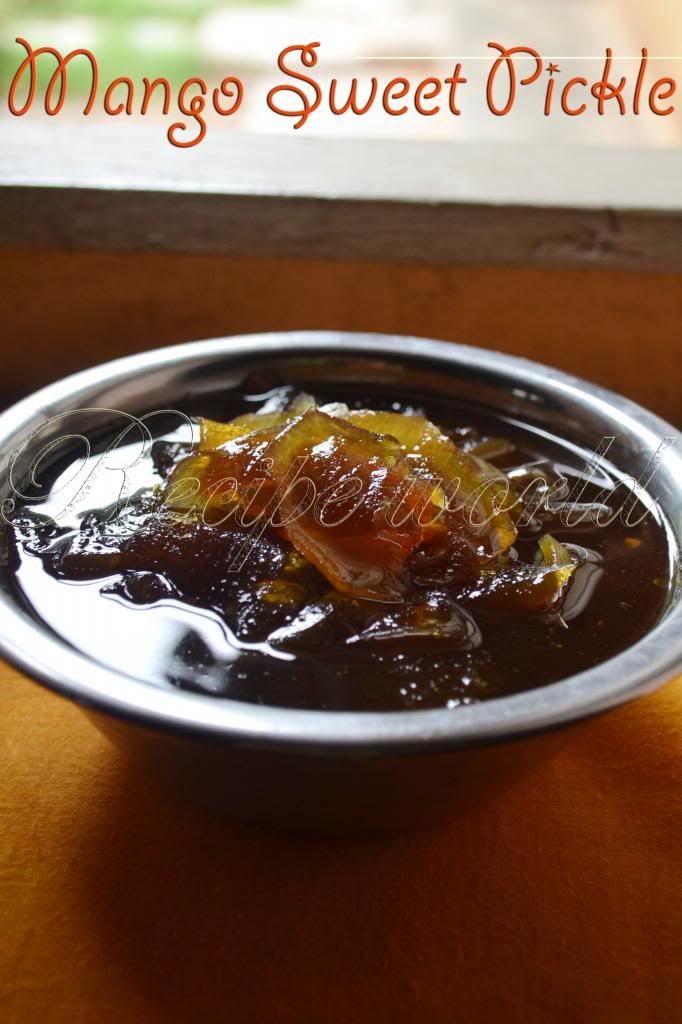
Coming to the recipe part, its a sweet and tangy dish which I had recently at my sister's place. It was prepared from raw mango and they call it as 'Mango Sweet Pickle'. Just learned the preparation method from them and tried it at home. Everybody at our home liked this pickle. Hope you will also like it!


Preparation Time: 40 minutes
Difficulty level: Medium

Ingredients:
  • 1 large mango - unripened (preferably Totapuri Mango)
  • Liquid jaggery - 1 to 1 1/2 cup (adjust according to sweetness)
  • Salt - 1 tsp or to taste
  • Green chillies - 2 
  • Water - 1/2 cup

Method:
  • Peel off the mango and cut it into thin slices of medium size.
  • Heat water in a vessel. Add the mango slices to the hot water and cook it for a minute or till half done.
  • To this, add salt, jaggery, slit green chillies and cook till the syrup becomes thick (May be 2 1/2 string consistency). By the time the syrup becomes thick, mango slices will be cooked fully and they will become transparent. 
  • Transfer the prepared sweet pickle to an air tight jar and use it when required. This can be stored up to 2 - 3 weeks.
  • This pickle goes well with rice like any other pickle.
 
Tips:
  • Any unripened mango can be used for this recipe. But Totapuri Mango is the most suited one.
  • Red chilli powder can be used instead of green chillies for this recipe.
  • This pickle should be both sweet and tangy in taste. When the pickle is almost done, check and adjust the taste. If the mango does not have a sour taste, few drops of lime squeeze can be added to make the pickle more tasty. 
Few days back, I had got a mail from a representative of Hudson Canola Oil saying they intend to send me a sample packet of Canola oil. I was just curious and provided them the mailing address. Yesterday, postman knocked my door and gave the parcel sent by them! It contained a tin of Hudson Canola Oil and a small recipe book written by Ms.Komal Taneja and a note to me. Wow, I felt really happy and thought of writing a review on Hudson Canola Oil.

These days, everybody is very very cautious about health and food. Almost all varieties of cooking oils which we use have lot of fat content. According to Hudson Canola Oil manufacturers, Hudson Canola is a standard edible vegetable grade oil, a light oil with neutral taste and flavour. Hudson Canola can be used for all types, methods and varieties of Indian cooking: frying, roasting or grilling. Canola is neutral in flavour and aroma with no distinctive taste or smell.

Canola Oil is extruded from the seeds of the yellow Canola flower.Canola Oil has the lowest  saturated fat amongst all oils, very high monounsaturated fat, very high Omega-3 and rich Vitamin-E content.
Hudson Canola Oil® comes to you directly from the finest, most sophisticated facilities in the Prairie regions of western Canada, where canola was first discovered. Hudson Canola is brought to you by Dalmia Continental, owners of Leonardo Olive Oil®. Hudson Canola is another pioneering effort by Dalmia Continental. In 2003, Dalmia Continental introduced Leonardo Olive Oil to India for Indian cuisine. Leonardo Olive Oil rapidly became the leading Indian brand of Olive Oil. Now, Dalmia proudly brings you another heart-healthy oil.  The world’s leading new heart-care oil. Hudson Canola Oil is the world’s best value for money amongst heart-healthy oils.


Thank you Hudson Canola Oil!! I am planning for some special recipe with Canola Oil today. 
Hope to see you all with a new recipe soon!

Cheers!
Vani
ಕನ್ನಡದಲ್ಲಿ ಓದಲು ಇಲ್ಲಿ ಕ್ಲಿಕ್ ಮಾಡಿ. 

The season of jack fruit has started now in India. Raw jack fruit is very good for cooking. Various dishes and also papad and chips are prepared from this seasonal vegetable. Some sweet varieties prepared using jack fruit are Jack Fruit Kadubu, Jack Fruit Halwa, and so on.
Jack fruit chips always resembles me the memories of childhood. At my mom's place, my mother and aunts used to prepare jack fruit chips in large quantities with the intention of preserving and using it for the whole year. Ours is a joint family and we were four kids with the same age group. Hiding the chips containers from our eyes was a big challenge for them! It was just like a hide and seek game :) Even now, every time while preparing chips, my mom and aunts will remember this and keep laughing!
Jack fruit chips will remain good for up to a year if prepared using good quality of cooking oil. Below is the recipe of Jack Fruit Chips:  


Preparation Time: 2 1/2 hours (approx.)
Difficulty level: Difficult

Ingredients:
  • Fully grown raw jack fruit - 1 (Medium size)
  • Oil for deep frying
  • Salt - 4 tsp
  • Water - 1 cup
  • Chips masala powder - according to taste

Method:
  • Cut the jack fruit and take out the flesh and take out the seeds which are inside the flesh.
  • Slit the jack fruit flesh into thin pieces lengthwise.
  • Dissolve salt in water and keep the salt water ready.
  • Heat oil in a heavy bottom pan. Deep fry one batch of slit jack fruit flesh on medium flame till it becomes crispy. Add 1 - 2 tsp salt water while deep frying each batch of chips.
  • Spread the deep fried chips on a tissue paper for 5 minutes.
  • Transfer the chips to a mixing bowl. Add Chips Masala Powder (1 - 2 tsp) according to taste. Toss it nicely and check the taste. If needed, add little more masala powder and adjust the taste.
  • Continue the above steps till all the slit jack fruit flesh is done.
  • Transfer the chips to an air tight container to retain the crispiness for long time.
  • Serve it with tea or coffee. Or simply you can enjoy it anytime!


Tips:
  • If the chips not becoming crispy, just deep fry it for 8 - 10 minutes, take out and allow to cool. Again deep fry it for another 4 - 5 minutes. This makes the chips crispy. Or, try adding few drops of vinegar while deep frying.
  • If you want to enjoy fresh chips even after months of preparation, try this tip: Deep fry the chips by adding salt water till crispy. Once cool, store it in an air tight container. When you feel like having it, heat 4 - 5 tsp of cooking oil in a wide pan. Pour some chips into it and add chips masala powder according to taste. Toss it nicely and enjoy fresh chips!
ಕನ್ನಡದಲ್ಲಿ ಓದಲು ಇಲ್ಲಿ ಕ್ಲಿಕ್ ಮಾಡಿ.

I always appreciate the North Karnataka style of food. If you go to Hubli, Dharwar, Haveri, etc. regions of North Karnataka, Roti (Rotti) is the main item of food everywhere. Their kind of Jawar roti accompanied by varieties of side dishes and powders..ahha..it tastes divine!! 
In Bangalore also, we can see this kind of food here and there. There is a small stall near Vajayanagar Bus Stand. They offer different varieties of rotis, side dishes and chutney powders of North Karnataka style. If you go there any time, you can see so many people near that stall to take roti parcels! When I used to stay in Vijayanagar, we used to visit there almost every week-end to avoid the hostel food. Among all the side dishes, we loved Badnekayi (Eggplant) Ennegayi and Hesarukalu (Moong Sprouts) Palya along with roti most of the times.
I learned this Moong Sprouts Palya recipe from a Kannada cookery show long back. Then, few changes are made in the original recipe according to our taste. As all of us know, moong sprouts are good for health and make sure to try this healthy side dish along with your chapathi or roti!


Preparation time: 15 minutes
Servings: 2

Ingredients:
Moong Sprouts - 1 1/2 cup
Green chilli-ginger-garlic paste - 1 1/2 tsp
Cumin seeds - 1/2 tsp
Mustard seeds - 1/2 tsp
Chopped onion - 1
Red chilli powder - 1/2 tsp or to taste
Black sesame seeds powder (optional) - 2 tsp
Amchur powder - 1/2 tsp or to taste
Salt to taste
Oil 3 - 4 tsp


Ingredients:
Heat oil in a heavy bottom pan. Add mustard seeds and cumin seeds and roast till they splutter.
Add green chilli-ginger-garlic paste and saute for a while to remove the raw smell. 
Then add the chopped onion and saute for 2 - 3 minutes.
Now, add the sprouted moong, salt and amchur powder and mix well. Add 1/4th cup of water and allow to cook by closing the lid.
Once it is cooked, add the black sesame seeds powder, cook for two more minutes and switch off the flame.
Delicious Palya is ready to serve with chapathi or roti!


Tips:
  • This Palya will taste good without adding black sesame seeds powder also.
  • To enhance the taste, add 1/4th spoon of garam masala powder before switching off the flame.

I am linking this recipe to 'Only' Cooking With Legumes event @ Nalini's Kitchen which was started by Pari.


ಕನ್ನಡದಲ್ಲಿ ಓದಲು ಇಲ್ಲಿ ಕ್ಲಿಕ್ ಮಾಡಿ. 

Mostly people who have a rural base will be familiar with this recipe. Ginnu is a sweet dish prepared from lactating cow's milk or colostrum milk of cow. Normally, first day's milk will be thicker and it can be used to prepare Ginnu. Often its called as 'Posu', 'Junnu' or Kharvas in different languages. In my native place, its called as 'Battalu Ginnu'.
We both are the great fans of Ginnu. Being away from native, we rarely get a chance to enjoy this sweet dish. One of my sister stays Hyderabad. She keeps preparing Ginnu using a powder mixture which they get there. Even I searched, but never found such a mixture in Bangalore. I had tried making Ginnu using normal milk by referring recipes on the net, but the taste was not that great.
Last week, I had a chance to taste Ginnu at my mother's place. Mom prepared it twice and I enjoyed eating :) Preparing Ginnu using colostrum milk is damn easy. Also, won't take much time for you to prepare! Try this recipe when you get colostrum milk of cow and let me know your feedback :)


Preparation time: 20 minutes
Yield: 10 medium size pieces
Difficulty level: Easy

Ingredients:
  • Colostrum milk of cow / buffalo - 3 cups (See Tips)
  • Sugar - 2 cups
  • Saffron - 15 strands


Method:
  • Combine sugar with milk and mix it till the sugar gets dissolved completely.
  • Fill the pressure cooker base with water and allow to heat.
  • Add saffron strands and transfer the sweetened milk into a steel pan which fits inside the pressure cooker.  
  • Close the lid of pressure cooker and allow it to get cooked. Switch off the flame after 2 whistles.
  • Once the pressure cooker becomes cool, take out the pan and cut the Ginnu into squares.
  • That's all, delicious Ginnu is ready to eat!


Tips:
  • If its the very first colostrum milk of buffalo, it will be very thick. Just add equal quantity of water and dilute the milk to avoid Ginnu becoming too hard. If its the second time milk, no need to add water. If its cow's colostrum milk, don't add water anytime.
  • Make sure that the sugar is dissolved in the milk completely. Once you put it for cooking, it won't dissolve any more.
  • You can replace saffron strands with cardamom powder or nutmeg to get a different flavor.
  • Sugar can be replaced with jaggery for this recipe (depending on your taste). I prefer adding sugar itself.
ಕನ್ನಡದಲ್ಲಿ ಓದಲು ಇಲ್ಲಿ ಕ್ಲಿಕ್ ಮಾಡಿ.

Just think of a situation where you are expecting some guests and confused what to prepare for them. Ideal condition is that it should be a sweet which is neither too simple nor too difficult and it will be nice if it can be stored for few more days..right? Here is one such recipe which I learnt from my mother. Unlike other varieties of Holige (Obbattu) we prepare, it will not be that soft; its kind of crispy and not too sweetish. Best thing I admire is that it can be stored up to 15 days!
All the credit for this recipe goes to my mother. These days, I am out of my kitchen and busy with my little one. I just clicked some photos and noted down the measurements while my mother was preparing Sakkare Holige (Obbattu). I am thinking of posting some more delicacies from mother's kitchen till I am back to cooking.
Hope to see you all with new recipes soon! Here is the recipe of Sakkare Holige (Obbattu)..


Preparation time: 1 1/2 hour
Time for the dough to get set: 1 hour
Yield - 40 pieces
Difficulty level - Medium

Ingredients:
For the filling:
  • Sooji rava (semolina) - 2 1/4 cup
  • Sugar - 2 3/4 cup
  • Fresh grated coconut - 10 cups
  • Salt - 1 1/2 tsp
  • Cardamom powder - 1 tsp
  • Ghee - 2 tsp

For the outer covering:
  • Wheat flour - 1 cup
  • All purpose flour / Maida - 1 cup
  • Salt - 1 tsp
  • Turmeric powder - 1 tsp
  • Water - 1 cup approx.
  • Oil - 1 cup or little more


Method:
  • Combine wheat flour, all purpose flour and turmeric powder in a mixing bowl. Take about a cup of water and add salt to it. Pour the flour mixture to the salt water and knead it nicely. Add 3/4th portion of oil and knead the dough without lumps. Finally, pour the remaining oil on the top of the dough and press it gently. Keep the dough closed ith a lid for an hour.
  • Heat the ghee on a heavy bottom pan and roast sooji rava on medium flame for 5 minutes or till you hear a nice aroma. Just after switching off the flame, combine sugar and grated coconut with sooji rava. Also add salt and cardamom powder and mix it well.
  • Now, take the sooji rava - coconut mixture and grind it without adding water. For grinding, you can use mixie jar - small ones or if you are preparing in large quantity, grinder would be the better option. If you can use use the grinding stone, its very convenient to grind this mixture because the mixture becomes bit sticky and sticks to the mixie jar. Do not grind the mixture very finely, it should be in the consistency of sooji rava.
  • Prepare lemon size balls from the ground mixture. Also divide the covering dough into same number of small parts. Apply oil to your hands and place the covering dough on your palm. Place the filling upon that and cover it completely. 
  • Roll the covered balls on a greased plastic sheet or a plantain leaf into circles. Transfer the rolled Holige to the hot tava and cook it on medium flame till you find brownish spots on one side. Turn it and do the same with other side. 
  • Delicious Sakkare Holig is ready to eat now! Enjoy it with ghee or simply you can eat that!

 Tips:
  • This Holige will be moderately sweet. If you add more sugar, mixture becomes too sticky and it will be very difficult to grind it. So, be sure to make proper measurements. 
ಕನ್ನಡದಲ್ಲಿ ಓದಲು ಇಲ್ಲಿ ಕ್ಲಿಕ್ ಮಾಡಿ.

Here is one more recipe which I learned from my mother recently. In fact its an old recipe, but never I had got a chance to prepare it :) Kadlemaddi is bit similar to the filling which we prepare for Obbattu. This traditional sweet is also called as 'Hayagreeva'. Below is the recipe of this simple sweet which is liked by most of the sweet lovers!   


Preparation time: 40 minutes
Servings: 4
Difficulty level: Medium

Ingredients:
Split chana dal - 3 cups
Jaggery - 1 3/4 cup (according to sweetness)
Sugar - 1/4 cup or according to taste
Salt - 1 1/2 tsp
Fresh grated coconut - 1 1/2 cup (see tips)
Cloves - 2
Cardamom - 2
Ghee (optional) - 2 tsp
Cashews (optional) - 10
Raisins (optional) - 15

Method:
Soak chana dal for about 30 minutes and pressure cook with enough water till very soft. It will get cooked nicely within 1 - 2 whistles.
Drain off all the excess water and mash the cooked mixture lightly using a ladle or a masher.
Take a heavy bottom pan and combine the mashed dal, jaggery, sugar, salt and grated coconut.
Keep mixing it on medium flame till most of the liquid content is evaporated. Once the mixture becomes thick and won't stick to the ladle any more, add cashew pieces, raisins, powdered cloves and cardamom and switch off the flame.  
Finally, add 2 tsp of ghee to the Kadle Maddi, mix it well and close the lid. Allow to get set for 10 minutes before serving.
Serve it warm with a spoonful of ghee on the top. It tastes nice even without ghee.


Tips:
  • Kadle Maddi can be prepared using sugar also. Adding of jaggery is not a compulsion here. But adding of jaggery will definitely make a difference in taste.
ಕನ್ನಡದಲ್ಲಿ ಓದಲು ಇಲ್ಲಿ ಕ್ಲಿಕ್ ಮಾಡಿ.

From past couple of months, I am not able to update my blog regularly. That's why, some of the recipe picks I clicked long back are still pending with me. Today I was just glancing at them and got inspired to write this recipe!
Marige Gojju is one of the traditional recipes of Havyakas. The name Marige Gojju is because of a special kind of vessel called as 'Marige' which was used to prepare this recipe. Marige means a wooden vessel which was used to mash and powder the ingredients for this Gojju. These days, nobody is using this kind of vessel in their kitchens. But we can see this 'Marige' in some houses of Malnad.
Here is the recipe of Marige Gojju which I learnt from mom. Try and taste this Gojju for your lunch or dinner..


Preparation Time: 15 minutes
Servings: 4

Ingredients:
Cooking oil - 2 1/2 tsp
Urad dal - 1/4 tsp
5 - 6 dry red chillies 
Sesame seeds - 1/2 tsp
Pinch of asafoetida
Mustard seeds - 1/4 tsp
Salt to taste
Thick curd - 1 to 1 1/4 cup

Method:
Heat oil in a heavy bottom pan. Add dry red chillies, urad dal, mustard seeds, asafoetida and sesame seeds and roast them nicely.
Add salt to taste before switching off the flame and allow the mixture to become cool.
Now, mash and powder the whole mixture with the help of a ladle. Make the powder as fine as possible. Small grinding stone may ease your work.
Add curd to this mixture and mix it well. That's all, tasty Marige Gojju is ready to serve!


Finally, I want to make one more addition to this recipe. When I told my Grandma that I wrote this recipe, she asked me what all the ingredients used. After knowing the ingredients which I normally use, she told that adding of 1/2 tsp of crushed garlic to the seasoning will enhance the taste of Gojju! Thanks a lot my dear Ajji for this nice tip :)
If you love the flavor of garlic, try adding crushed garlic to this recipe sometime.

Tips:
  • Mixie is not recommendable for powdering the ingredients here. Because, mashing the ingredients will enhance the taste of this Gojju. 
NewerStories OlderStories Home